The Sipwise C5 comes with a commercial Cloud PBX module to provide B2B features for small and medium sized enterprises. The following chapters describe the configuration of the PBX features.
A device gets provisioned with the following steps:
- Your customer creates a PBX device for a supported model and inputs a device’s MAC address.
- Sipwise C5 sends the provided MAC address to the device vendor (e.g. rps.yealink.com).
- When the corresponding device is connected to the network, the device fetches the provisioning URL from the vendor site.
- The device downloads its specific configuration and the firmware from Sipwise C5.
- The phone updates the firmware and automatically sets the SIP proxy server, username and password and other SIP parameters received from Sipwise C5.
PBX device provisioning requires appropriate device models, firmwares, configurations and profiles to be added to the system.
A device model defines a specific hardware device, like the vendor, the model name, the number of keys and their capabilities. For example, a Cisco SPA504G has 4 keys, which can be used for private lines, shared lines (SLA) and busy lamp field (BLF). If you have an additional attendant console, you get 32 more buttons, which can only do BLF. The list of supported devices can be found in Section 17.1.13, “List of available pre-configured devices”.
A device firmware is used to update a potentially outdated factory firmware on a device. The default firmwares included in Sipwise C5 were tested with the provided device configurations and hence guarantee that all the supported features work as expected. That is why we recommend using the default firmwares and device configurations provided by Sipwise.
To make device provisioning easy-to-use for end-users, they do not have to care about firmwares or configurations mentioned above. Instead, you provide a device profile for every supported device model and associate such a device profile with a specific device configuration and firmware. When a customer employee with administrative rights provisions PBX devices for the company, he just selects the corresponding device profiles and specifies MAC addresses if necessary. Sipwise C5 will take care of the rest.
Sipwise C5 is supplied with a set of supported device models, their firmwares, configurations and profile. You can just enable them and your customers will be able to use PBX device provisioning immediately.
To perform basic configuration and upload the set for a specific vendor, device model(s) or for all supported devices, execute the steps described in the following section.
Execute the following initial steps before your customers can easily and securely provision their PBX devices:
- Set the certificates and the keys for your HTTPs FQDN
- Upload the required device models/firmwares/configurations/profiles
You can create new ones or use the existing certificate and the key for your web FQDN.
- Put the required files into the /etc/ngcp-config/ssl folder.
Specify the paths to the files and the FQDN in the following config.yml parameters:
- server_certfile
- server_keyfile
- Specify the FQDN in autoprov.server.host
- Optionally, enable nginx_debug
The final configuration should look similar to this one:
autoprov:
  hardphone:
    skip_vendor_redirect: no
  server:
    bootstrap_port: '1445'
    ca_certfile: /etc/ngcp-config/ssl/client-auth-ca.crt
    host: portal.yourdomain.com
    nginx_debug: yes
    port: '1444'
    server_certfile: /etc/ngcp-config/ssl/certificate.pem
    server_keyfile: /etc/ngcp-config/ssl/private_key.pem
    ssl_enabled: yes
  softphone:
    config_lockdown: '0'
webauth: '0'- Apply and push the changes
ngcpcfg apply 'PBX device provisioning configuration'
ngcpcfg push all
To upload device models/firmwares/configurations/profiles for devices with ZTP support, you need to obtain credentials from the corresponding vendor or its local distributor in advance. These credentials are required to send information about your devices and their provisioning URLs to the corresponding ZTP/RPS systems.
The /usr/sbin/ngcp-insert-pbx-devices.pl script will insert the specified items into the database. For example, to upload items for all supported Yealink devices for the default reseller, execute the script with the following parameters:
/usr/sbin/ngcp-insert-pbx-devices.pl --api-user youruser --api-pass yourpassword --yealink-user user --yealink-password password
| tip | |
Execute /usr/sbin/ngcp-insert-pbx-devices.pl --help to find other useful parameters, e.g. --device-models, --resellers and others. |
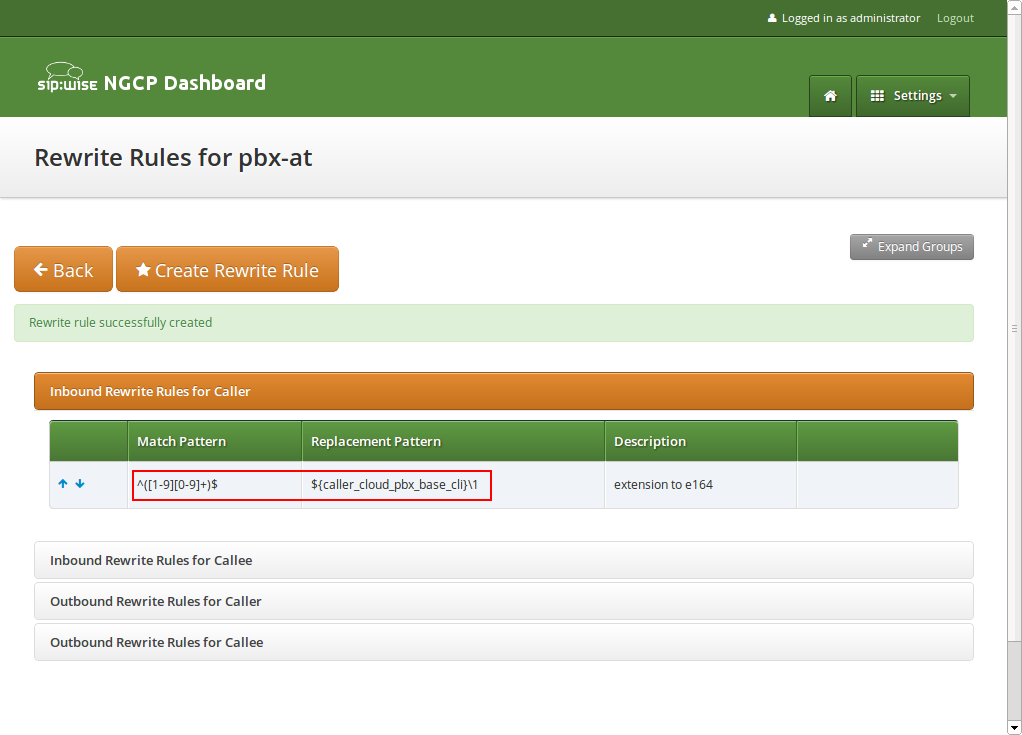
In a PBX environment, the dial-plans usually looks different than for normal SIP subscribers. PBX subscribers should be able to directly dial internal extensions (e.g. 100) instead of the full number to reach another PBX subscriber in the same PBX segment. Therefore, we need to define specific Rewrite Rules to make this work.
The PBX dial plans are different from country to country. In the Central European area, you can directly dial an extension (e.g. 100), and if you want to dial an international number like 0049 1 23456, you have to dial a break-out digit first (e.g. 0), so the number to be dialed is 0 0049 1 23456. Other countries are used to other break-out codes (e.g. 9), which then results in 9 0049 1 23456. If you dial a national number like 01 23456, then the number to actually be dialled is 9 01 23456.
Since all numbers must be normalized to E.164 format via inbound rewrite rules, the rules need to be set up accordingly.
Let’s assume that the break-out code for the example customers created below is 0, so we have to create a Rewrite Rule Set with the following rules.
-
Match Pattern:
^([1-9][0-9]+)$ -
Replacement Pattern:
${caller_cloud_pbx_base_cli}\1 -
Description:
extension to e164 -
Direction:
Inbound -
Field:
Caller
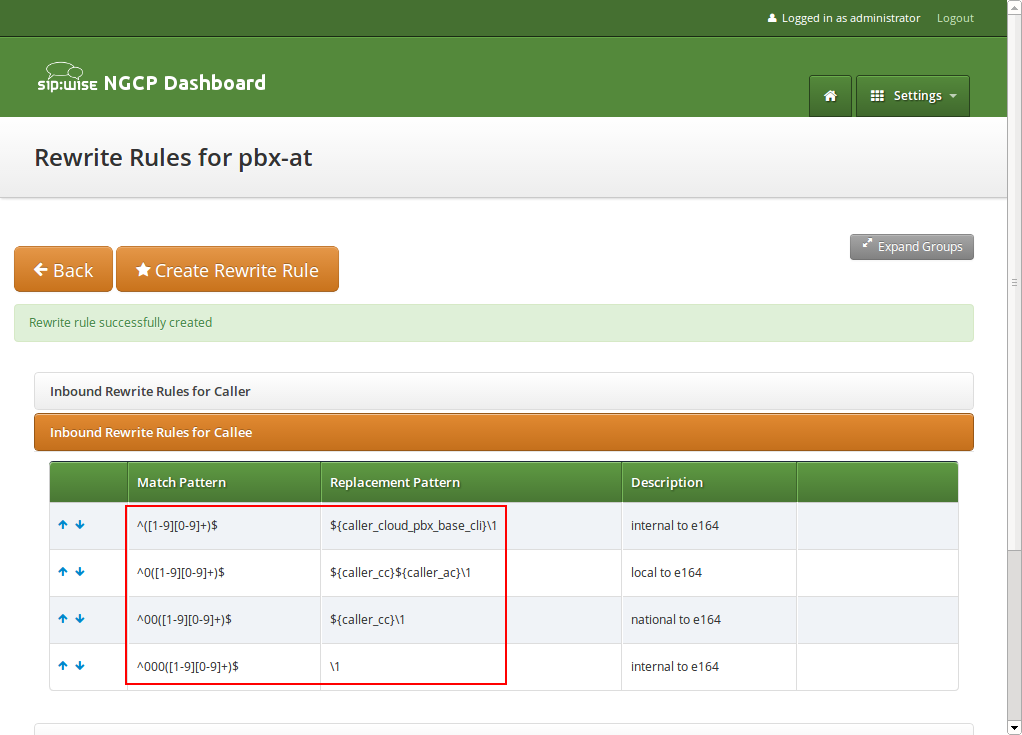
These rules are the most important ones, as they define which number formats the PBX subscribers can dial. For the break-out code of 0, the following rules are necessary e.g. for German dialplans to allow pbx internal extension dialing, local area calls without area codes, national calls with area code, and international calls with country codes.
PBX internal extension dialin
-
Match Pattern:
^([1-9][0-9]+)$ -
Replacement Pattern:
${caller_cloud_pbx_base_cli}\1 -
Description:
extension to e164 -
Direction:
Inbound -
Field:
Callee
Local dialing without area code (use break-out code 0)
-
Match Pattern:
^0([1-9][0-9]+)$ -
Replacement Pattern:
${caller_cc}${caller_ac}\1 -
Description:
local to e164 -
Direction:
Inbound -
Field:
Callee
National dialing (use break-out code 0 and prefix area code by 0)
-
Match Pattern:
^00([1-9][0-9]+)$ -
Replacement Pattern:
${caller_cc}\1 -
Description:
national to e164 -
Direction:
Inbound -
Field:
Callee
International dialing (use break-out code 0 and prefix country code by 00)
-
Match Pattern:
^000([1-9][0-9]+)$ -
Replacement Pattern:
\1 -
Description:
international to e164 -
Direction:
Inbound -
Field:
Callee
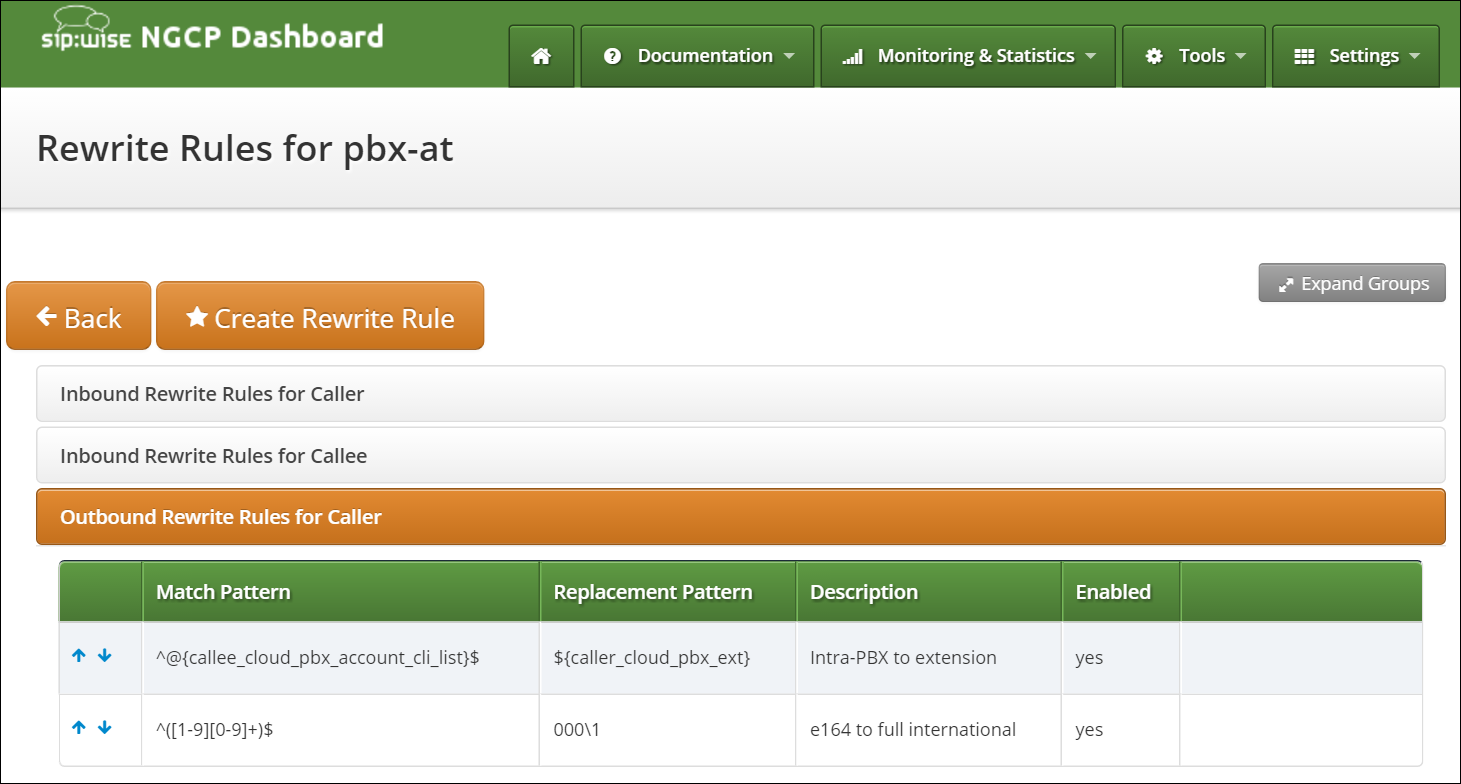
When a call goes to a PBX subscriber, it needs to be normalized in a way that it’s call-back-able, which means that it needs to have the break-out code prefixed. We create a rule to show the calling number in international format including the break-out code. For PBX-internal calls, the caller name will be shown (this is handled by implicitly setting domain preferences accordingly, so you don’t have to worry about that in rewrite rules).
Adding a break-out code (use break-out code 0 and prefix country code by 00)
-
Match Pattern:
^([1-9][0-9]+)$ -
Replacement Pattern:
000\1 -
Description:
e164 to full international -
Direction:
Outbound -
Field:
Caller
Displaying the extension in the caller number for PBX-internal calls
-
Match Pattern:
^@{callee_cloud_pbx_account_cli_list}$ -
Replacement Pattern:
${caller_cloud_pbx_ext} -
Description:
e164 to full international -
Direction:
Outbound -
Field:
Caller
Create a new Rewrite Rule Set for each dial plan you’d like to support. You can later assign it to customer domains and even to subscribers, if a specific subscriber of a PBX customer would like to have his own dial plan.
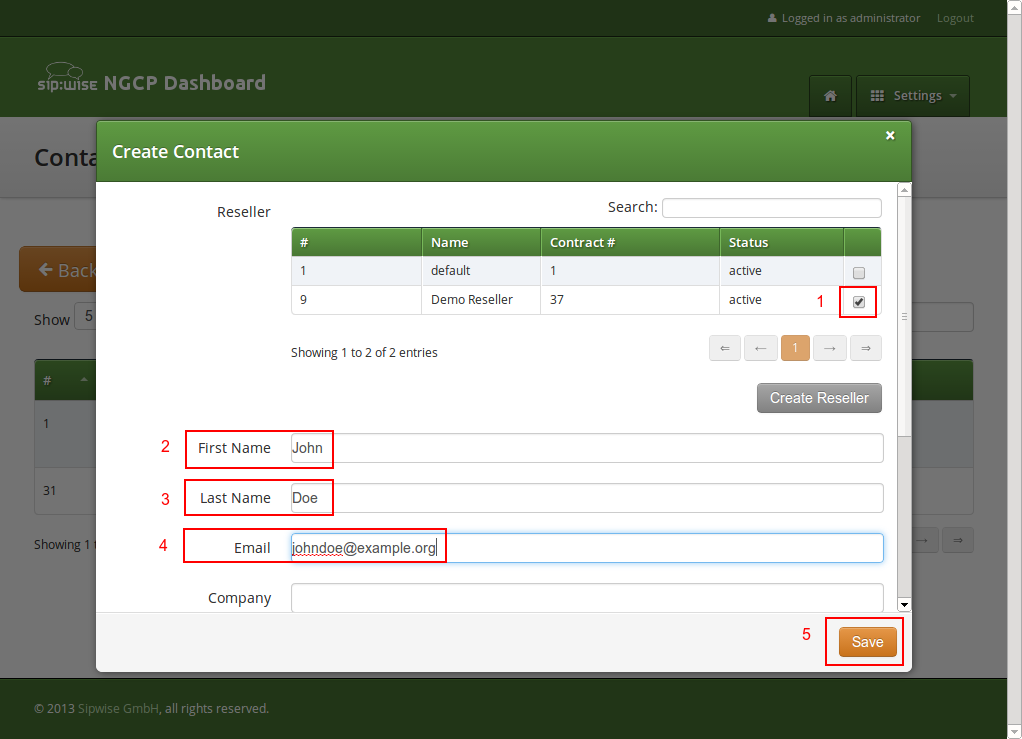
As with a normal SIP Account, you have to create a Customer contract per customer, and one Subscriber, which the customer can use to log into the web interface and manage his PBX environment.
Go to Settings→Customers and click Create Customer. We need a Contact for the customer, so press Create Contact.
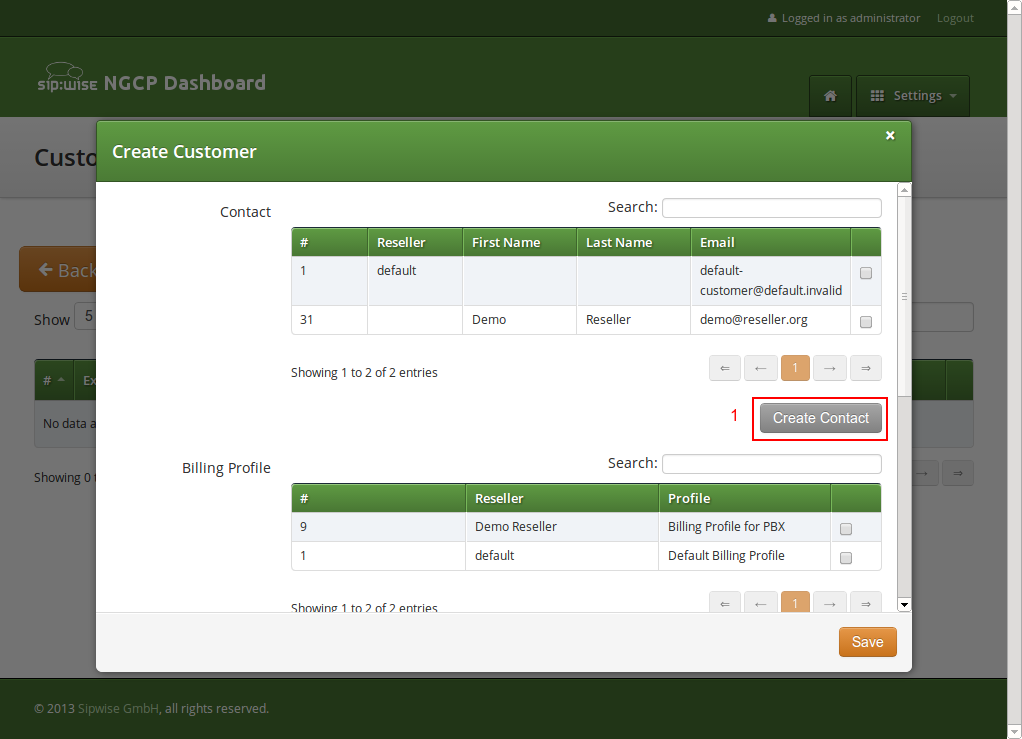
Fill in the desired fields (you need to provide at least the Email Address) and press Save.
The new Contact will be automatically selected now. Also select a Billing Profile you want to use for this customer. If you don’t have one defined yet, press Create Billing Profile, otherwise select the one you want to use.
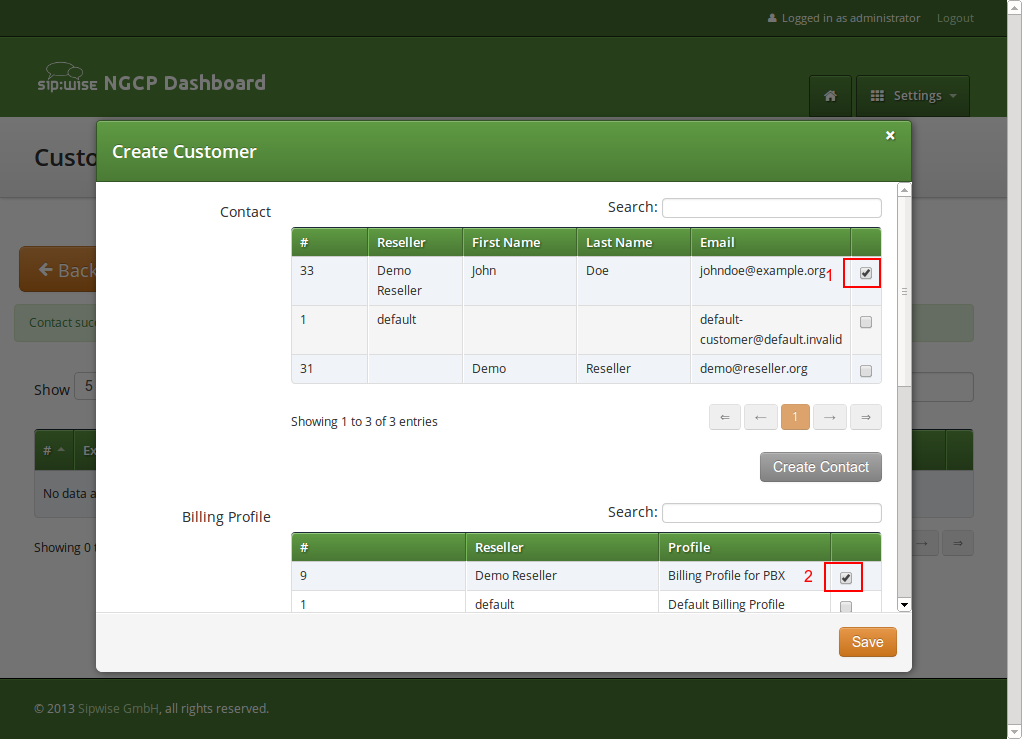
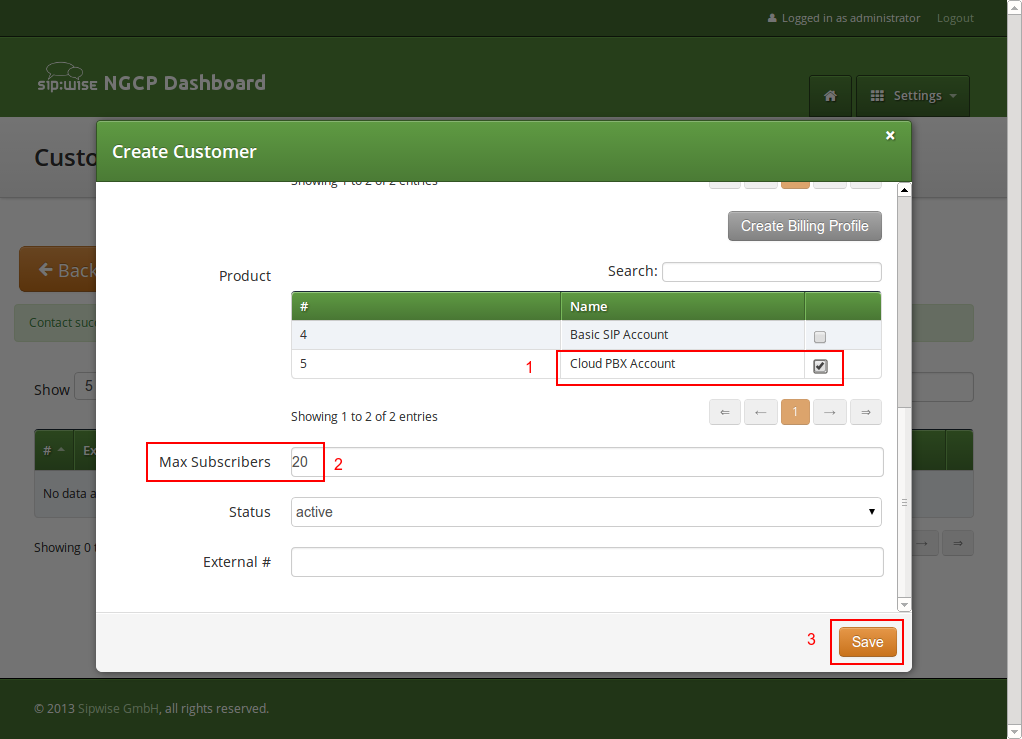
Next, you need to select the Product for the PBX customer. Since it’s going to be a PBX customer, select the product Cloud PBX Account.
Since PBX customers are supposed to manage their subscribers by themselves, they are able to create them via the web interface. To set an upper limit of subscribers a customer can create, define the value in the Max Subscribers field.
| important | |
As you will see later, both PBX subscribers and PBX groups are normal subscribers, so the value defined here limits the overall amount of subscribers and groups. A customer can create an unlimited amount of subscribers if you leave this field empty. |
Press Save to create the customer.
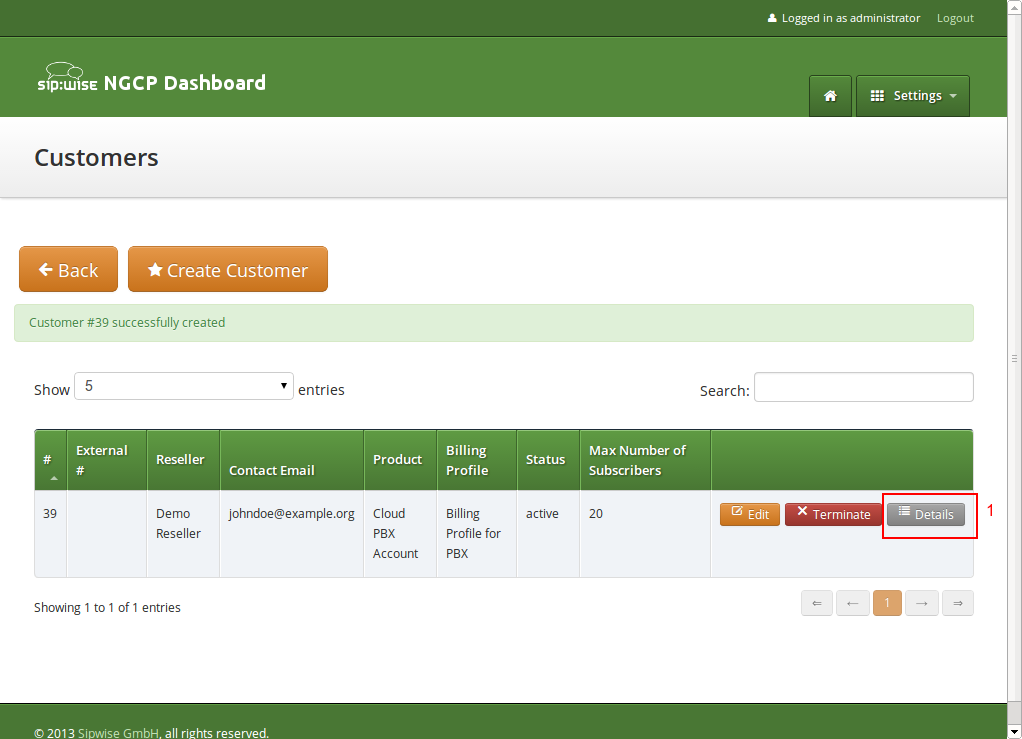
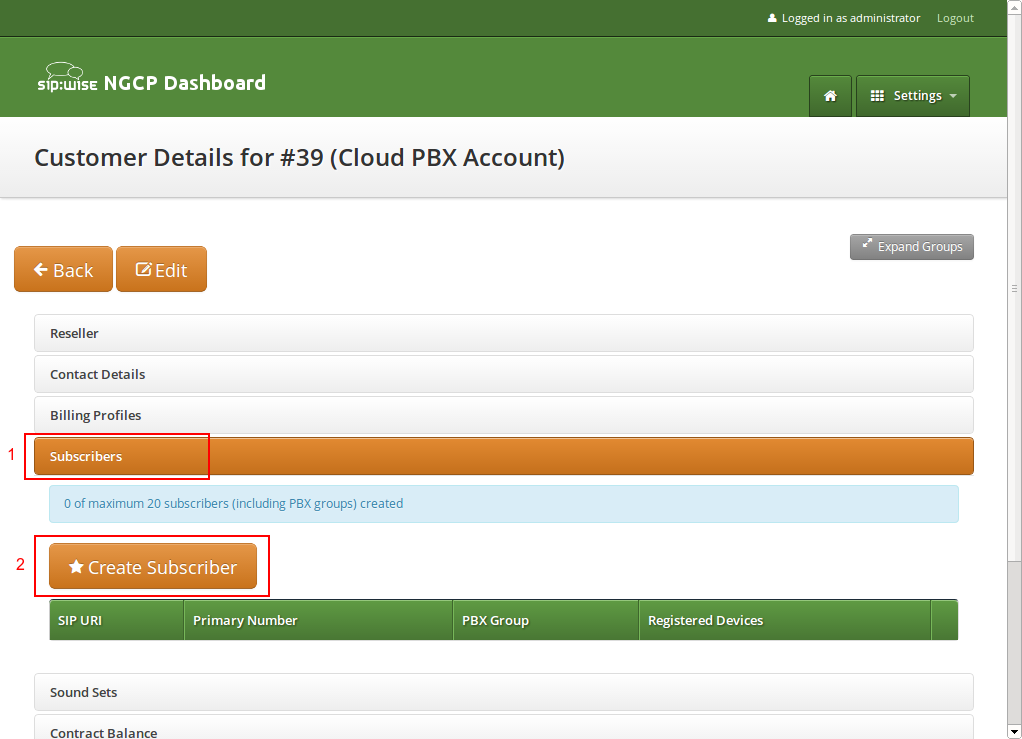
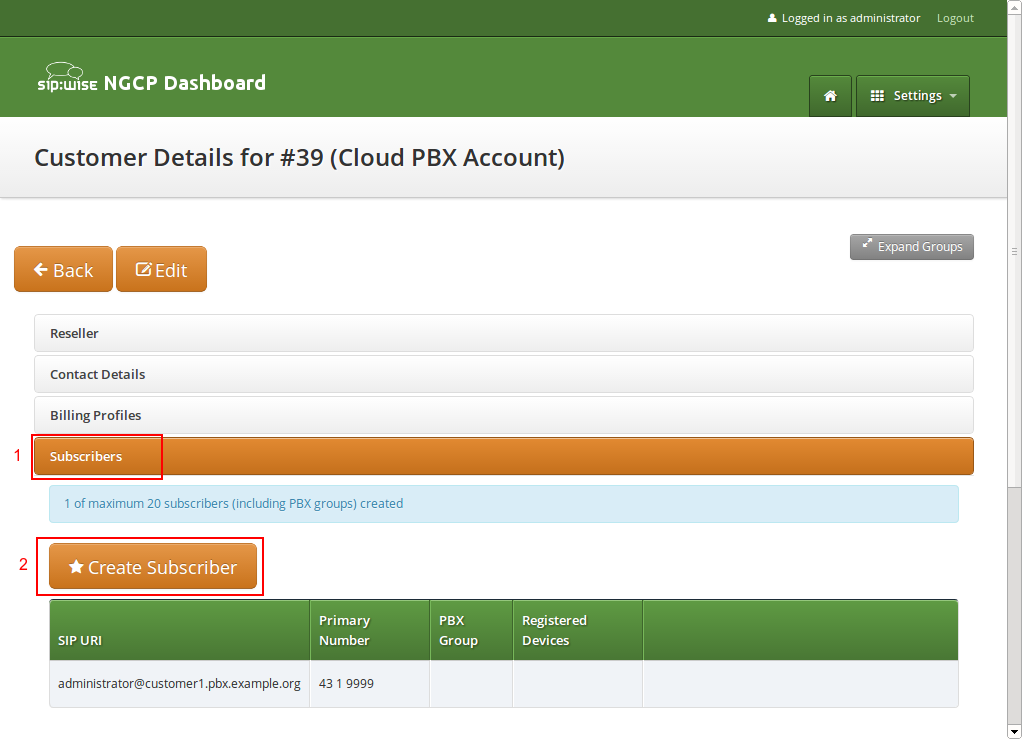
Once the customer is created, you need to create at least one Subscriber for the customer, so he can log into the web interface and manage the rest by himself.
Click the Details button on the newly created customer to enter the detailed view.
To create the subscriber, open the Subscribers row and click Create Subscriber.
For your pilot subscriber, you need a SIP domain, a pilot number (the main number of the customer PBX), the web credentials for the customer to log into the web interfaces, and the SIP credentials to authenticate via a SIP device.
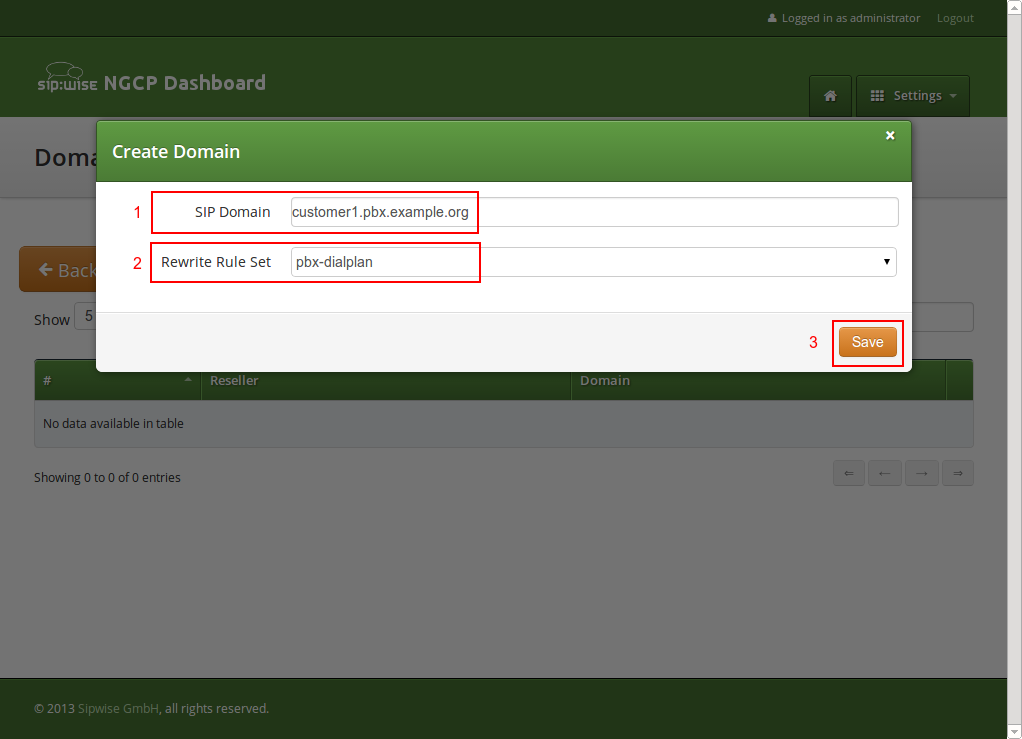
| important | |
In a PBX environment, customers can create their own subscribers. As a consequence, each PBX customer should have its own SIP domain, in order to not collide with subscribers created by other customers. This is important because two customers are highly likely to create a subscriber (or group, which is also just a subscriber) called |
| tip | |
To handle one domain per customer, you should create a wild-card entry into your DNS server like |
So to create a new domain for the customer, click Create Domain.

Specify the domain you want to create, and select the PBX Rewrite Rule Set which you created in Section 17.1.2, “Preparing PBX Rewrite Rules”, then click Save.
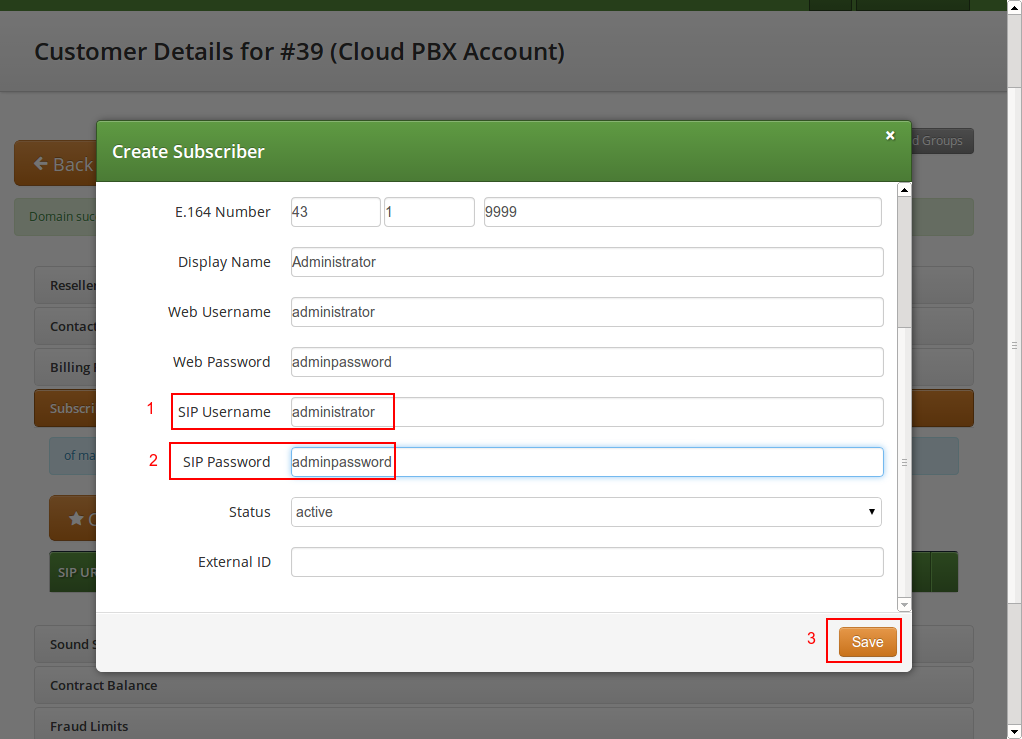
Finish the subscriber creation by providing an E.164 number, which is going to be the base number for all other subscribers within this customer, the web username and password for the pilot subscriber to log into the web interface, and the sip username and password for a SIP device to connect to the PBX.
The parameters are as follows:
- Domain: The domain in which to create the pilot subscriber. Each customer should get his own domain as described above to not collide with SIP usernames between customers.
- E.164 Number: The primary number of the PBX. Calls to this number are routed to the pilot subscriber, and each subsequent subscriber created for this customer will use this number as its base number, suffixed by an individual extension. You can later assign alias numbers also for DID support.
- Display Name: This field is used on phones to identify subscribers by their real names instead of their number or extension. On outbound calls, the display name is signalled in the Display-Field of the From header, and it’s used as a name in the XMPP contact lists.
- Web Username: The username for the subscriber to log into the customer self-care web interface. This is optional, if you don’t want a subscriber to have access to the web interface.
- Web Password: The password for the subscriber to log into the customer self-care web interface.
- SIP Username: The username for the subscriber to authenticate on the SIP and XMPP service. It is automatically used for devices, which are auto-provisioned via the Device Management, or can be used manually by subscribers to sign into the SIP and XMPP service with any arbitrary clients.
- SIP Password: The password for the subscriber to authenticate on the SIP and XMPP service.

Once the subscriber is created, he can log into the customer self-care interface at https://<your-ip>/login/subscriber and manage his PBX, like creating other users and groups, assigning Devices to subscribers and configure the Auto Attendant and more.
As an administrator, you can also do this for the customer, and we will walk through the typical steps as an administrator to configure the different features.
Go to the Customer Details of the PBX customer you want to configure, e.g. by navigating to Settings→Customers and clicking the Details button of the customer you want to configure.
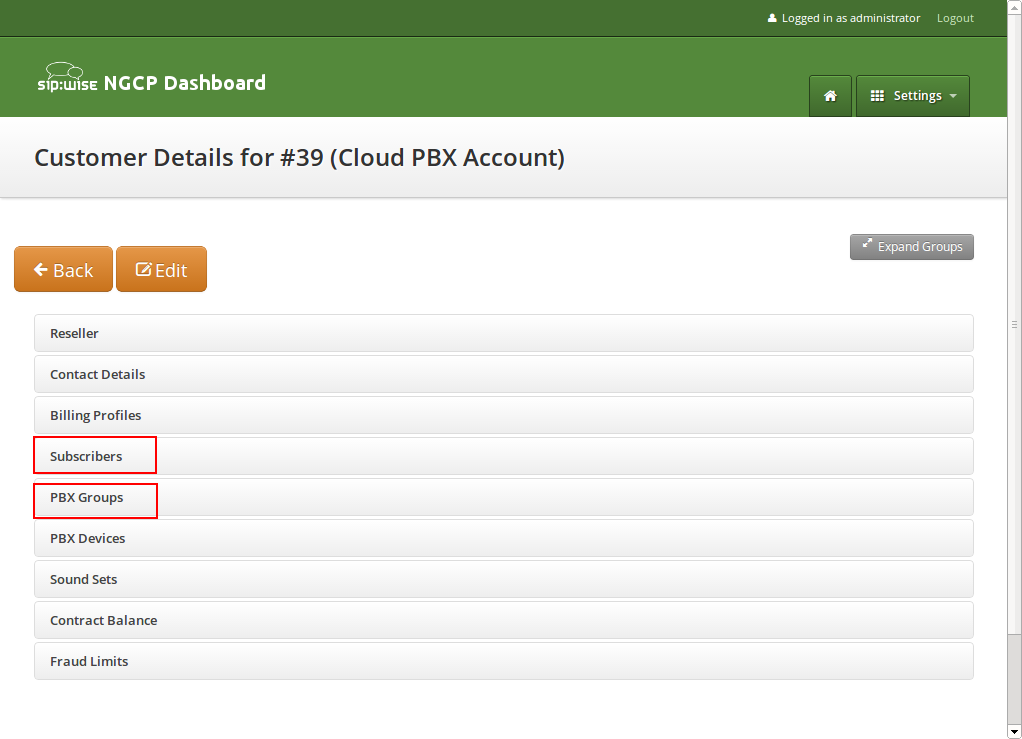
Since we already created a pilot subscriber, more settings now appear on the Customer Details view. The sections we are interested in for now are the Subscribers and PBX Groups sections.
To create another subscriber for the customer PBX, open the Subscribers row and click Create Subscriber.
When creating another subscriber in the PBX after having the pilot subscriber, some fields are different now, because the Domain and E.164 Number are already pre-defined at the pilot subscriber level.
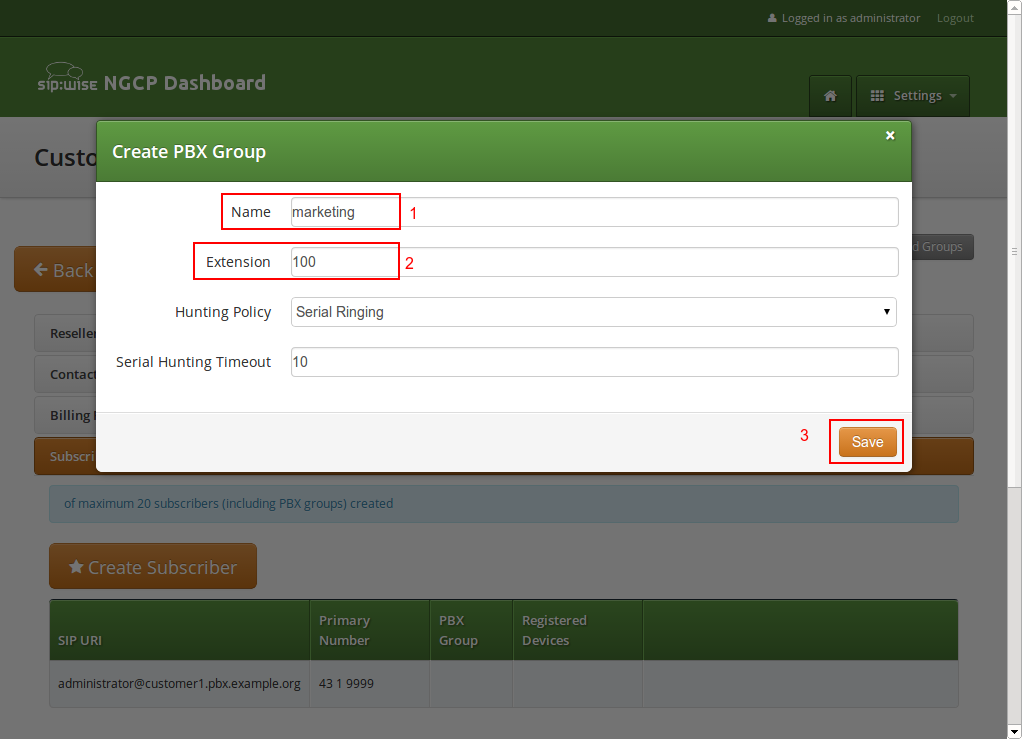
What you need to define for a new subscriber is the Group the subscriber is supposed to be in. We don’t have a group yet, so create one by clicking Create Group.
A PBX Group has four settings:
- Name: The name of the group. This is used to identify a group when assigning it to subscribers on one hand, and also subscribers are pushed as server side contact lists to XMPP clients, where they are logically placed into their corresponding groups.
-
Extension: The extension of the group, which is appended to the primary number of the pilot subscriber, so you can actually call the group from the outside. If our pilot subscriber number is
43 1 9999and the extension is100, you can reach the group from the outside by dialing43 1 9999 100. Since PBX Groups are actually just normal subscribers in the system, you can assign Alias Numbers to it for DID later, e.g.43 1 9998. -
Hunting Policy: If you call a group, then all members in this group are ringing based on the policy you choose.
Serial Ringingcauses each of the subscribers to be tried one after another, until one of them picks up or all subscribers are tried.Parallel Ringingcauses all subscribers in the group to be tried in parallel. Note that a subscriber can have a call-forward configured to some external number (e.g. his mobile phone), which will work as well. - Serial Hunting Timeout: This value defines for how long to ring each member of a group in case of serial hunting until the next subscriber is being tried.
We will only fill in the Name and Extension for now, as the hunting policy can be changed later if needed. Click Save to create the group.
Once the group is created and selected, fill out the rest of the form as needed. Instead of the E.164 Number, you can now only choose the Extension, which is appended to the primary number of the pilot subscriber and is then used as primary number for this particular subscribers. Again, if your pilot number is 43 1 9999 and you choose extension 101 here, the number of this subscriber is going to be 43 1 9999 101. Also, you can again later assign more alias numbers (e.g. 43 1 9997) to this subscriber for DID.
The rest of the fields is as usual, with Display Name defining the real name of the user, Web Username and Web Password allowing the subscriber to log into the customer self-care interface, and the SIP Username and SIP Password to allow signing into the SIP and XMPP services.
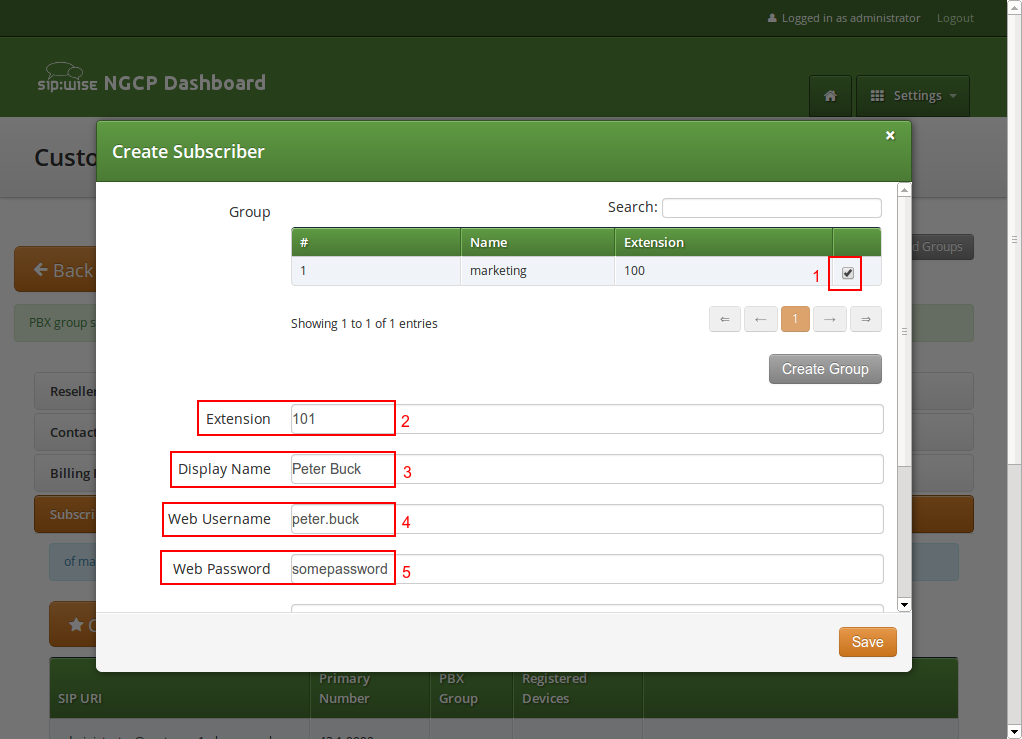
Click Save to create the subscriber.

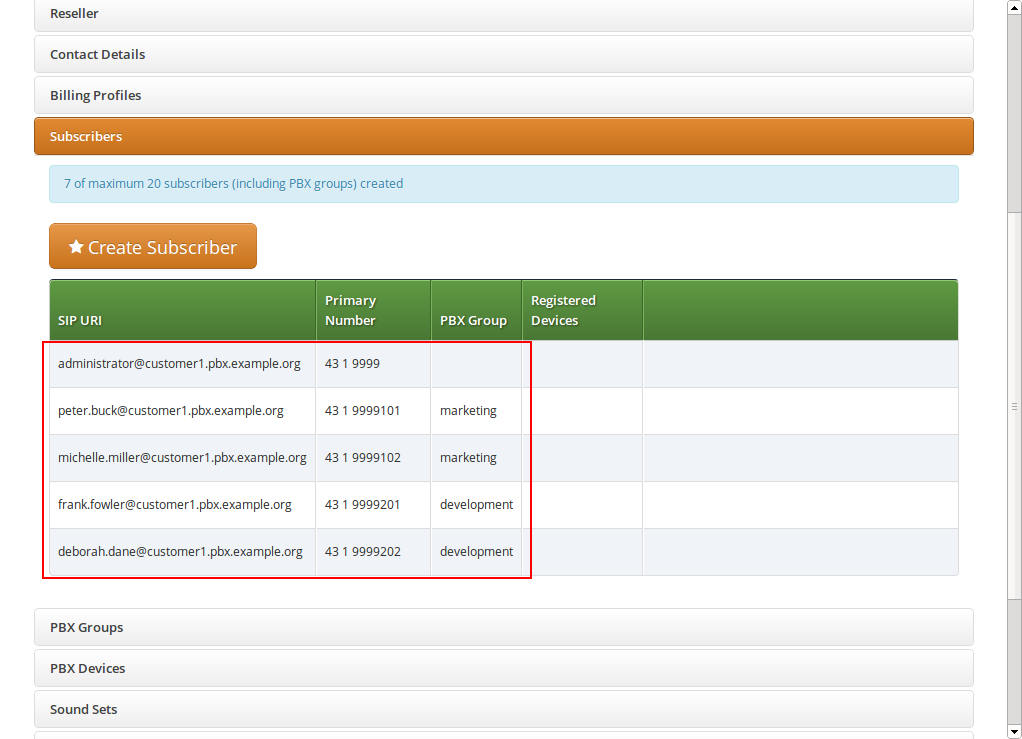
Repeat the steps to create all the subscribers and groups as needed. An example of a small company configuration in terms of subscribers and groups might look like this:
| tip | |
The subscribers can be reached via 3 different ways. First, you can call them by their SIP URIs (e.g. by dialing |
Basically, you can register any SIP phone with the system using a SIP subscriber credentials. However, the platform supports PBX Device Provisioning of certain vendors and models, as described in Section 17.1.1, “PBX Device Provisioning”.
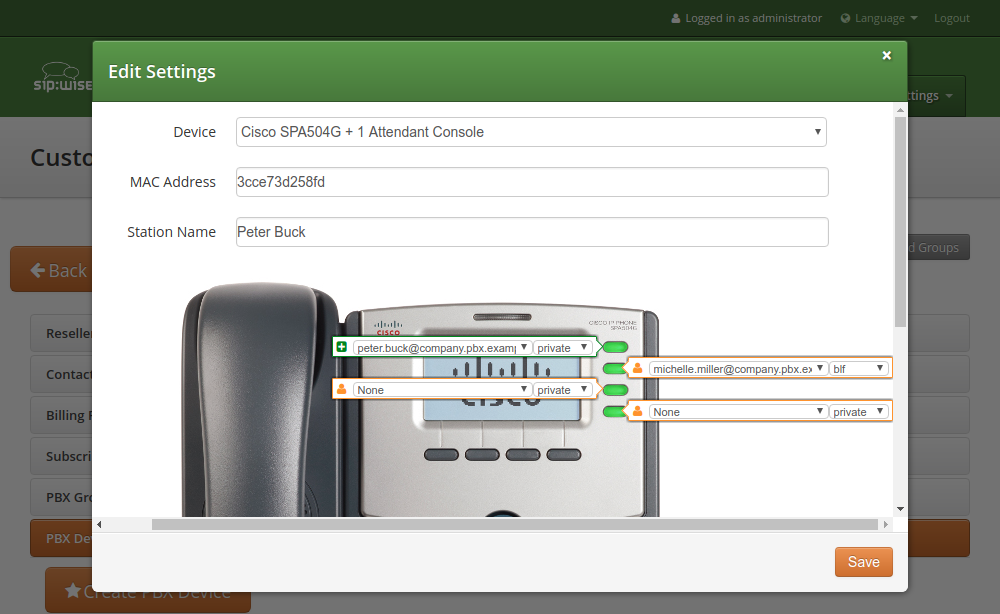
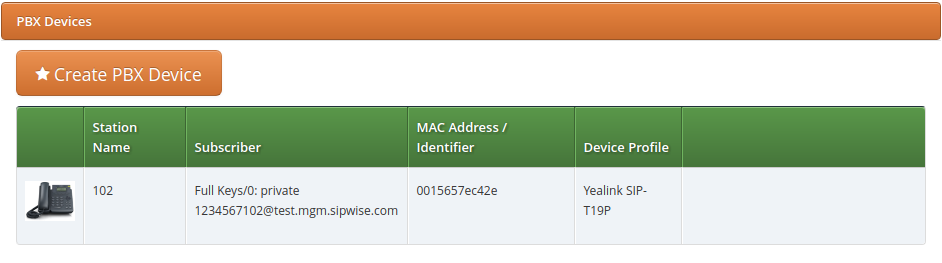
To configure a physical device, expand the PBX Devices section in the Customer Details page and click Create Device.
Set up three general parameters for the new device, which are:
- Device Profile: The actual device profile you want to use. This has been pre-configured in the Device Management by the administrator or reseller, and the customer can choose from the list of profiles (which is a combination of an actual device plus its corresponding configuration).
- MAC Address/Identifier: The MAC address of the phone to be added. The information can usually either be found on the back of the phone, or in the phone menu itself.
-
Station Name: Since you can (depending on the actual device) configure more lines on a phone, you can give it a station name, like
Receptionor the name of the owner of the device.
In addition to that information, you can configure the lines (subscribers) you want to use on which key, and the mode of operation (e.g. if it’s a normal private phone line, or if you want to monitor another subscriber using BLF, or if you want it to act as shared line using SLA).
For example, a Cisco SPA504G has 4 keys you can use for private and shared lines as well as BLF on the phone itself, and in our example we have an Attendant Console attached to it as well, so you have 32 more keys for BLF.
The settings per key are as follows:
- Subscriber: The subscriber to use (for private/shared lines) or to monitor (for BLF).
- Line/Key: The key where to configure this subscriber to.
Line/Key Type: The mode of operation for this key, with the following options (depending on which options are enabled in the Device Model configuration for this device:
- Private Line: Use the subscriber as a regular SIP phone line. This means that the phone will register the subscriber, and you can place and receive phone calls with/for this subscriber.
- Shared Line: The subscriber is also registered on the system and you can place and receive calls. If another phone has the same subscriber also configured as shared line, both phones will ring on incoming calls, and you can pick the call up on either of them. You cannot place a call with this subscriber though if the line is already in use by another subscriber. However, you can "steal" a running call by pressing the key where the shared line is configured to barge into a running call. The other party (the other phone where the shared line is configured too) will then be removed from the call (but can steal the call back the same way).
BLF Key: The Busy Lamp Field monitors the call state of another subscriber and provides three different functionalities, depending on the actual state:
- Speed Dial: If the monitored subscriber is on-hook, the user can press the button and directly call the monitored subscriber.
- Call Pickup: If the monitored subscriber is ringing, the user can press the button to pick up the call on his own phone.
- State Indication: It the monitored subscriber is on the phone, the key is indicating that the monitored subscriber is currently busy.
In our example, we will configure a private line on the first key, and the BLF for another subscriber on the second key.
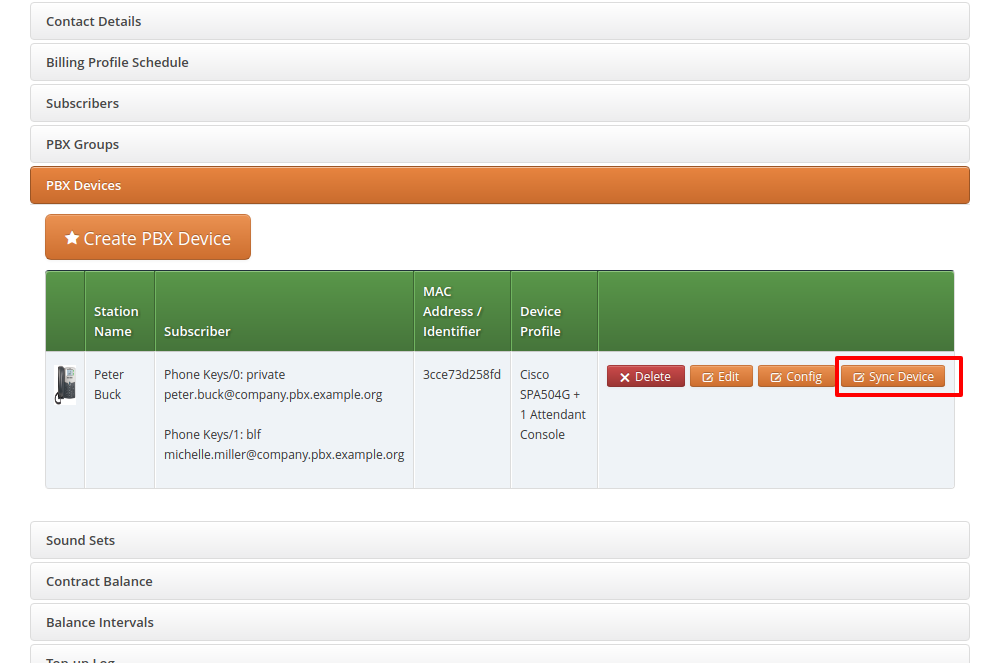
Once the PBX device is saved, you will see it in the list of PBX Devices.
Depending on a manufacturer and the model, there are two ways of provisioning a device:
- putting the provisioning URL directly to the device via a web browser (this option is used e.g. for Cisco devices);
- using the device’s Zero Touch Provisioning (ZTP) feature. For Yealink it is called Redirection and Provisioning Service (RPS).
Since a stock device obtained from an arbitrary distributor doesn’t know anything about your system, it can’t fetch its configuration from there. For that to work, you need to push the URL of where the phone can get the configuration to the phone once.
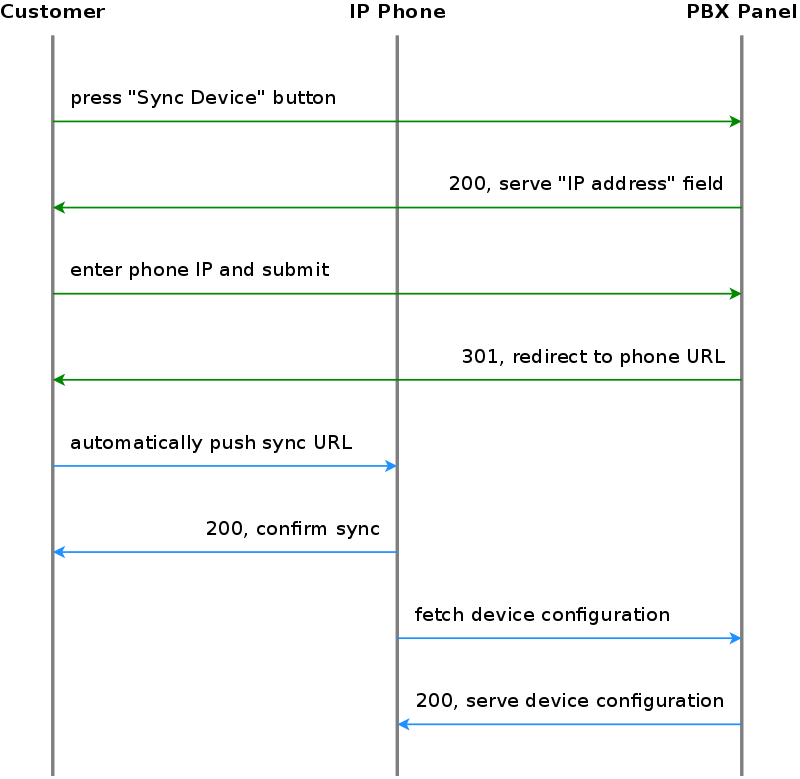
In order to do so, click the Sync Device button on the device you want to configure for the very first time.
| important | |
As you will see in the next step, you need the actual IP address of the phone to push the provisioning URL onto it. That implies that you need access to the phone to get the IP, and that your browser is in the same network as the phone in order to be able to connect to it, in case the phone is behind NAT. |
Enter the IP Address of the phone (on Cisco SPAs, press Settings 9, where Settings is the paper sheet symbol, and note down the Current IP setting), then click Push Provisioning URL.

You will be redirected directly to the phone, and the Provisioning URL is automatically set. If everything goes right, you will see a confirmation page from the phone that it’s going to reboot.
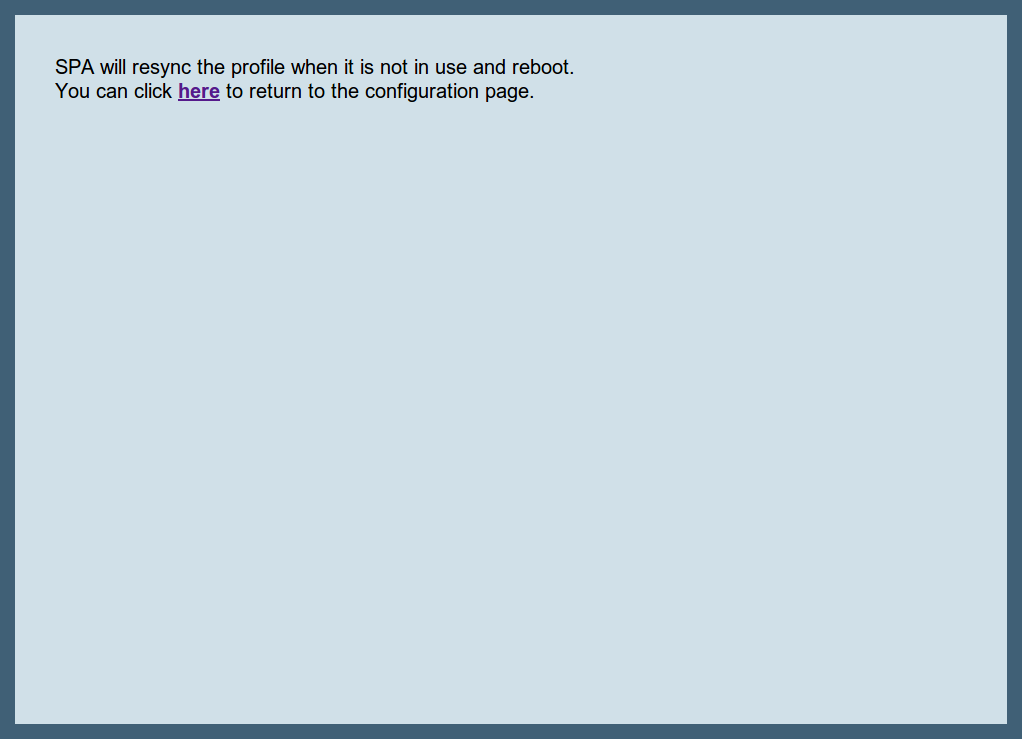
You can close the browser window/tab and proceed to sync the next subscriber.
| tip | |
You only have to do this step once per phone to tell it the actual provisioning URL, where it can fetch the configuration from. From there, it will regularly sync with the server automatically to check for configuration changes and apply them automatically. |
All Polycom, Panasonic, Snom, Grandstream and Yealink phones supported by Sipwise C5 can be provisioned using ZTP/RPS service without physically accessing the devices. You only need to input MAC addresses of corresponding devices and associate them with subscribers. Sipwise C5 will then immediately supply this information to the ZTP/RPS system of the corresponding device vendor. When a subscriber unpacks the phone and connects it to the Internet for the first time, the phone will contact the manufactorer’s ZTP/RPS service and get its provisioning URL to Sipwise C5. Then, the phone downloads all required items from Sipwise C5 and automatically configures itself. Immediately after that, the subscriber can make the first call.
To prepare a PBX device for ZTP/RPS provisioining, follow these steps:
- Go to the PBX Devices section of the corresponding customer and click Create PBX Device.
Specify the device and its SIP lines parameters:
- Select the required device model
- Input the device MAC address
- Specify the name of this line for your convenience
- Select a subscriber from the list for the corresponding SIP line. Some devices support multiple lines and you can provision all of them at once.
- Select the line type: private, shared or BLF.
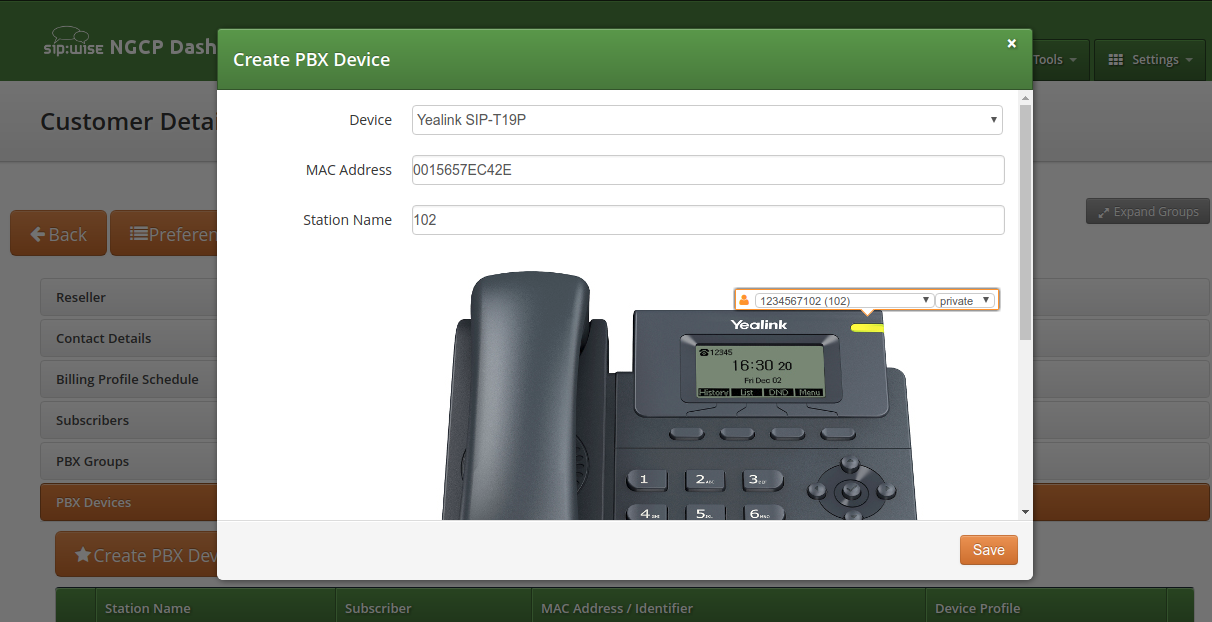
- Click Save. You will see the device in the list of customer’s PBX devices.
| tip | |
If you have already provisioned a specific device on another platform or for another reseller, then you might need to delete that MAC address manually from the ZTP/RPS service. |
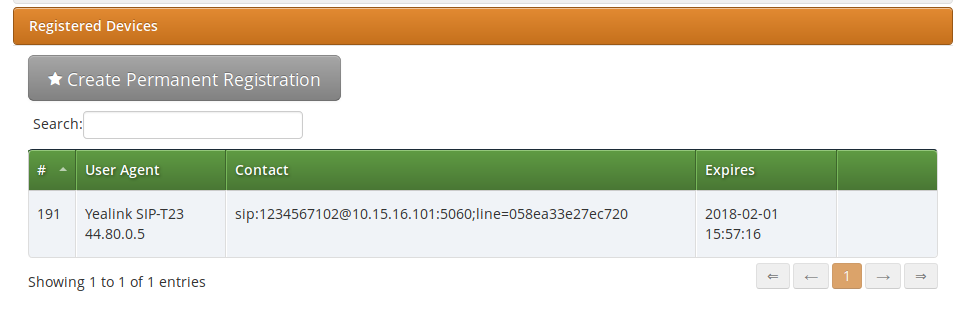
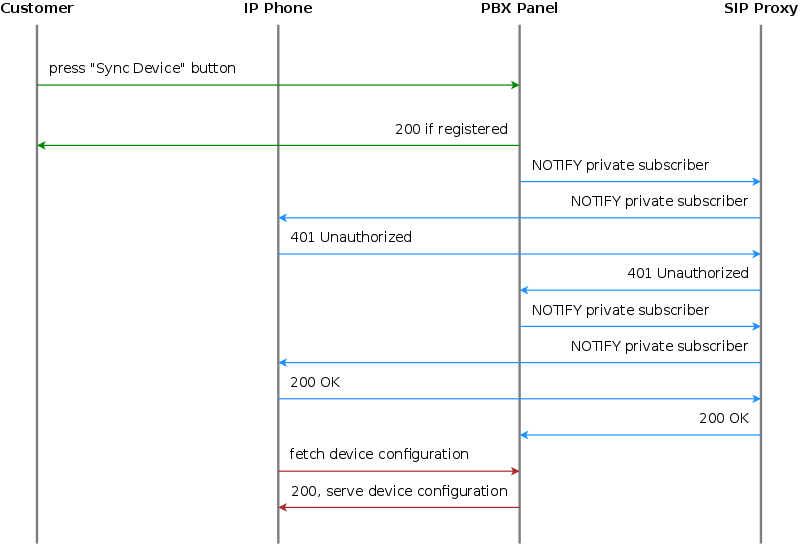
When the PBX device provisions itself, it will become registered with your SIP proxy server. From then, it will be listed in the subscriber’s Registered Devices page.
If you need to troubleshoot the provisioning process, the following logs would help you:
- /var/log/ngcp/nginx (e.g. SSL errors are collected here: autoprov_error.log)
- /var/log/ngcp/panel-debug.log (general provisioning logs)
| tip | |
In case you would like to edit a device model, firmware, configuration or profile, refer to Section 12, “Adjusting the PBX Devices Configuration” |
In the Customer Details view, there is a row Sound Sets, where the customer can define his own sound sets for Auto Attendant, Music on Hold and the Office Hours Announcement.
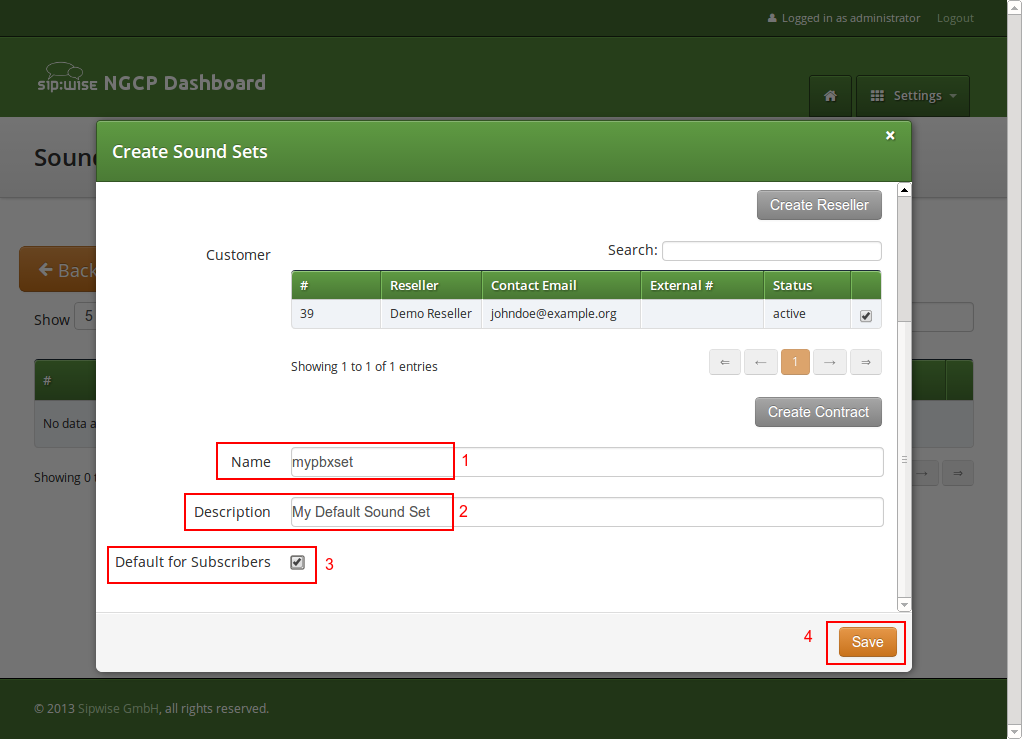
To create a new sound set, open the Sound Sets row and click Create Sound Set.
If you do this as administrator or reseller, the Reseller and/or Customer is pre-selected, so keep it as is. If you do this as customer, you don’t see any Reseller or Customer fields.
So the important settings are:
- Name: The name of the sound set as it will appear in the Subscriber Preferences, where you can assign the sound set to a subscriber.
- Description: A more detailed description of the sound set.
- Default for Subscribers: If this setting is enabled, then the sound set is automatically assigned to all already existing subscribers which do NOT have a sound set assigned yet, and also for all newly created subscribers.
Fill in the settings and click Save.
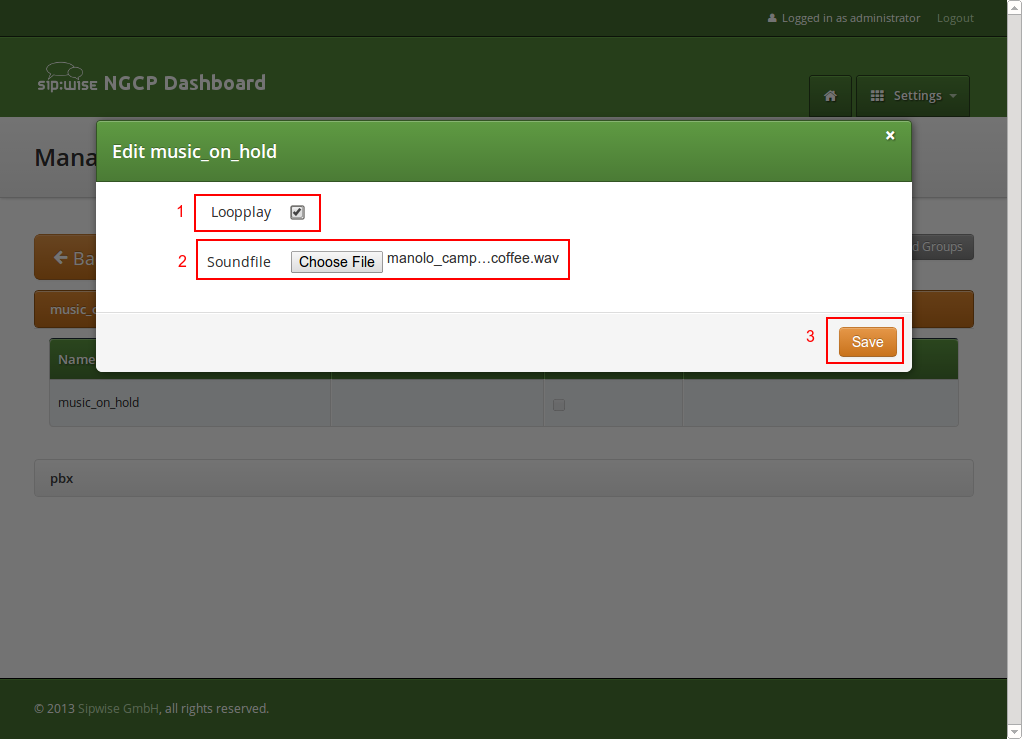
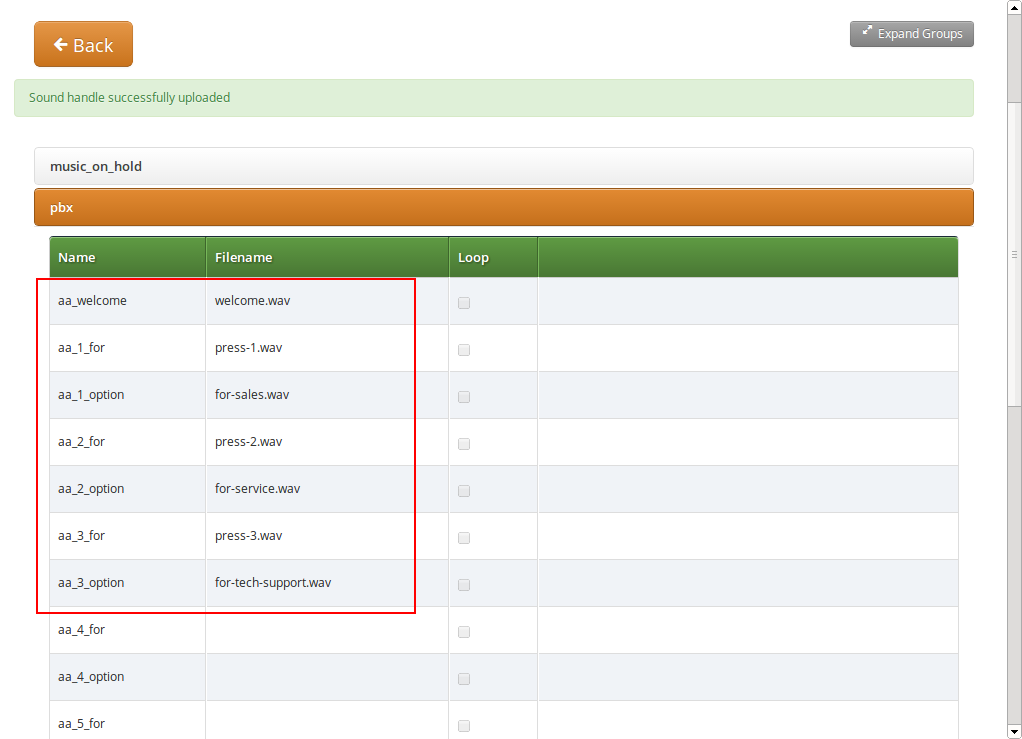
To upload files to your Sound Set, click the Files button for the Sound Set.
Open the music_on_hold row and click Upload on the music_on_hold entry. Choose a WAV file from your file system, and click the Loopplay setting if you want to play the file in a loop instead of just once. Click Save to upload the file.
The Auto-Attendant is a built-in IVR feature that is available to Cloud PBX subscribers. It provides an automatic voice menu that enables the caller to select from a number of destinations, which could be other PBX subscribers or groups.
Another typical use case for the Auto-Attendant function is when the customer would like to have an "office assistant" that automatically takes incoming calls and routes them to the desired extension (i.e. to a subscriber).
The Auto-Attendant offers 2 ways of selecting the final call destination:
- option selection: selecting one of the pre-configured destinations by pressing a single digit (0-9)
- extension dialing: entering an arbitrary PBX extension number directly
The Auto-Attendant feature can be activated for any subscriber in the Customer PBX individually. There are three steps involved:
- You have to prepare a Sound Set to have Auto-Attendant sound files.
-
You have to configure the destinations for the various options you provide
(e.g. pressing
1should go to themarketingsubscriber,2todevelopmentand3to some external number). - You have to set a Call Forward to the Auto-Attendant.
To do so, go to Customer Details and in the Subscribers section, click the Preferences button of the subscriber, where the Auto-Attendant should be set.
Create a Sound Set and upload the Sound Files for it as described below. Afterwards in the Subscriber Preferences view, set the Customer Sound Set preference to the Sound Set to be used. To do so, click Edit on the Customer Sound Set preference and assign the set to be used.
Uploading Auto-Attendant Sound Files
When configuring a Call Forward to the Auto-Attendant, it will play the following files:
-
aa_welcome: This is the welcome message (the greeting) which is played when someone calls the Auto-Attendant. -
each available pair of
aa_X_for/aa_X_option: Each menu item in the Auto-Attendant consists of two parts. Theforpart, which plays something like Press One for, and theoptionpart, which play something like Marketing. The Auto-Attendant only plays those menu options where both theforpart and theoptionpart is present, so if you only have 3 destinations you’d like to offer, and you want them to be on keys 1, 2 and 3, you have to upload files foraa_1_for,aa_1_option,aa_2_for,aa_2_optionandaa_3_forandaa_3_option.
| important | |
The sound files only define the general structure of what is being played to the caller. The actual destinations behind your options are configured separately in Configuring the Auto-Attendant Slots Section 17.1.7.4, “Configuring the Auto-Attendant Slots”. |
An example configuration could look like this:
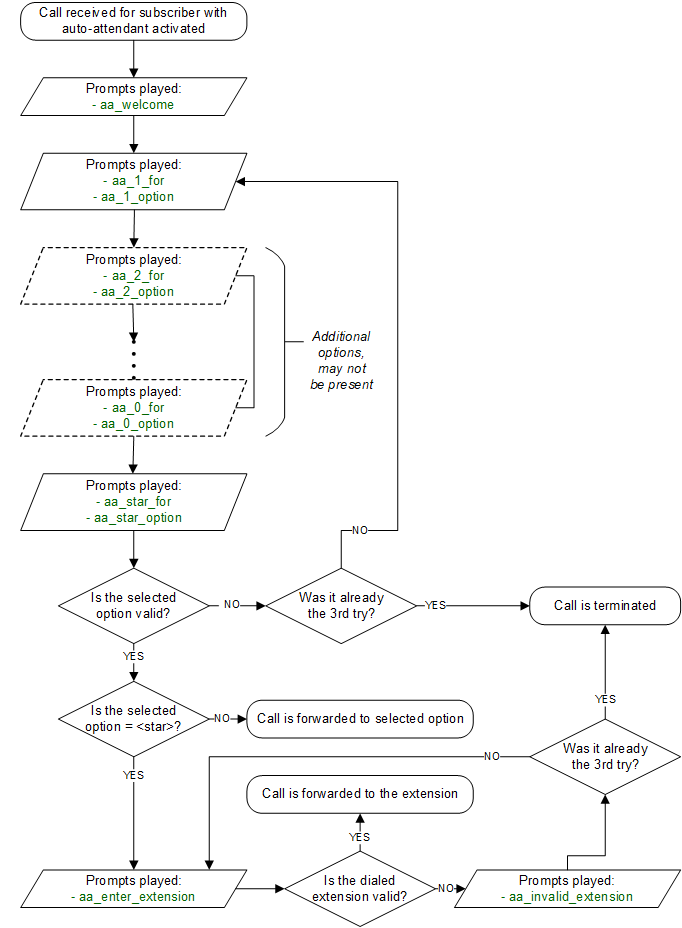
In order to activate the extension dialing function within the Auto-Attendant, you have to upload the following prompt files:
-
aa_star_for, aa_star_option: the announcement "Press star for connecting to an extension" (or similar message, depending on customer’s needs) -
aa_enter_extension: will instruct the caller to enter the phone number of the extension he wants to connect to -
aa_invalid_extension: will be played when the phone number entered does not match any of the customer’s extensions

The illustration below shows the sequence of voice prompts played when Auto-Attendant feature is activated and a caller listens the IVR menu.
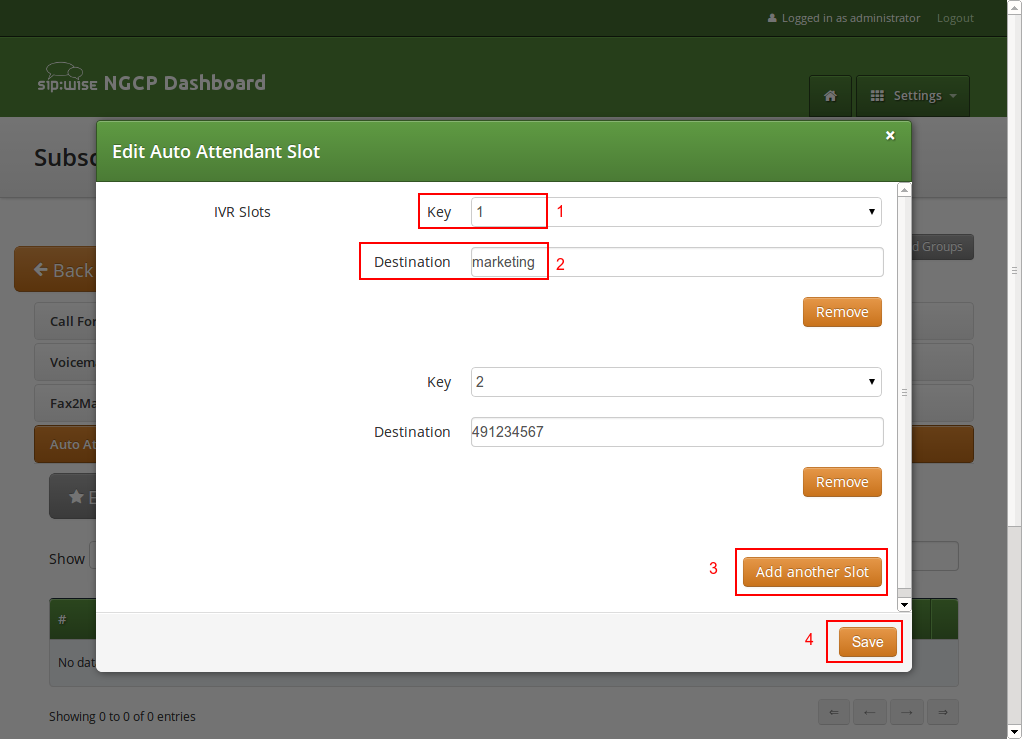
In the Auto-Attendant Slots section, click the Edit Slots button to configure the destination options. There are up to 10 available slots to configure, from keys 0 to 9.
| tip | |
Be aware that only configured slots will be prompted in the Auto-Attendant menu. |
Click Add another Slot to add a destination option, select the Key the destination should be assigned to, and enter a Destination. The destination can be a subscriber username (e.g. marketing), a full SIP URI (e.g. sip:michelle.miller@customer1.pbx.example.org or any external SIP URI) or a number or extension (e.g. 491234567 or 101).
Repeat the step for every option you want to add, then press Save.
Once the Sound Set and the Slots are configured, activate the Auto-Attendant by setting a Call Forward to Auto-Attendant.
To do so, open the Call Forwards section in the Subscriber Preferences view and press Edit on the Call Forward type (e.g. Call Forward Unconditional if you want to redirect callers unconditionally to the Auto-Attendant).
Select Auto-Attendant and click Save to activate the Auto-Attendant.
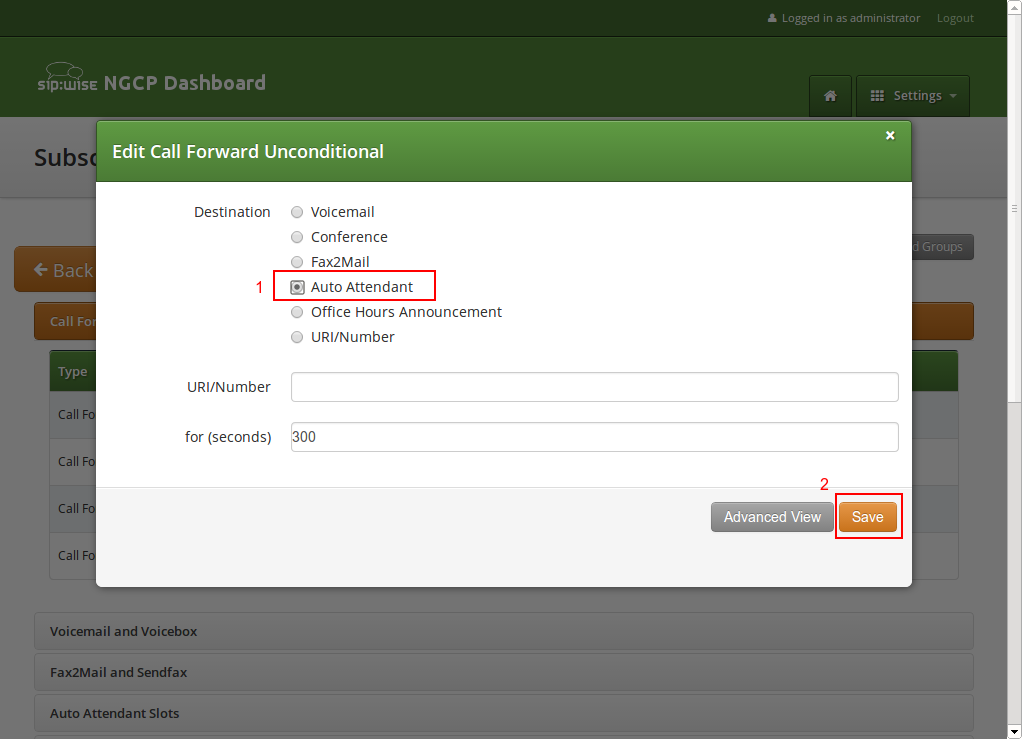
| tip | |
As with any other Call Forward, you can define more complex forwarding rules in the Advanced View to only forward the call to the Auto-Attendant during specific time periods, or as a fallback if no one picks up the office number. |
A huntgroup or a PBX Group is a Cloud PBX feature that distributes the calls between members of the group according to the configured hunt policy and timeout. The PBX group belongs to a customer and one Cloud PBX subscriber can be a member of one or more of the huntgroups of the customer. Call Waiting is a CPE (phone) feature that allows you to take another call while you’re already on the phone.
Multiple incoming calls to the huntgroup may result in multiple calls delivered to the same subscriber if the Call Waiting feature is enabled on his phone, regardless whether the huntgroup members are busy at this time. Hence, busy subscribers may get a second incoming call. It may be an expected behavior (since one subscriber may have multiple devices and/or clients that all ring in parallel) or not, depending on the setup.
Therefore, Sipwise C5 Cloud PBX module offers Skip busy huntgroup members feature to check the busy status of individual huntgroup members before routing a call to them. This will leave subscribers on active phone calls undisturbed by calls to huntgroup.
The configuration of the Skip busy huntgroup members feature is done via the main
configuration file: /etc/ngcp-config/config.yml. The relevant section is:
kamailio.proxy.pbx.skip_busy_hg_members, the example below shows the default values of
the parameters.
      skip_busy_hg_members:
        enable: 'no'
        redis_key_name: 'totaluser'
Option kamailio.proxy.pbx.skip_busy_hg_members.enable determines if
call destined to a huntgroup is routed to subscribers that have busy status. When
enabled and huntgroup member is busy according to the active calls information in
internal Redis storage the huntgroup call is not offered to this huntgroup member. The
Sipwise C5 platform tries the other available HG members.
| important | |
This option does not present an extended server-side Call Waiting functionality. It concerns only the huntgroups' behavior. Hence subscriber would still be able to receive multiple calls when called directly (not via huntgroup) with Call Waiting enabled on his phone. |
The option redis_key_name may take the following values:
-
totaluser: The callee is busy when involved in one or more incoming or outgoing calls in active or alerting phase. -
activeuser: The callee is busy when involved in one or more incoming or outgoing calls in active or alerting phase but NOT busy for the calls that are forwarded.
When the feature is enabled with redis_key_name set to totaluser:
      skip_busy_hg_members:
        enable: 'yes'
        redis_key_name: 'totaluser'
The behavior when calling the huntgroup is the following:
- The callee is busy when involved in one or more incoming or outgoing calls in active or alerting phase.
- The callee is busy for incoming calls that are forwarded.
This can be better illustrated by the following use cases:
- Use Case 1
- Subscriber receives an incoming call. A second call is made to the HG. The subscriber should NOT receive this call via HG extension.
- Use Case 2
- Subscriber makes an outgoing call. A second call is made to the HG. The subscriber should NOT receive this call via HG extension.
- Use Case 3
- Subscriber with call forwards (CFU, CFB, CFNA, CFT) receives a call to his extension (not extension of HG) which is then forwarded. A second call is made to the HG. The subscriber should NOT receive the call via HG extension.
In order to prevent the forwarded calls from keeping the subscriber as "busy" for the
purpose of this feature the platform administrator should set the
kamailio.proxy.pbx.skip_busy_hg_members.redis_key_name parameter to value
activeuser:
      skip_busy_hg_members:
        enable: 'yes'
        redis_key_name: 'activeuser'
While User Cases 1 an 2 will behave in the same way as described above, the change of behavior happens in Use Case 3:
- Use Case 3
- Subscriber with call forwards (CFU, CFB, CFNA, CFT) receives a call to his extension (not extension of HG) which is then forwarded. A second call is made to the HG. The subscriber should receive the call as normal.
There is a possibility to fine-tune when callee is considered busy and exclude, for example, intra-PBX calls or calls to voicemail from keeping subscriber as "busy". Please contact Sipwise support if you’d like to do that.
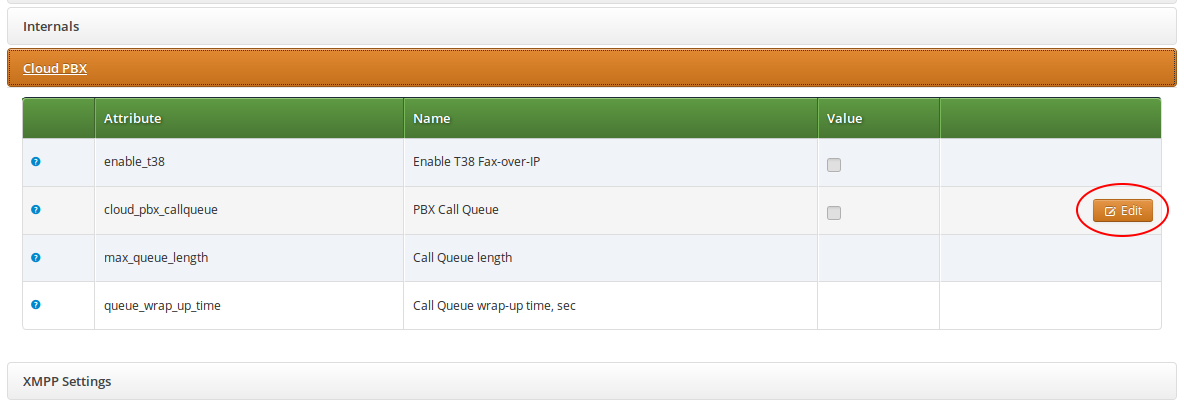
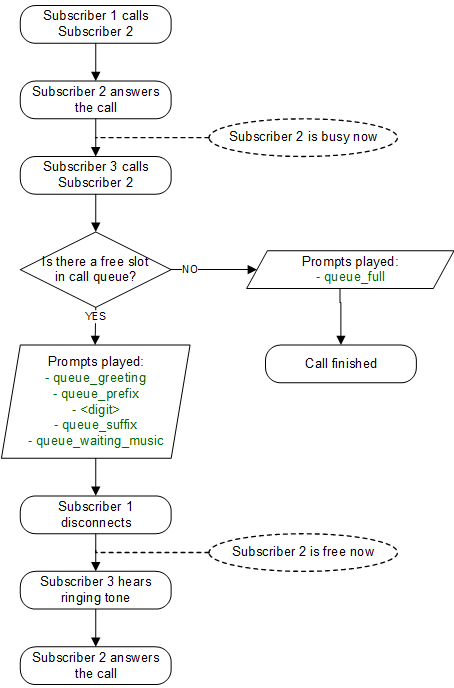
The Sipwise C5 platform offers call queueing feature for Cloud PBX subscribers. For any subscriber within the PBX Sipwise C5 system administrator or the subscriber himsef may activate the Call Queue. This is done individually for each subscriber on demand.
If call queue activation has been done and the subscriber receives more than 1 call at a time, then the second and all further callers will be queued until the subscriber finishes his call with the first caller and gets free.
The call queue configuration is available at the path: Subscribers → select one → Details → Preferences → Cloud PBX.
Following configuration parameters may be set for call queueing:
-
cloud_pbx_callqueue: shows the status of call queueing (enabled / disabled); by default it is disabled -
max_queue_length: the length of call queue, i.e. the maximum number of callers in a queue; the default is 5 -
queue_wrap_up_time: the delay in seconds between the ending of the previous call and the connection of the next queued caller with the subscriber; the default is 10
In order to change the actual setting, press the Edit button in the relevant row.
Queued callers first hear a greeting message then information about their position in the queue and finally a waiting music / signal.
Table 23. Call Queue Voice Prompts
| Prompt handle | Prompt content |
|---|---|
| All lines are busy at the moment, you are being queued. |
| You are currently number… |
| … in the queue, please hold the line. |
| All lines are busy at the moment, please try again later. |
| <waiting music> |
The Cisco SPA phones can connect to the provisioning interface of the PBX via HTTP and HTTPS. When perform secure provisioning over HTTPS, the phones validate the server certificate to check if its a legitimate Cisco provisioning server. To pass this check, the provisioning interface must provide a certificate signed by Cisco for that exact purpose.
The following steps describe how to obtain such a certificate.
First, a new SSL key needs to be generated:
$ openssl genrsa -out provisioning.key 2048
Generating RSA private key, 2048 bit long modulus
...+++
...............................................................+++
e is 65537 (0x10001)
Next, a certificate signing request needs to be generated as follows. Provide your company details.
| important | |
The Common Name (e.g. server FQDN or YOUR name) field is crucial here. Provide an FQDN which the phones will later use via DNS to connect to the provisioning interface, for example pbx.example.org. Cisco does NOT support wild-card certificates. |
| important | |
Leave the password empty when asked for it (press Enter without entering anything). |
$ openssl req -new -key provisioning.key -out provisioning.csr
You are about to be asked to enter information that will be incorporated
into your certificate request.
What you are about to enter is what is called a Distinguished Name or a DN.
There are quite a few fields but you can leave some blank
For some fields there will be a default value,
If you enter '.', the field will be left blank.

Country Name (2 letter code) [AU]:AT
State or Province Name (full name) [Some-State]:Vienna
Locality Name (eg, city) []:Vienna
Organization Name (eg, company) [Internet Widgits Pty Ltd]:Sipwise GmbH
Organizational Unit Name (eg, section) []:Operations
Common Name (e.g. server FQDN or YOUR name) []:pbx.example.org
Email Address []:office@sipwise.com

Please enter the following 'extra' attributes
to be sent with your certificate request
A challenge password []:
An optional company name []:
Finally, compress the provisioning.csr file via ZIP and send it to our Cisco sales representative. If in doubt, you can try to send it directly to ciscosb-certadmin@cisco.com asking them to sign it.
| important | |
Only send the CSR file. Do NOT send the key file, as this is your private key! |
| important | |
Ask for both the signed certificate AND a so-called combinedca.crt which is needed to perform client authentication via SSL. Otherwise you can not restrict access to Cisco SPAs only. |
You will receive a signed CRT file, which Sipwise can use to configure the PBX provisioning interface.
If a client connects via HTTPS, the server also checks for the client certificate in order to validate that the device requesting the configuration is indeed a legitimate Cisco phone, and not a fraudulent user with a browser trying to fetch user credentials.
Cisco Client Root Certificate can be obtained from Download Client Certificates website.
The IP phones supported by the PBX need to initially be configured to fetch their configuration from the system. Since the phones have no initial information about the system and its provisioning URL, they need to be boot-strapped. Furthermore, changes for a specific device might have to be pushed to the device immediately instead of waiting for it to re-fetch the configuration automatically.
The following sections describe the work-flows how this is accomplished without having the customer directly accessing the phone.
Initial Bootstrapping
Subsequent Device Resyncs
If one of the subscribers configured on a PBX device is registered via SIP, the system can trigger a re-sync of the phone directly via SIP without having the customer enter the IP of the phone again. This is accomplished by sending a special NOTIFY message to the subscriber:
NOTIFY sip:subscriber@domain SIP/2.0
To: <sip:subscriber@domain>
From: <sip:subscriber@domain>;tag=some-random-tag
Call-ID: some-random-call-id
CSeq: 1 NOTIFY
Subscription-State: active
Event: check-sync
Content-Length: 0
In order to prevent unauthorized re-syncs, the IP phone challenges the request with its own SIP credentials, so the NOTIFY is sent twice, once without authentication, and the second time with the subscriber’s own SIP credentials.
Initial Bootstrapping
Panasonic provides a zero-touch provisioning mechanism in their firmwares, which causes the factory-reset phones to connect to a Panasonic web service at https://provisioning.e-connecting.net to check if a custom provisioning URL is configured for the MAC address of the phone. If an association between the MAC and a provisioning URL is found, the web service redirects the phone to the provisioning URL, where the phone connects to in order to obtain the configuration file.

The CloudPBX module ensures that when an end customer creates a Panasonic device, the MAC address is automatically provisioned on the Panasonic web service via an API call, so the customer’s phone can use the correct provisioning URL to connect to the auto-provisioning server of the CloudPBX.
As a result, no customer interaction is required to bootstrap Panasonic phones, other than just creating the phone with the proper MAC on the CloudPBX web interface.
Factory Reset
For already provisioned phones, the end customer might need to perform a factory reset:
- Press Settings or Setup
- Enter #136
- Select Factory Setting and press Enter
- Select Yes and press Enter
- Select Yes and press Enter
The default username for factory-reset phones is admin with password adminpass.
Subsequent Device Resyncs
The same procedure as with Cisco SPA phones applies, once a subscriber configured on the phone is registered.
Initial Bootstrapping
Yealink provides a zero-touch provisioning mechanism in their firmwares, which causes the factory-reset phones to connect to a Yealink web service at https://rps.yealink.com to check if a custom provisioning URL is configured for the MAC address of the phone. If an association between the MAC and a provisioning URL is found, the web service redirects the phone to the provisioning URL, where the phone connects to in order to obtain the configuration file.
If both Cisco SPA and Yealink phones are used, an issue with the Cisco-signed server certificate configured on the provisioning port (1444 by default) of the CloudPBX provisioning server arises. Yealink phones by default only connect to trusted server certificates, and the Cisco CA certificate used to sign the server certificate is not trusted by Yealink. Therefore, a two-step approach is used to disable the trusted check via a plain insecure http port (1445 by default) first, where only device-generic config options are served. No user credentials are provided in this case, because no SSL client authentication can be performed. The generic configuration disables the trusted check, and at the same time changes the provisioning URL to the secure port, where the Yealink phone is now able to connect to.
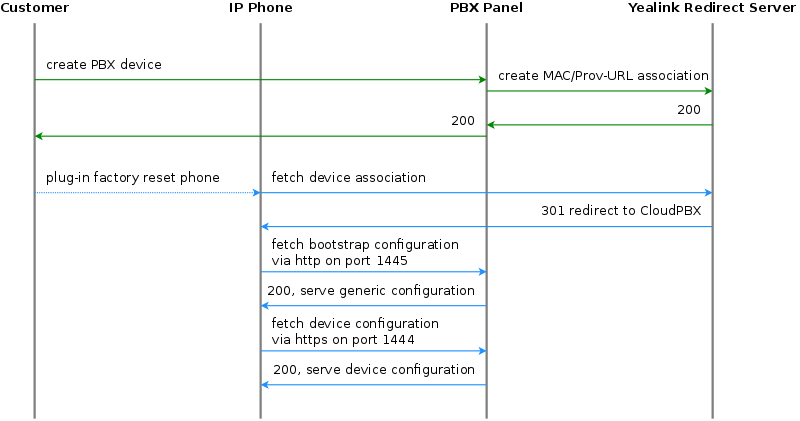
The CloudPBX module ensures that when an end customer creates a Yealink device, the MAC address is automatically provisioned on the Yealink web service via an API call, so the customer’s phone can use the correct insecure bootstrap provisioning URL to connect to the auto-provisioning server of the CloudPBX for the generic configuration, which in turn provides the information on where to connect to for the secure, full configuration.
As a result, no customer interaction is required to bootstrap Yealink phones, other than just creating the phone with the proper MAC on the CloudPBX web interface.
Factory Enable Yealink Auto-Provisioning
Older Yealink firmwares don’t automatically connect to the Yealink auto-provisioning server on initial boot, so it needs to be enabled manually by the end customer.
- Log in to http://phone-ip/servlet?p=hidden&q=load using admin and admin as user/password when prompted
- Change Redirect Active to Enabled
- Press Confirm and power-cycle phone
Subsequent Device Resyncs
The same procedure as with Cisco SPA phones applies, once a subscriber configured on the phone is registered.
Initial Bootstrapping
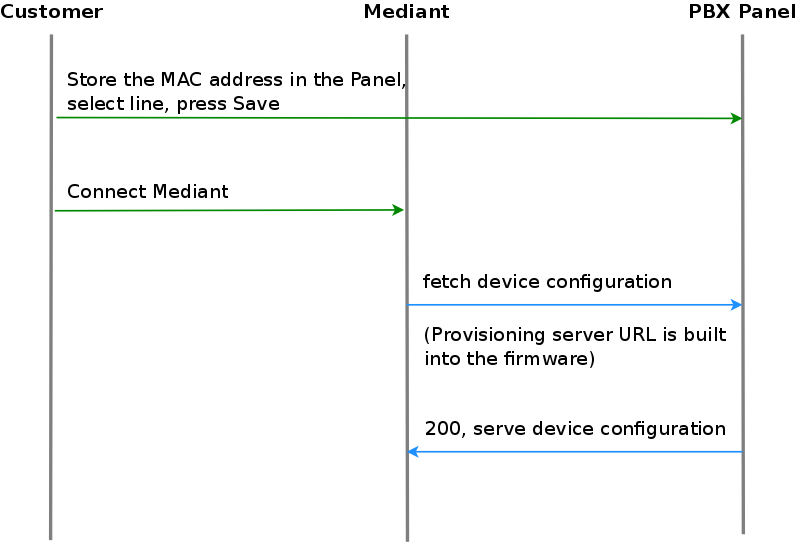
An Audiocodes device provides a zero-touch provisioning mechanism in its firmware which causes a factory-reset device to connect to the URL built into the firmware. This URL is pointing to Sipwise C5 provisioning server (in case of Sipwise C5 Carrier: web01 node) listening on TCP port 1444 for HTTPS sessions.
The prerequisites for the device provisioning are that the device has a routable IP address and can reach the IP address of Sipwise C5 provisioning interface.
The Audiocodes device should request the firmware file or CLI configuration file from Sipwise C5 platform. The firmware versions and CLI config versions are decoupled from each other; Sipwise C5 can not enforce specific version of the firmware on the device. Instead, it should be requested by the device itself. In other words, provisioning is a pull and not a push process.
Sipwise C5 expects the provisioning request from the Audiocodes device after SSL handshake and serves the requested file to the device if the device provides valid MAC address as the part of the URL. The MAC address is used to identify the device to Sipwise C5 platform. The firmware and CLI config files are provided at the following URLs:
-
the base URL to download firmwares:
https://<NGCP_IP>:1444/device/autoprov/firmware/001122334455/from/0/latest -
the base URL to download CLI config:
https://<NGCP_IP>:1444/device/autoprov/config/001122334455
where 001122334455 should be replaced with the actual device’s MAC address and <NGCP_IP> with IP address of Sipwise C5 provisioning interface.
Device management basics
The list of device models, firmwares and configurations are global to a reseller and are available for end customer. This data is initially provided by Sipwise as bulk upload of all supported phone models. The firmwares and settings are stored in the database on the DB node pair(s). The Sipwise C5 leverages the Cloud PBX module with its template system to generate the configurations and firmware files from database on the fly. Please refer to the following chapters in Sipwise C5 handbook for the current information on how to perform device management:
Parameterizing the Device Configuration Template
The device-specific parameters are filled in by the system individually when a physical device fetches its configuration file. Parameters from Sipwise C5 panel:
-
username:Subscriber Details → Master Data → SIP Username -
password:Subscriber Details → Master Data → SIP Password -
domain:Subscriber Details → Master Data → Domain -
extension:Subscriber Details → Master Data → Extension -
area code:Subscriber Preferences → Number Manipulations → ac -
country code:Subscriber Preferences → Number Manipulations → cc
The produced CLI config file has the following structure:
SIP account credentials:
"sip-definition account 0"
-
user-name
[username] -
password
[password] -
host-name
[domain] - register reg
-
contact-user
"[country code][area code][extension]"
-
user-name
IP Groups:
"voip-network ip-group 1" and "voip-network ip-group 2"
-
sip-group-name
[domain]
-
sip-group-name
Proxy and registration settings:
"sip-definition proxy-and-registration"
-
set gw-name
[domain]
-
set gw-name
Manipulations:
manipulation-name "from trunk domain":
"sbc manipulations message-manipulations 3"
-
action-value
"[% line.domain %]"
-
action-value
manipulation-name "clip no screening":
"sbc manipulations message-manipulations 8"
-
action-value
"'<sip:+[country code][area code][extension]@' + param.ipg.dst.host + '>'"
-
action-value
Specific CLI parameters are:
-
[IPPBX_Hostname] -
[IPPBX_server_IP]
which are used at the following configuration parameters:
Proxy settings:
"voip-network proxy-ip 1"
-
proxy-address
[IPPBX_Hostname]
-
proxy-address
Manipulations:
"sbc manipulations message-manipulations 1"
-
action-value
[IPPBX_Hostname]
-
action-value
This chapter provides information and hints for preparing and performing the deployment of certain VoIP devices at customer sites, that have a customer-facing interface which also needs customisation.
Audiocodes ISDN gateways and eSBCs are devices used to connect legacy (ISDN) PBX and IP-PBX to Sipwise C5 platform and maintain their operations within the Operator’s network. Sipwise C5 offers a SipConnect 1.1 compliant signaling and media interface to connect SIP trunks to the platform. In addition to this interface, Sipwise C5 provides an auto-provisioning mechanism to configure SIP endpoints like IP phones, media gateways and eSBCs.
Provisioning URL
An Audiocodes device needs to obtain the provisioning URL of Sipwise C5 in one way or the other to request its device configuration and subsequently download specific firmwares, obtain SIP credentials to connect to the network facing side, and configure the customer facing side for customer devices to connect either via ISDN or SIP. Typical ways of obtaining the provisioning URL for a SIP endpoint are:
- using DHCP option-66 (in a pre-staging environment or directly at the customer premise) where vendor-specific Redirect Servers are configured in the default configuration or firmware
- getting pre-configured per deployment from the SIP endpoint vendor
- getting pre-configured per deployment by a 3rd party distributor
The assumption is that Audiocodes devices are supplied with a firmware (and all required SSL certificates) being pre-configured and the provisioning URL pointing to an Operator URL Sipwise C5 is serving, before handing the devices over to field service engineers doing the truck rolls.
Field Configuration
The Sipwise C5 provides a SipConnect 1.1 compliant interface on the network side for the Audiocodes devices. This interface clearly defines the numbering formats of the calling and called party, the SIP header mechanisms to provide CLI restriction, the RTP codecs, etc.
On the customer facing side, however, those variables might be different from deployment to deployment:
- An IP-PBX might choose to only send its extension as calling party number, or might choose to send the full number in national format.
- It might choose to use the SIP From-header mechanisms to suppress displaying of the CLI, or use the SIP Privacy header.
- The same uncertainty exists to some extent for a legacy PBX connecting via ISDN to the Audiocodes device.
The assumption here is that a field service engineer is NOT supposed to change the Audiocodes configuration in order to make the customer interface work, as this will lead to big issues in maintaining those local changes, especially if a replacement of the device is necessary. Instead, the Audiocodes configuration must ensure that all different kinds of variants in terms of SIP headers, codecs and number formats are translated correctly to the network side and vice versa. If it turns out that there are scenarios in the field which are not handled correctly, temporary local changes might be performed to finish a truck roll, but those changes MUST be communicated to the platform operator, and the server-side configuration templates must be adapted to handle those scenarios gracefully as well.
For deployments with ISDN interfaces on the customer facing side of the Audiocodes, different Device Profiles with specific Device Configurations per Device Model must exist to handle certain scenarios, specifically whether the ISDN interface is operating in Point-to-Point or Point-to-Multipoint mode. Configuration options like which side is providing the clock-rate are to be defined up-front, and the PBX must be reconfigured to adhere to the configuration.
Network Configuration
On the network facing side, both the ISDN and eSBC style deployments have to be designed to obtain an IP address via DHCP. The definition of the IP address ranges is up to the Operator. It may or may not be NAT-ed, but it is advised to use a private IP range directly routed in the back-bone to avoid NAT.
On the customer facing side, networking is only relevant for the eSBC deployment. In order to make the IP-PBX configuration as stream-lined as possible, a pre-defined network should be established on the customer interface of the Audiocodes device.
| tip | |
The proposal is to define a network 192.168.255.0/24 with the Audiocodes device using the IP 192.168.255.2 (leaving the 192.168.255.1 to a possible gateway). The IP-PBX could obtain its IP address via DHCP from a DHCP server running on the Audiocodes device (e.g. serving IP addresses in the range of 192.168.255.100-254), or could have it configured manually (e.g. in the range of 192.168.255.3-99). Since the Audiocodes device IP on the customer side is always fixed at 192.168.255.2, the IP-PBX for each customer can be configured the same way, pointing the SIP proxy/registrar or outbound proxy always to this IP. |
The customer facing side is outside the Sipwise demarcation line, that’s why the network configuration mentioned above only serves as proposal and any feedback is highly welcome. However, it must be clearly communicated how the customer facing network is going to be configured, because Sipwise C5 needs to incorporate this configuration into the Audiocodes configuration templates.
Pre-Configuration on Sipwise C5 platform
- Before connecting a customer to a SIP trunk, it must be clear which Audiocodes Device Model is going to be used (depending on if, which and how many ISDN ports are necessary) and which Device Profile for the Device Model is required (eSBC mode, ISDN P-to-P or P-to-MP mode). Based on that, the correct physical device must be picked.
Next, the customer has to be created on Sipwise C5 . This step requires the creation of the customer, and the creation of a subscriber within this customer. For the subscriber, the proper E.164 numbers or number blocks must be assigned, and the correct subscriber preferences must be set for the network interface to adhere to the SipConnect 1.1 interface. This step is automated by a script provided by Sipwise until the provisioning work-flow is fully integrated with Operator’s OSS/BSS systems. Required parameters are:
- an external customer id to relate the customer entity on Sipwise C5 with a customer identifier in Operator’s IT systems
- a billing profile name
- a subscriber username and password, the domain the subscriber is configured for
- the numbers or number blocks assigned to the subscriber, and the network provided number of the subscriber
- optional information is geographic location information and IP network information to properly map emergency calls
Finally, the association between the MAC address of the Audiocodes device and the SIP subscriber to be used on the SIP trunk must be established. This step is also automated by a script provided by Sipwise. Required parameters are:
- the subscriber id
- the Device Profile to be used
- and the MAC address of the Audiocodes device
Installation
Once the above requirements are fulfilled and the customer is created on Sipwise C5 , the Audiocodes device can be installed at the customer premise.
When the Audiocodes device boots, it requests the configuration file from Sipwise C5 by issuing a GET request via HTTPS.
For authentication and authorization purposes, Sipwise C5 requests an SSL client certificate from the device and will check whether it’s signed by a Certificate Authority known to Sipwise C5 . Therefore, Audiocodes must provide the CA certificate used to sign the devices' client certificates to Sipwise to allow for this process. Also, Sipwise C5 will provide an SSL server certificate to the device. The device must validate this certificate in order to prevent man-in-the-middle attacks. Options here are to have:
- Sipwise provide a self-signed certificate to Audiocodes for Audiocodes or a 3rd party distribution partner to configure it as trusted CA in the pre-staging process
- the Operator provide a certificate signed by a CA which is already in the trust store of the Audiocodes devices.
Once the secured HTTPS connection is established, Sipwise C5 will provide a CLI style configuration file, with its content depending on the pre-configured Device Profile and subscriber association to the device’s MAC address.
The configuration includes the firmware version of the latest available firmware configured for the Device Model, and a URL defining from where to obtain it. The configuration details on how the Audiocodes devices manage the scheduling of firmware updates are to be provided by Audiocodes or its partners, since this is out of scope for Sipwise. Ideally, firmware updates should only be performed if the device is idle (no calls running), and within a specific time-frame (e.g. between 1 a.m. and 5 a.m. once a certain firmware version is reached, including some random variation to prevent all devices to download a new firmware version at the same time).
Device Replacement
If a customer requires the replacement of a device, e.g. due to hardware issues or due to changing the number or type of ISDN interfaces, a new association of the new device MAC, its Device Profile and the subscriber must be established.
In order to make the change as seamless as possible for the customer, a new device is created for the customer with the new MAC, a proper Device Profile, but the same subscriber as used on the old device. Once the new device boots at the customer premise, it will obtain its configuration and will register with the same subscriber as the old device (in case it’s still operational). For inbound calls to the customer, this will cause parallel ringing to take place, and it’s up to the customer or the field engineer when to re-configure or re-cable the PBX to connect to one or the other device.
Once the old device is decommissioned, the old MAC association can be deleted on Sipwise C5 .
| Vendor | Model | Available from release |
|---|---|---|
Audiocodes | Mediant800 | mr4.1.1.1 |
Cisco | ATA112 | mr3.4.1.1 |
Cisco | ATA122 | mr3.4.1.1 |
Cisco | SPA232D | mr3.4.1.1 |
Cisco | SPA301 | mr3.4.1.1 |
Cisco | SPA303 | mr3.4.1.1 |
Cisco | SPA501G | mr3.4.1.1 |
Cisco | SPA502G | mr3.4.1.1 |
Cisco | SPA512G | mr3.4.1.1 |
Cisco | SPA504G | mr3.4.1.1 |
Cisco | SPA504G + SPA500S | mr3.7.1.4 |
Cisco | SPA504G + two SPA500S | mr3.7.1.4 |
Cisco | SPA514G | mr3.4.1.1 |
Cisco | SPA508G | mr3.4.1.1 |
Cisco | SPA509G | mr3.4.1.1 |
Cisco | SPA525G | mr3.4.1.1 |
Grandstream | HT814 | mr5.1.1.1 |
Grandstream | GXW-4008 | mr5.1.1.1 |
Grandstream | GXW-4216 | mr5.1.1.1 |
Innovaphone | IP2X2X | mr3.8.3.3 |
Innovaphone | IP230-X | mr3.8.3.3 |
Innovaphone | IP232 | mr3.8.3.3 |
Innovaphone | IP222 | mr3.8.3.3 |
Innovaphone | IP240 | mr3.8.3.3 |
Innovaphone | IP22 | mr3.8.3.3 |
Innovaphone | IP111 | mr3.8.3.3 |
Panasonic | KX-UT113 | mr3.7.1.1 |
Panasonic | KX-UT123 | mr3.7.1.1 |
Panasonic | KX-UT133 | mr3.7.1.1 |
Panasonic | KX-UT136 | mr3.7.1.1 |
Panasonic | KX-UT248 | mr3.7.1.1 |
Panasonic | KX-TGP600 | mr5.1.1.1 |
Panasonic | KX-HDV330 | mr5.1.1.1 |
Panasonic | KX-HDV230 | mr5.1.1.1 |
Panasonic | KX-HDV130 | mr5.1.1.1 |
Polycom | VVX300 | mr5.4.1.1 |
Polycom | VVX400 | mr5.4.1.1 |
Polycom | VVX500 | mr5.4.1.1 |
Yealink | CP860 | mr5.2.1.1 |
Yealink | SIP-T19P | mr3.7.1.1 |
Yealink | SIP-T20P | mr3.7.1.1 |
Yealink | SIP-T21P | mr3.7.1.1 |
Yealink | SIP-T22P | mr3.7.1.1 |
Yealink | SIP-T23P | mr3.7.1.1 |
Yealink | SIP-T23G | mr3.7.1.1 |
Yealink | SIP-T26P | mr3.7.1.1 |
Yealink | SIP-T28P | mr3.7.1.1 |
Yealink | SIP-T32G | mr3.7.1.1 |
Yealink | SIP-T38G | mr3.7.1.1 |
Yealink | SIP-T41P | mr3.7.1.1 |
Yealink | SIP-T42G | mr3.7.1.1 |
Yealink | SIP-T46G | mr3.7.1.1 |
Yealink | SIP-T48G | mr3.7.1.1 |
Yealink | SIP-T28P + EXP39 | mr3.8.1.1 |
Yealink | SIP-T28P + two EXP39 | mr3.8.1.1 |
Yealink | W52P | mr3.7.1.6 |
| Model | IPv6 | TLS | SRTP | Auto provisioning | Private Line | Shared Line | Busy Lamp | Speed Dial |
|---|---|---|---|---|---|---|---|---|
Mediant800 | Y | Y | Y | dhcp | 1 | 0 | 0 | N |
IP Phones
| Model | IPv6 | TLS | SRTP | Auto provisioning | Private Line | Shared Line | Busy Lamp | Extension Boards |
|---|---|---|---|---|---|---|---|---|
SPA301 | N | Y | Y | http | 1 | 1 | 0 | N |
SPA303 | N | Y | Y | http | 1-3 | 1-3 | 1-2 | N |
SPA501G | N | Y | Y | http | 1-8 | 1-8 | 1-7 | N |
SPA502G | N | Y | Y | http | 1 | 1 | 0 | N |
SPA512G | N | N | Y | http | 1 | 1 | 0 | N |
SPA504G | N | Y | Y | http | 1-4 | 1-4 | 1-3 | 2 |
SPA514G | N | N | Y | http | 1-4 | 1-4 | 1-3 | N |
SPA508G | N | Y | Y | http | 1-8 | 1-8 | 1-7 | N |
SPA509G | N | Y | Y | http | 1-12 | 1-12 | 1-11 | N |
SPA525G | N | Y | N | http | 1-5 | 1-5 | 1-4 | N |
Analog Adapters
| Model | IPv6 | TLS | SRTP | Auto provisioning | Private Line | Shared Line | Busy Lamp |
|---|---|---|---|---|---|---|---|
SPA232D | N | Y | Y | http | 1-6 | 0 | 0 |
ATA112 | Y | Y | Y | http | 1-2 | 0 | 0 |
ATA122 | Y | Y | Y | http | 1-2 | 0 | 0 |
Extension Boards
| Model | Ports | Buttons | Busy Lamp | Supported phones |
|---|---|---|---|---|
SPA500S | 2 | 32 | 1-32 | SPA500 |
Analog Adapters
| Model | IPv6 | TLS | SRTP | Auto provisioning | Private Line | Shared Line | Busy Lamp |
|---|---|---|---|---|---|---|---|
HT814 | N | Y | Y | redirect | 4 | N | N |
GXW-4008 | N | Y | Y | redirect | 8 | N | N |
GXW-4216 | N | Y | Y | redirect | 16 | N | N |
IP Phones
| Model | IPv6 | TLS | SRTP | Auto provisioning | Private Line | Shared Line | Busy Lamp | Extension Boards |
|---|---|---|---|---|---|---|---|---|
IP232 | N | Y | Y | dhcp | 1 | 0 | 1-16 | 2 |
IP222 | N | Y | Y | dhcp | 1 | 0 | 1-16 | 2 |
IP240 | N | N | N | dhcp | 1 | 0 | 1-15 | 2 |
IP111 | N | Y | Y | dhcp | 1 | 0 | 1-16 | 0 |
Analog Adapters
| Model | IPv6 | TLS | SRTP | Auto provisioning | Private Line | Shared Line | Busy Lamp |
|---|---|---|---|---|---|---|---|
IP22 | N | Y | Y | dhcp | 1 | 0 | 0 |
Extension Boards
| Model | Ports | Buttons | Busy Lamp | Supported phones |
|---|---|---|---|---|
IP2X2X | 2 | 64 | 1-32 | IP2x2 |
IP230-X | 2 | 30 | 1-30 | IP230 |
IP Phones
| Model | IPv6 | TLS | SRTP | Auto provisioning | Private Line | Shared Line | Busy Lamp | Extension Boards |
|---|---|---|---|---|---|---|---|---|
KX-UT113 | N | N | N | redirect | 1-2 | 1-2 | 0 | N |
KX-UT123 | N | N | N | redirect | 1-2 | 1-2 | 0 | N |
KX-UT133 | N | N | N | redirect | 1-4 | 1-4 | 1-23 | N |
KX-UT136 | N | N | N | redirect | 1-4 | 1-4 | 1-23 | N |
KX-UT248 | N | N | Y | redirect | 1-6 | 1-6 | 1-23 | N |
KX-TGP600 | Y | Y | Y | redirect | 1-8 | N | N | N |
KX-HDV330 | Y | Y | Y | redirect | 1-12 | Y | Y | N |
KX-HDV230 | Y | Y | Y | redirect | 1-6 | Y | Y | N |
KX-HDV130 | Y | Y | Y | redirect | 1-2 | Y | Y | N |
IP Phones
| Model | IPv6 | TLS | SRTP | Auto provisioning | Private Line | Shared Line | Busy Lamp | Extension Boards |
|---|---|---|---|---|---|---|---|---|
VVX300 | N | N | Y | redirect | 1-6 | 1-6 | Y | N |
VVX400 | N | N | Y | redirect | 1-12 | 1-12 | Y | N |
VVX500 | N | N | Y | redirect | 1-12 | 1-12 | Y | N |
IP Phones
| Model | IPv6 | TLS | SRTP | Auto provisioning | Private Line | Shared Line | Busy Lamp | Extension Boards |
|---|---|---|---|---|---|---|---|---|
CP860 | Y | Y | Y | redirect | 1 | N | N | N |
SIP-T19P | Y | Y | Y | redirect | 1 | 1 | 0 | N |
SIP-T20P | Y | Y | Y | redirect | 1 | 1 | 0 | N |
SIP-T21P | Y | Y | Y | redirect | 1-2 | 1-2 | 1 | N |
SIP-T22P | Y | Y | Y | redirect | 1-3 | 1-3 | 1-2 | N |
SIP-T23P | Y | Y | Y | redirect | 1-3 | 1-3 | 1-2 | N |
SIP-T23G | Y | Y | Y | redirect | 1-3 | 1-3 | 1-2 | N |
SIP-T26P | Y | Y | Y | redirect | 1-3 | 1-3 | 1-12 | N |
SIP-T28P | Y | Y | Y | redirect | 1-6 | 1-6 | 1-15 | 2 |
SIP-T32G | Y | Y | Y | redirect | 1-3 | 1-3 | 1-2 | N |
SIP-T38G | Y | Y | Y | redirect | 1-6 | 1-6 | 1-15 | N |
SIP-T41P | Y | Y | Y | redirect | 1-3 | 1-3 | 1-14 | N |
SIP-T42G | Y | Y | Y | redirect | 1-3 | 1-3 | 1-14 | N |
SIP-T46G | Y | Y | Y | redirect | 1-6 | 1-6 | 1-26 | N |
SIP-T48G | Y | Y | Y | redirect | 1-6 | 1-6 | 1-28 | N |
W52P | N | Y | Y | redirect | 1-5 | 1-5 | 0 | N |
SPA301
1) Soft keys
Not available.
2) Hard keys
- vm
- hold/unhold
3) Line keys
Not available.
4) VSC
- directed pickup
- park/unpark
SPA303
1) Soft keys
Idle:
redial | lcr | dir | dnd > |
< cfwd | unpark |
Idle with missed calls:
lcr | miss |
Call:
hold | endCall | conf | xfer > |
< bxfer | park |
Call on hold:
resume | endCall | newCall | redial > |
< dir | cfwd | dnd |
Ringing:
answer | ignore |
2) Hard keys
- vm
- hold/unhold
3) Line keys
- BLF monitoring
- directed pickup
4) VSC
- directed pickup
SPA501G
1) Soft keys
Idle:
redial | lcr | dir | dnd > |
< cfwd | unpark |
Idle with missed calls:
lcr | miss |
Call:
hold/resume | endCall | conf | xfer > |
< bxfer | park |
Call on hold:
resume | endCall | newCall | redial > |
< dir | cfwd | dnd |
Ringing:
answer | reject |
2) Hard keys
- vm
- hold/unhold
3) Line keys
- BLF monitoring
- directed pickup
4) VSC
- directed pickup
SPA502G
1) Soft keys
Idle:
redial | lcr | dir | dnd > |
< cfwd | unpark |
Idle with missed calls:
lcr | miss |
Call:
hold/resume | endCall | conf | xfer > |
< bxfer | park |
Call on hold:
resume | endCall | newCall | redial > |
< dir | cfwd | dnd |
Ringing:
answer | reject |
2) Hard keys
- vm
- hold/unhold
3) Line keys
Not available.
4) VSC
- directed pickup
SPA504G
1) Soft keys
Idle:
redial | lcr | dir | dnd > |
< cfwd | unpark |
Idle with missed calls:
lcr | miss |
Call:
hold/resume | endCall | conf | xfer > |
< bxfer | park |
Call on hold:
resume | endCall | newCall | redial > |
< dir | cfwd | dnd |
Ringing:
answer | reject |
2) Hard keys
- vm
- hold/unhold
3) Line keys
- BLF monitoring
- directed pickup
4) VSC
- directed pickup
SPA512G
1) Soft keys
Idle:
redial | lcr | dir | dnd > |
< cfwd | unpark |
Idle with missed calls:
lcr | miss |
Call:
hold/resume | endCall | conf | xfer > |
< bxfer | park |
Call on hold:
resume | endCall | newCall | redial > |
< dir | cfwd | dnd |
Ringing:
answer | reject |
2) Hard keys
- vm
- hold/unhold
3) Line keys
Not available.
4) VSC
- directed pickup
SPA514G
1) Soft keys
Idle:
redial | lcr | dir | dnd > |
< cfwd | unpark |
Idle with missed calls:
lcr | miss |
Call:
hold/resume | endCall | conf | xfer > |
< bxfer | park |
Call on hold:
resume | endCall | newCall | redial > |
< dir | cfwd | dnd |
Ringing:
answer | reject |
2) Hard keys
- vm
- hold/unhold
3) Line keys
- BLF monitoring
- directed pickup
4) VSC
- directed pickup
SPA509G
1) Soft keys
Idle:
redial | lcr | dir | dnd > |
< cfwd | unpark |
Idle with missed calls:
lcr | miss |
Call:
hold/resume | endCall | conf | xfer > |
< bxfer | park |
Call on hold:
resume | endCall | newCall | redial > |
< dir | cfwd | dnd |
Ringing:
answer | reject |
2) Hard keys
- vm
- hold/unhold
3) Line keys
- BLF monitoring
- directed pickup
4) VSC
- directed pickup
SPA508G
1) Soft keys
Idle:
redial | lcr | dir | dnd > |
< cfwd | unpark |
Idle with missed calls:
lcr | miss |
Call:
hold/resume | endCall | conf | xfer > |
< bxfer | park |
Call on hold:
resume | endCall | newCall | redial > |
< dir | cfwd | dnd |
Ringing:
answer | reject |
2) Hard keys
- vm
- hold/unhold
3) Line keys
- BLF monitoring
- directed pickup
4) VSC
- directed pickup
SPA525G
1) Soft keys
Idle:
Redial | call Rtn | Directory | DND > |
< Forward | Unpark |
Idle with missed calls:
Call Rtn | Miss |
Call:
Hold | End Call | Conf | Transfer > |
BlindXfer | Park |
Call on hold:
Resume | EndCall | EewCall | Redial > |
< Directory | Forward | DND |
Ringing:
Answer | Ignore |
2) Hard keys
- vm
- hold/unhold
3) Line keys
- BLF monitoring
- directed pickup
4) VSC
- directed pickup
T19P
1) Soft keys
Idle:
History | DND | Menu |
Idle with missed calls:
Exit | View |
Call:
Tran | Hold | Conf | Cancel |
Call on hold:
Tran | Resume | NewCall | Cancel |
Ringing:
Answer | FWD | Silence | Reject |
2) Hard keys
- vm
- redial
- transfer
3) Line keys
Not available.
4) VSC
- transfer park
- directed pick up
- park/unpark
T20P
1) Soft keys
Idle:
History | DND | Menu |
Idle with missed calls:
Exit | View |
Call:
Tran | Hold | Conf | Cancel |
Call on hold:
Tran | Resume | NewCall | Cancel |
Ringing:
Answer | FWD | Silence | Reject |
2) Hard keys
- vm
- redial
- transfer
3) Line keys
- BLF monitoring
- directed pickup
4) VSC
- transfer park
- park/unpark
T21P
1) Soft keys
Idle:
History | DND | Menu |
Idle with missed calls:
Exit | View |
Call:
Tran | Hold | Conf | Cancel |
Call on hold:
Tran | Resume | NewCall | Cancel |
Ringing:
Answer | FWD | Silence | Reject |
2) Hard keys
- vm
- redial
- transfer
3) Line keys
- BLF monitoring
- directed pickup
4) VSC
- transfer park
- park/unpark
T22P
1) Soft keys
Idle:
History | DND | Menu |
Idle with missed calls:
Exit | View |
Call:
Tran | Hold | Conf | Cancel |
Call on hold:
Tran | Resume | NewCall | Cancel |
Ringing:
Answer | FWD | Silence | Reject |
2) Hard keys
- vm
- redial
- transfer
3) Line keys
- BLF monitoring
- directed pickup
4) VSC
- park/unpark
- transfer park
T23P
1) Soft keys
Idle:
History | DND | Menu |
Idle with missed calls:
Exit | View |
Call:
Tran | Hold | Conf | Cancel |
Call on hold:
Tran | Resume | NewCall | Cancel |
Ringing:
Answer | FWD | Silence | Reject |
2) Hard keys
- vm
- redial
- transfer
3) Line keys
- BLF monitoring
- directed pickup
4) VSC
- park/unpark
- transfer park
T23G
1) Soft keys
Idle:
History | Dir | DND | Menu |
Idle with missed calls:
Exit | View |
Call:
Tran | Hold | Conf | EndCall |
Call on hold:
Tran | Resume | NewCall | EndCall |
Ringing:
Answer | FWD | Reject |
2) Hard keys
- vm
- redial
- transfer
3) Line keys
- BLF monitoring
- directed pickup
4) VSC
- unpark
- transfer park
T26P
1) Soft keys
Idle:
History | DND | Menu |
Idle with missed calls:
Exit | View |
Call:
Tran | Hold | Conf | Cancel |
Call on hold:
Tran | Resume | NewCall | Cancel |
Ringing:
Answer | FWD | Silence | Reject |
2) Hard keys
- vm
- redial
- transfer
3) Line keys
- BLF monitoring
- directed pickup
4) VSC
- unpark
- transfer park
T28P
1) Soft keys
Idle:
History | DND | Menu |
Idle with missed calls:
Exit | View |
Call:
Tran | Hold | Conf | Cancel |
Call on hold:
Tran | Resume | NewCall | Cancel |
Ringing:
Answer | FWD | Silence | Reject |
2) Hard keys
- vm
- redial
- transfer
3) Line keys
- BLF monitoring
- directed pickup
4) VSC
- park/unpark
- transfer park
T32G
1) Soft keys
Idle:
History | DND | Menu |
Idle with missed calls:
Exit | View |
Call:
Tran | Hold | Conf | Cancel |
Call on hold:
Tran | Resume | NewCall | Cancel |
Ringing:
Answer | FWD | Silence | Reject |
2) Hard keys
- vm
- redial
- transfer
3) Line keys
- BLF monitoring
- directed pickup
4) VSC
- unpark
- transfer park
T38G
1) Soft keys
Idle:
History | DND | Menu |
Idle with missed calls:
Exit | View |
Call:
Tran | Hold | Conf | Cancel |
Call on hold:
Tran | Resume | NewCall | Cancel |
Ringing:
Answer | FWD | Silence | Reject |
2) Hard keys
- vm
- redial
- transfer
3) Line keys
- BLF monitoring
- directed pickup
4) VSC
- unpark
- transfer park
T41P
1) Soft keys
Idle:
History | DND | Menu |
Idle with missed calls:
Exit | View |
Call:
Tran | Hold | Conf | Cancel |
Call on hold:
Tran | Resume | NewCall | Cancel |
Ringing:
Answer | FWD | Silence | Reject |
2) Hard keys
- vm
- redial
- transfer
3) Line keys
- BLF monitoring
- directed pickup
4) VSC
- park/unpark
- transfer park
T42G
1) Soft keys
Idle:
History | DND | Menu |
Idle with missed calls:
Exit | View |
Call:
Tran | Hold | Conf | Cancel |
Call on hold:
Tran | Resume | NewCall | Cancel |
Ringing:
Answer | FWD | Silence | Reject |
2) Hard keys
- vm
- redial
- transfer
3) Line keys
- BLF monitoring
- directed pickup
4) VSC
- park/unpark
- transfer park
T46G
1) Soft keys
Idle:
History | DND | Menu |
Idle with missed calls:
Exit | View |
Call:
Tran | Hold | Conf | Cancel |
Call on hold:
Tran | Resume | NewCall | Cancel |
Ringing:
Answer | FWD | Silence | Reject |
2) Hard keys
- vm
- redial
- transfer
3) Line keys
- BLF monitoring
- directed pickup
4) VSC
- park/unpark
- transfer park
T48G
1) Soft keys
Idle:
History | DND | Menu |
Idle with missed calls:
Exit | View |
Call:
Tran | Hold | Conf | Cancel |
Call on hold:
Tran | Resume | NewCall | Cancel |
Ringing:
Answer | FWD | Silence | Reject |
2) Hard keys
- vm
- redial
- transfer
3) Line keys
- BLF monitoring
- directed pickup
4) VSC
- park/unpark
- transfer park
W52P
1) Soft keys
Idle:
History | Line |
Idle with missed calls:
Exit | View |
Call:
Ext. Call | Options |
Call on hold:
Resume | Line |
Ringing:
Accept |
2) Hard keys
- vm
- redirect
3) VSC
- park/unpark
- transfer park
KX-UT113
1) Soft keys
Idle:
Settings | Call Log | Phone book |
Call:
Blind | Phone book |
Call on hold:
Call Log | Phone book |
Ringing:
Answer | Reject |
2) Hard keys
- vm
- forward/dnd
- hold/unhold
- redial
- recall
- transfer
- conf
3) Line keys
Not available.
4) VSC
- park/unpark
- transfer park
KX-UT123
1) Soft keys
Idle:
Settings | Call Log | Phone book |
Call:
Blind | Phone book |
Call on hold:
Call Log | Phone book |
Ringing:
Answer | Reject |
2) Hard keys
- vm
- forward/dnd
- hold/unhold
- redial
- recall
- transfer
- conf
3) Line keys
Not available.
4) VSC
- park/unpark
- transfer park
KX-UT133
1) Soft keys
Idle:
Settings | Call Log | Phone book |
Call:
Blind | Phone book |
Call on hold:
Call Log | Phone book |
Ringing:
Answer | Reject |
2) Hard keys
- vm
- forward/dnd
- hold/unhold
- redial
- recall
- transfer
- conf
3) Line keys
- BLF monitoring
- directed pickup
4) VSC
- unpark
- transfer park
KX-UT136
1) Soft keys
Idle:
Settings | Call Log | Phone book |
Call:
Blind | Phone book |
Call on hold:
Call Log | Phone book |
Ringing:
Answer | Reject |
2) Hard keys
- vm
- forward/dnd
- hold/unhold
- redial
- recall
- transfer
- conf
3) Line keys
- BLF monitoring
- directed pickup
4) VSC
- park/unpark
- transfer park
KX-UT248
1) Soft keys
Idle:
Settings | Call Log | Phone book |
Call:
Blind | Phone book |
Call on hold:
Call Log | Phone book |
Ringing:
Answer | Reject |
2) Hard keys
- vm
- forward/dnd
- hold/unhold
- redial
- recall
- transfer
- conf
3) Line keys
- BLF monitoring
- directed pickup
4) VSC
- park/unpark
- transfer park
IP222
1) Soft keys
Idle:
Setup | All Calls | Home | Calls | My favorites | Phonebook |
Call:
Hold | Transfer | Park | Cancel |
Call on hold:
Resume | Transfer | Park | Cancel |
Ringing:
Answer | Transfer | Silence | Reject |
2) Hard keys
- hold
- redial
3) Line keys
- BLF monitoring
4) VSC
- unpark
- transfer park
IP232
1) Soft keys
Idle:
Setup | All Calls | Home | Calls | My favorites | Phonebook |
Call:
Hold | Transfer | Park | Cancel |
Call on hold:
Resume | Transfer | Park | Cancel |
Ringing:
Answer | Transfer | Silence | Reject |
2) Hard keys
- hold
- redial
3) Line keys
- BLF monitoring
4) VSC
- unpark
- transfer park
IP111
1) Soft keys
Idle:
Setup | All Calls | Home | Calls | My favorites | Phonebook |
Call:
Hold | Transfer | Park | Cancel |
Call on hold:
Resume | Transfer | Park | Cancel |
Ringing:
Answer | Transfer | Silence | Reject |
2) Hard keys
- hold
- redial
3) Line keys
- BLF monitoring
4) VSC
- unpark
- transfer park
IP240
1) Soft keys
Not available.
2) Hard keys
- hold
- redial
- conference
- dnd
- forward
3) Line keys
- BLF monitoring
4) VSC
- transfer park
- unpark
In PBX environment, shared line appearance is supported for PBX subscribers. In comparison to the private line, subscriber registering for the shared line will, immediately after the successful registration, subscribe for Call-Info event. This subscribe is challenged for authentication and if the credentials are provided, subscriber is notified that the subscription is active. In the respective NOTIFY message, this is reflected in Subscription-State header set to active. NOTIFY also contains information about the status of the shared line in Call-Info header. If the appearance is not used, Call-Info header will describe the state as idle. In the NOTIFY message, this is reflected as “appearance-index=*;appearance-state=idle”.
If there is incoming call to the subscriber, the appearance index is created after the call is accepted and state will be set to active. Call-Info header will contain “appearance-index=1; appearance-state=active”. After call is finished and appearance is not used elsewhere, appearance index is removed and state is set to idle. In the case of outgoing call, subscription to line-seize event is required to be able to dial. Before dialing can be started, SUBSCRIBE to line-seize is sent. Consequently, subscriber receives NOTIFY for line-seize with active subscription state. Call-info subscription is updated accordingly, appearance is created and its state is set to seized. As soon as the call starts ringing, Call-Info status is updated to progressing and line-seize subscription is set to terminated with “reason=noresource” in Subscription-State header. When the call is accepted, Call-Info status is changed to active and set again to idle when call is finished. Also, the appearance index is removed.
You can order two commercial Unified Communication Clients for full end-to-end integration of voice, video, chat and presence features. There are two applications available:
- the sip:phone Desktop Client for Microsoft Windows, Apple OSX, and Linux;
- the sip:phone Mobile App for iOS and Android.
Both clients are fully brandable to the customer’s corporate identity. The clients are not part of the standard delivery and need to be licensed separately. This handbook discusses the mobile client in details.
We continuously develop the mobile clients to provide new features, as they do not support the full range of features yet.
The sip:phone Mobile App is a mobile client for iOS and Android that supports voice calls via SIP, as well as presence and instant messaging via XMPP. The following sections describe the steps needed to integrate it into your Sipwise C5.
Part of the mobile apps is a mechanism to sign up to the service via a 3rd party website, which is initiated on the login screen and rendered within the app. During the sign-up process, the 3rd party service is supposed to create a new account and subscriber in Sipwise C5 (e.g. automatically via the API) and provide the end user with the access credentials.
The mobile apps come with a zero config mechanism to simplify the end-customer log in using these credentials (especially ruling out the need to manually enter them). It makes it possible to deliver the access credentials via a side channel (e.g. Email, SMS) packed into a URL. The user just clicks the URL, and it automatically launches the app with the correct credentials. The following picture shows the overall workflow.
There are two components provided by a 3rd party system. One is the 3rd Party Sign-Up Form, and the other is the 3rd Party Launch Handler. The purpose of these components is to allow an end customer to open a link with the access credentials via the sip:phone app.
The 3rd Party Sign-Up Form is a website the app shows to the end user when he taps the sign-up link on the app Login Screen. There, the end customer usually provides his contact details like name, address, phone number and email address, etc. After validation, the website creates an account and a subscriber in Sipwise C5 via the API.
After successfully creating the account and the subscriber, this site needs to construct a specially crafted URL, which is sent back to the end customer via a side channel. Ideally, this channel would be an SMS if you want to verify the end customer’s mobile number, or an email if you want to check the email address.
The sip:phone app registers a URL schema handler for URLs starting with sipphone://. If you start such a link, the app performs a Base64 decoding of the string right after the sipphone:// prefix and then decrypts the resulting binary string via AES using the keys defined during the branding step. The resulting string is supposed to be
username=$user&server=$domain&password=$password.
Therefore, the 3rd Party Sign-Up Form needs to construct this string using the credentials defined while creating the subscriber via Sipwise C5 API, then encrypt it via AES, and finally perform a Base64 encoding of the result.
| info | |
Up until and including version mr6.5.6 of Sipwise C5 , the SIP login credentials are used here. Future versions will connect to the REST interface of Sipwise C5 using the web credentials first and fetch the SIP credentials along with other settings from there. |
An example Perl code performs encoding of such a string. The AES key and initialization vector ($key and $iv) are the standard values of the sip:phone app and should work until you specified other values during the branding process.
#!/usr/bin/perl -w
use strict;
use Crypt::Rijndael;
use MIME::Base64;
use URI::Escape;

my $key = 'iBmTdavJ8joPW3HO';
my $iv = 'tww21lQe6cmywrp3';

my $plain = do { local $/; <> };
# pkcs#5 padding to 16 bytes blocksize
my $pad = 16 - (length $plain) % 16;
$plain .= pack('C', $pad) x $pad;

my $cipher = Crypt::Rijndael->new(
        $key,
        Crypt::Rijndael::MODE_CBC()
);
$cipher->set_iv($iv);
my $crypted = $cipher->encrypt($plain);
# store b64-encoded string and print to STDOUT
my $b64 = encode_base64($crypted, '');
print $b64, "\n";
# print to STDOUT using URL escaping also
print uri_escape($b64), "\n";
This snippet takes a string from STDIN, encrypts it via AES, encodes it via Base64 and sends the result to STDOUT. It also writes the second line with the same string, but this time, the URL is escaped. To test it, you would run it as follows on a shell, granted it’s stored at /path/to/encrypt.pl.
echo -n 'username=testuser&server=example.org&password=testpass' \
  | /path/to/encrypt.pl
This command would result in the output strings CI8VN8toaE40w8E4OH2rAuFj3Qev9QdLI/Wv/VaBCVK2yNkBZjxE9eafXkkrQfmYdeu01PquS5P40zhUq8Mfjg== and CI8VN8toaE40w8E4OH2rAuFj3Qev9QdLI%2FWv%2FVaBCVK2yNkBZjxE9eafXkkrQfmYdeu01PquS5P40zhUq8Mfjg%3D%3D. The sip:phone can use the former string to automatically fill in the login form of the Login Screen if started via a Link like sipphone://CI8VN8toaE40w8E4OH2rAuFj3Qev9QdLI/Wv/VaBCVK2yNkBZjxE9eafXkkrQfmYdeu01PquS5P40zhUq8Mfjg==.
Here is the same code in PHP.
#!/usr/bin/php
<?php
$key = "iBmTdavJ8joPW3HO";
$iv = "tww21lQe6cmywrp3";

$clear = fgets(STDIN);
$cipher = fnEncrypt($clear, $key, $iv);

echo $cipher, "\n";
echo urlencode($cipher), "\n";

function fnEncrypt($clear, $key, $iv) {
        $pad = 16 - strlen($clear) % 16;
        $clear .= str_repeat(pack('C', $pad), $pad);
        return rtrim(base64_encode(mcrypt_encrypt(
                MCRYPT_RIJNDAEL_128, $key, $clear,
                MCRYPT_MODE_CBC, $iv)), "\0");
}
?>
Similar to the Perl code, you can call it like this:
echo -n 'username=testuser&server=example.org&password=testpass' \
  | /path/to/encrypt.php
However, a URL with the sipphone:// schema is not displayed as a link in an SMS or an Email client and thus can not be clicked by the end customer, so you need to make a detour via a regular http:// URL. To do so, you need a 3rd Party Launch Handler to trick the phone to open such a link.
Therefore, that the 3rd Party Sign-Up Form needs to return a link containing a URL pointing to the 3rd Party Launch Handler and pass the URL escaped string gathered above to the client via an SMS or an Email. Since it is the regular http:// link, it is clickable on the phone and can be launched from virtually any client (SMS, Email, etc.), which correctly renders an HTML link.
A possible SMS sent to the end customer (via the phone number entered in the sign-up from) could, therefore, look as follows (trying to stay below 140 chars).
http://example.org/p?c=CI8VN8toaE40w8E4OH2rAuFj3Qev9QdLI
%2FWv%2FVaBCVK2yNkBZjxE9eafXkkrQfmYdeu01PquS5P40zhUq8Mfjg%3D%3D to launch sipphone
An HTML Email could look like this:
Welcome to Example.org,
<a href="http://www.example.org/sipphone?c=CI8VN8toaE40w8E4OH2rAuFj3Qev9QdLI
%2FWv%2FVaBCVK2yNkBZjxE9eafXkkrQfmYdeu01PquS5P40zhUq8Mfjg%3D%3D">
click here
</a> to log in.
That way, you can do both: verify the contact details of the end customer, and send the end customer the login credentials in a secure manner.
The URL http://www.example.org/sipphone mentioned above can be any simple script, and its sole purpose is to send back a 301 Moved Permanently or 302 Moved Temporarily with a Location: sipphone://xxxxxxxxxxxx header to tell the phone to open this link via the sip:phone app. The xxxxxxxxxxxx is the plain (non-URL-escaped) string generated by the above script.
An example CGI script performing this task follows.
#!/usr/bin/perl -w
use strict;
use CGI;

my $q = CGI->new;
my $c = $q->param('c');
print CGI::redirect("sipphone://$c");
The script simply takes the URL parameter c from the URL http://www.example.org/sipphone?c=CI8VN8toaE40w8E4OH2rAuFj3Qev9QdLI%2FWv%2FVaBCVK2yNkBZjxE9eafXkkrQfmYdeu01PquS5P40zhUq8Mfjg%3D%3D crafted above and puts its content into a Location header using the sipphone:// schema, and finally sends a 301 Moved Permanently back to the phone.
The phone follows the redirect by opening the URL using the sip:phone app, which in turn decrypts the content and fills in the login form.
| info | |
Future versions of Sipwise C5 will be shipped with this launch handler integrated into the system. Up until and including the version mr6.5.6, this script needs to be installed on any webserver manually. |
The mobile push functionality provides the remote start of a mobile application on incoming calls via the Google GCM or the Apple APNS notification services. It enables you to offer your subscribers a modern and convenient service on mobile devices.
| caution | |
Although suspending an application on a phone and waking it up via the mobile push notification service extends battery life, the whole mobile push notification concept is the best effort framework provided by Apple and Google for iOS and Android respectively, and therefore does not guarantee 100% reliability. |
If the mobile push functionality is enabled and there are no devices registered for a subscriber, the call-flow looks as follows.
- The caller sends INVITE to proxy
- The callee is offline, proxy forwards the call to AS (application server)
- AS subscribes to the callee’s registration events on proxy
- AS sends early media to the caller as a feedback, as the call initiation process might take a while
- AS sends the push request to GCM/APNS service
- GCM/APNS service delivers the push request to the callee
- The callee accepts the push request and confirms the mobile application start (unattended on Android), then the mobile application registers to proxy
- Proxy sends registration notification to AS
- AS deflects the call back to proxy
- Proxy sends INVITE to the callee
- The callee accepts the call
- The response is sent back to the caller. Hence, the call setup is completed
In the case of a time-out (no registration notification within a particular time), the application server rejects the call request with an error.
Follow this checklist to make sure you’ve completed all the steps. If you miss anything, the service may not work as expected.
| Name | Description | Link |
|---|---|---|
Obtain a trusted SSL certificate from a CA | Required for either application | |
Create an Apple developer account and enable the push notification service | For iOS mobile application | Section 17.2.2.4, “Create an Apple Account and Enable the Push Notification Service” |
Obtain the Apple certificate for the app | For iOS mobile application | Section 17.2.2.5, “Obtain an Apple SSL Certificate and a Private Key” |
Obtain the API key for the app from Google | For Android mobile application | Section 17.2.2.6, “Obtain the API Key for the App from Google” |
Provide the required information to developers | It is required to make beta builds and publish the apps | Section 17.2.2.7, “Provide the Required Information to Developers” |
Adjust the configuration | Adjust the config.yml file and apply the changes (usually performed by Sipwise) | Section 17.2.2.8, “Adjust Sipwise C5 Configuration (Usually Performed by Sipwise)” |
Recheck your DNS Zone configuration | Check that the DNS Zone is correctly configured | |
Add DNS SRV records | Create specific DNS SRV records for SIP and XMPP services | |
Check NTP configuration | Ensure that all your servers show exact time | |
Enable Apple/Google Mobile Push in the Admin Panel | It can be enabled for a domain or separate subscribers | |
Configure a mobile application | Check that subscribers can easily install and use your application |
A trusted SSL certificate is required, and we suggest obtaining it before starting the configuration.
The mobile application uses respective iOS/Android libraries to establish a secure TLS connection with certain Sipwise C5 services, such as SIP/XMPP/pushd(https). A signed SSL certificate is required to guarantee the security of this connection.
Any Certificate Authority (CA) such as Verisign and others can provide you with the required trusted SSL certificate (a certificate and the key files) which you will use in the configuration below.
Below is a brief instruction on how to create an Apple account and enable the Push Notification Service in it. You may need to perform additional steps depending on your project.
| info | |
You may only create an Apple account (step 1 below) and enroll into the Apple Developer Program (step 2 below) and Sipwise developers will do the rest. Still, you can perform all the steps by yourself. |
- Create an Apple developer account to get the Apple ID for your company. For this, go to developer.apple.com/account
- Enrol in the Apple Developer Program. It is required to configure push notifications as you will need a push notification certificate for your App ID, which requires the Apple Developer Program membership. Go to developer.apple.com/programs for more details.
Register an App ID:
Sign into developer.apple.com/account.
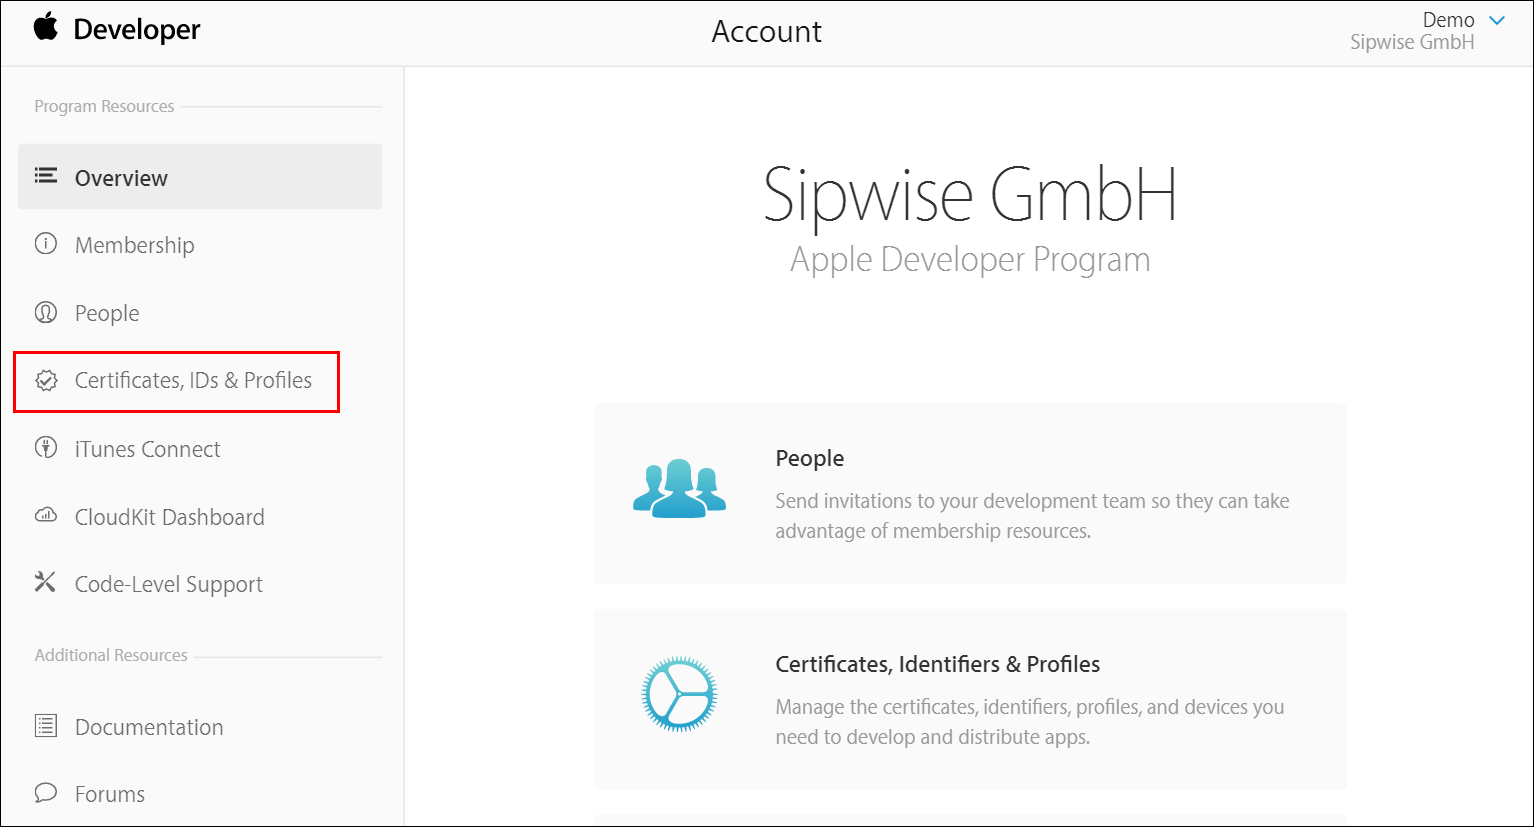
Click Certificates, IDs & Profiles.
Under Identifiers, select App IDs.
Click the Add button (+) in the upper-right corner.
Enter a name for the App ID in the App ID Description block. This helps you identify the App ID later.
Select Explicit App ID and enter the app’s bundle ID in the Bundle ID field. Note that an explicit App ID exactly matches the bundle ID of an app you are building — for example, com.example.push. An explicit App ID can not contain an asterisk (*).
In the App Services section enable Push Notifications. Click Continue to submit the form
- Click Submit to create the App ID.
Create a CSR (Certificate Signing Request):
Sign into developer.apple.com/account/ios/certificate.
Click the Add button (+) in the upper-right corner.
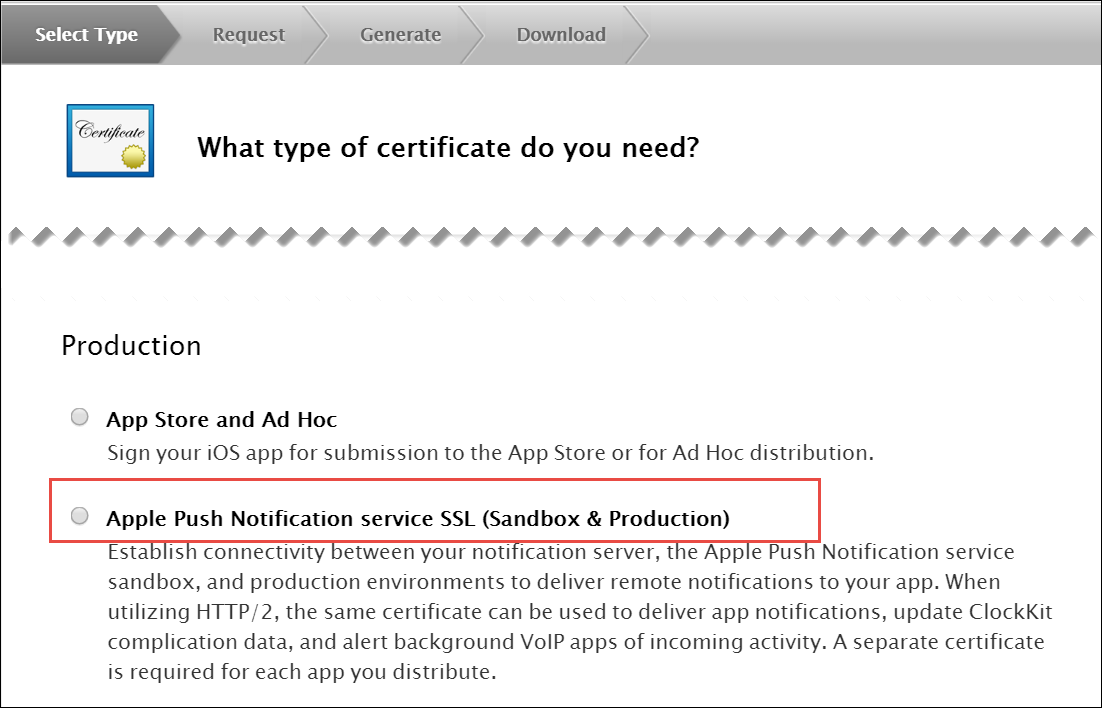
Select Apple Push Notification service SSL (Sandbox & Production) as the certificate type and click Continue.
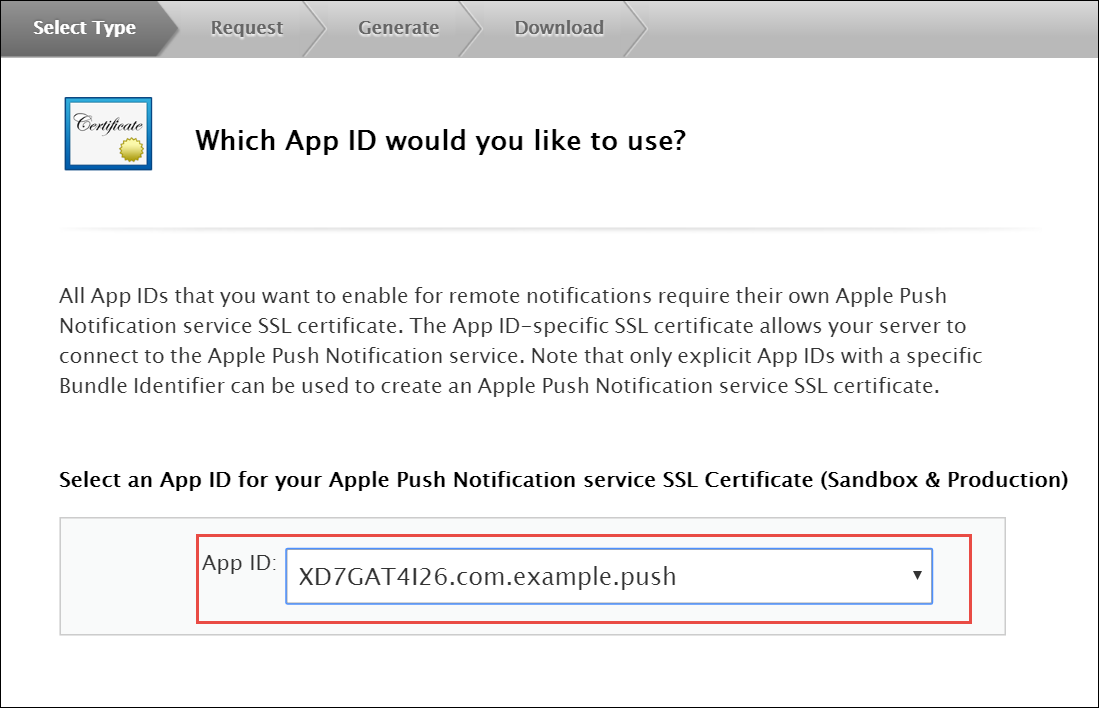
Select your App ID and click Continue.
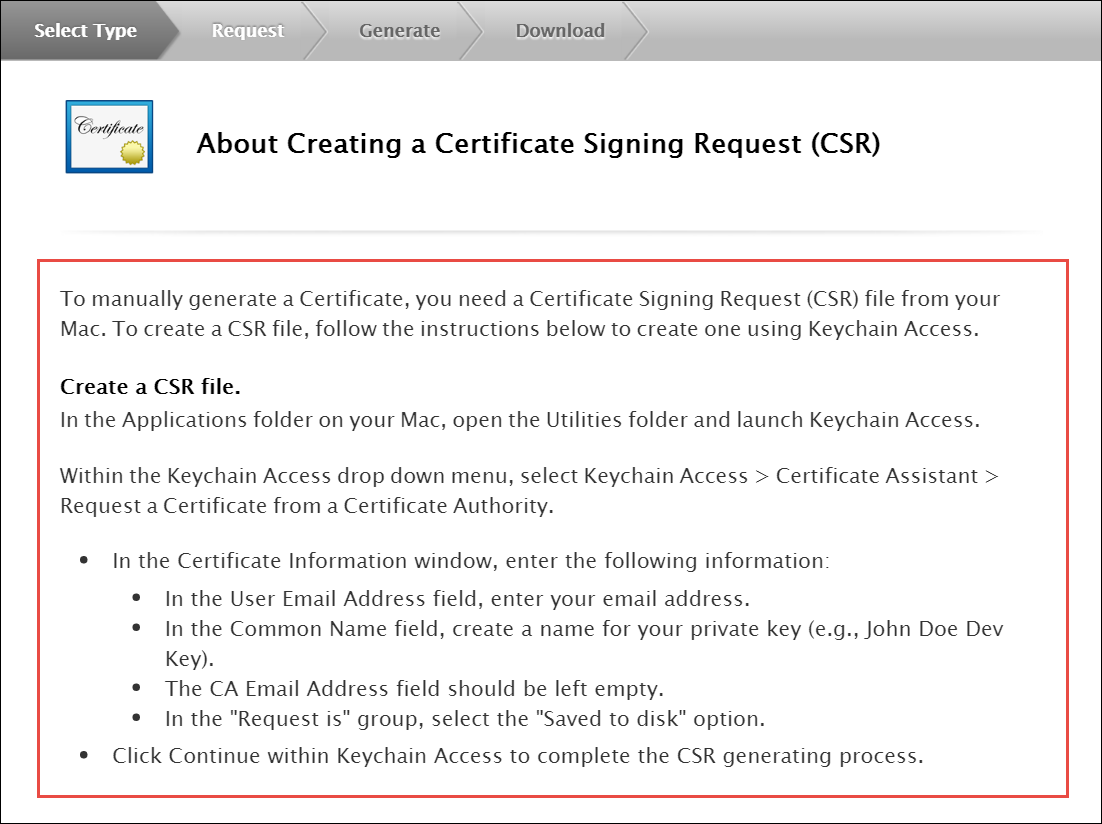
- Read the information about creating a CSR.
Follow the instructions to create a CSR using Keychain Access in MAC.
info If you do not have access to a Mac, you can still create a CSR in Linux or Windows using OpenSSL, for example.
Get the Certificate and Private Key
When you have the CSR file return to the browser and click Continue.
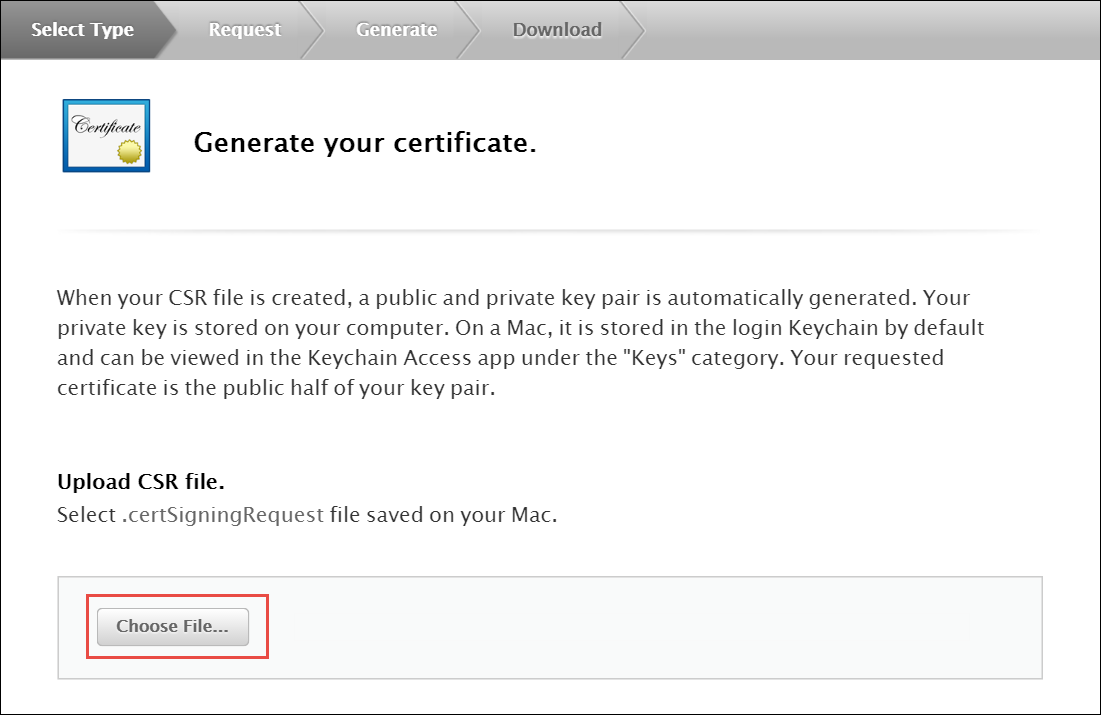
Click Choose File… in your browser.
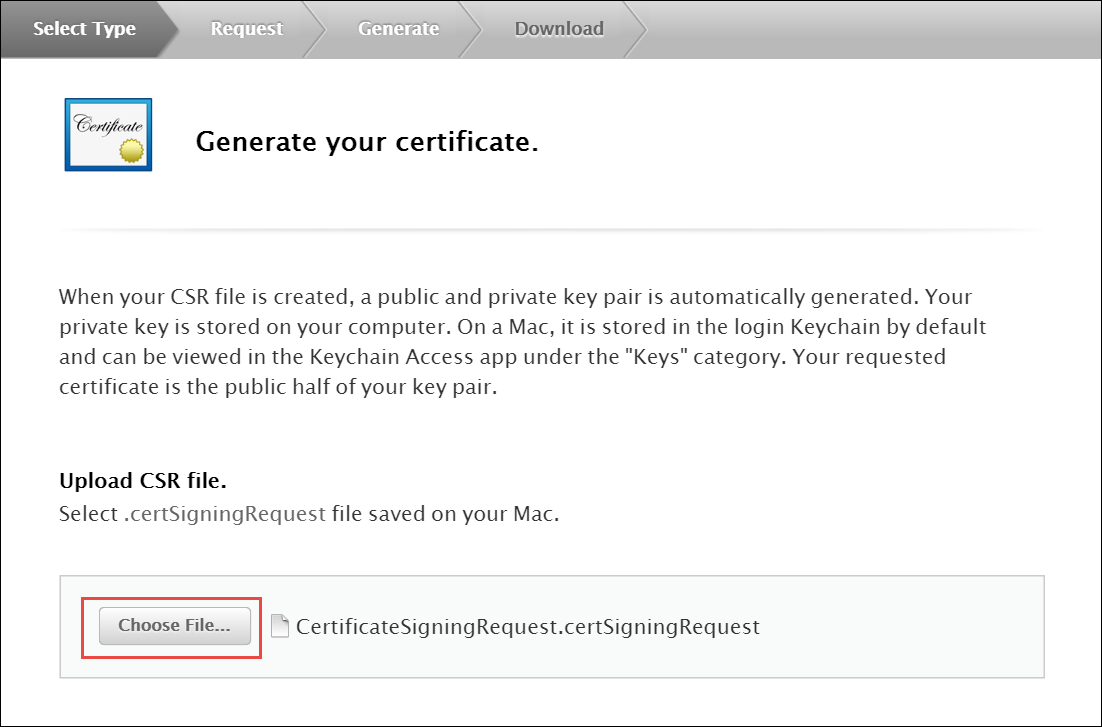
Select the CSR file you just created and saved and click Continue.
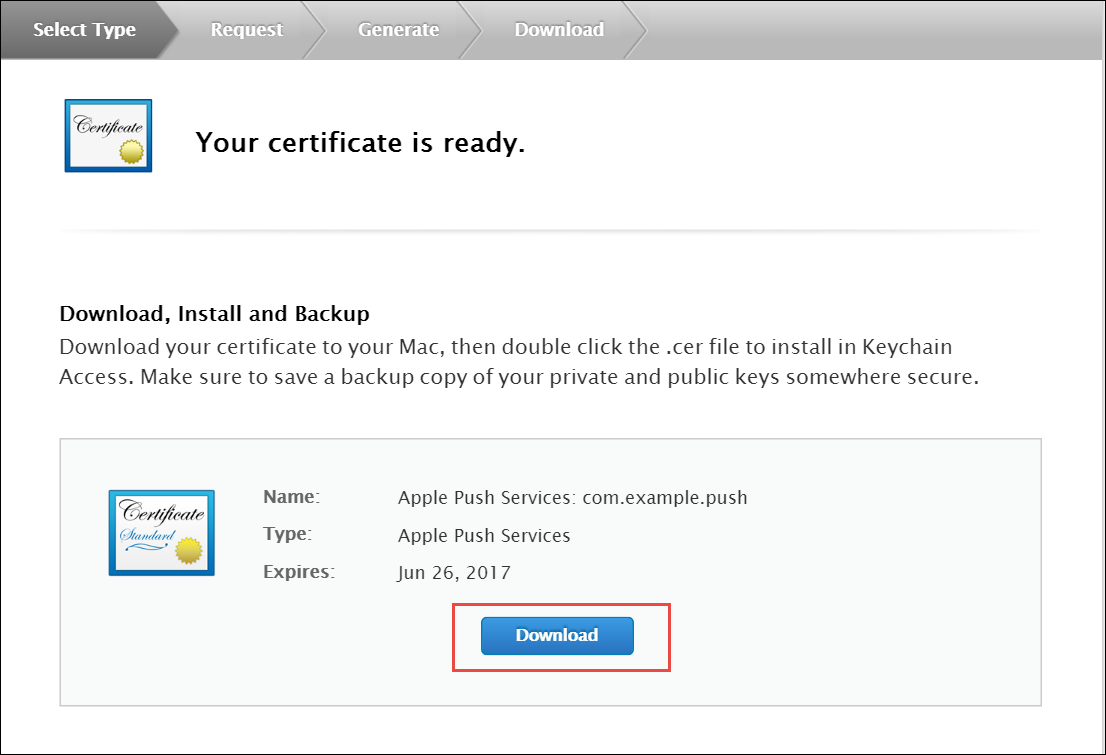
- Click Download to download the certificate (give it the aps.cer name).
- Open the downloaded certificate file (it should automatically be opened in Keychain Access, otherwise open it manually in Keychain Access).
- Find the certificate you just opened/imported in Keychain Access.
- Expand the certificate to show the Private Key.
- Select only the Private Key portion of the certificate, right-click on it and select Export "Common Name"… from the menu.
- Choose a location (e.g. Desktop) and filename to export the .p12 file to and click Save.
- Optionally pick a password for the .p12 file to protect its private key contents and click OK. (You will then need to enter your log-in password to permit the export).
Generate a PEM file from the p12 file:
- Open up your terminal and run the following commands to create a PEM file from the p12 file (If you input a password for the p12 file, you will need to enter it here):
cd ~/Desktop
openssl x509 -in aps.cer -inform der -out PushChatCert.pem
openssl pkcs12 -in PushChatCert.p12 -out PushCertificate.pem -nodes –clcerts
openssl pkcs12 -nocerts -out PushChatKey.pem -in PushChatKey.p12
You can use Google Cloud Messaging (GCM) to send push notifications to your subscribers with Android-based mobile devices. Google Cloud Messaging is a free service that acts as an intermediary between Sipwise C5 and devices of your subscribers. Google’s Cloud Connection Server (CCS), a part of GCP, manages the persistent connections with mobile devices to deliver your push notifications.
While communicating with CCS, Sipwise C5 identifies itself using an API key. To get it, follow the steps below.
Create a new project in the Google APIs Console page. For this go to code.google.com/apis/console.
Click Create a Project..
Input the project name, agree with the Terms of Service and click Create.
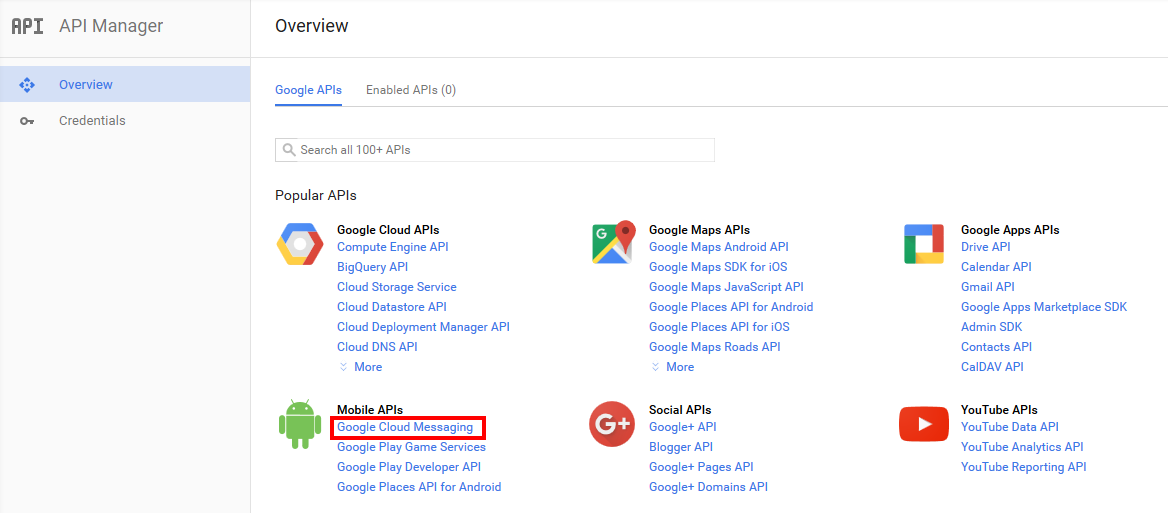
Click Google Cloud Messaging on the Overview page.
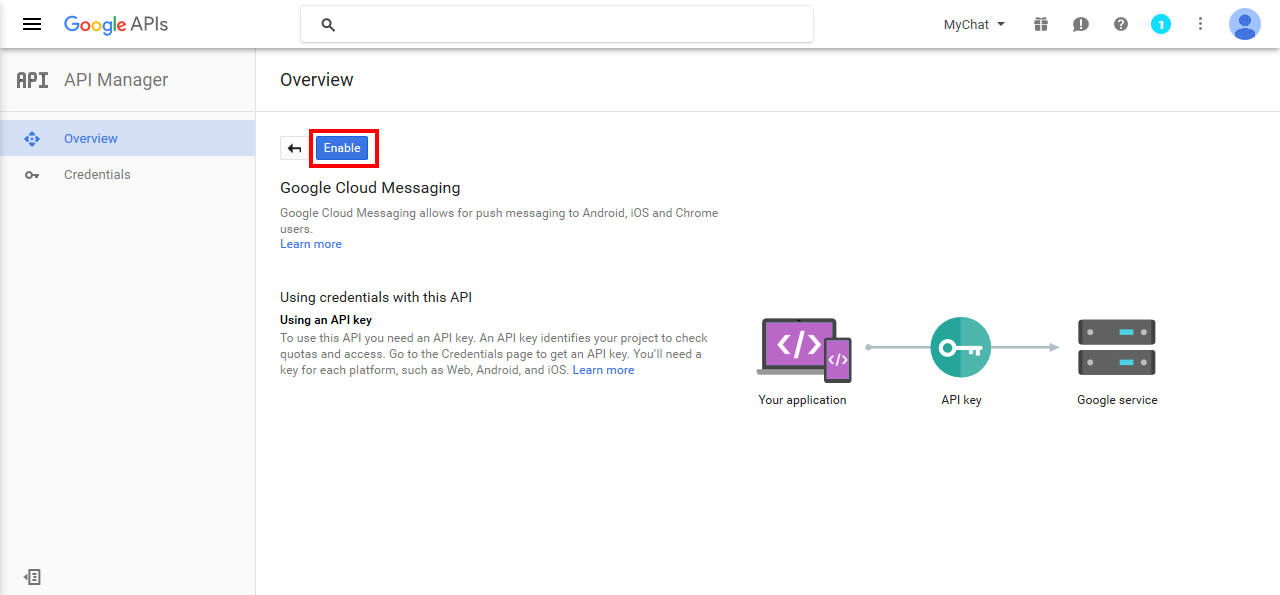
Click Enable for the Google Cloud Messaging.
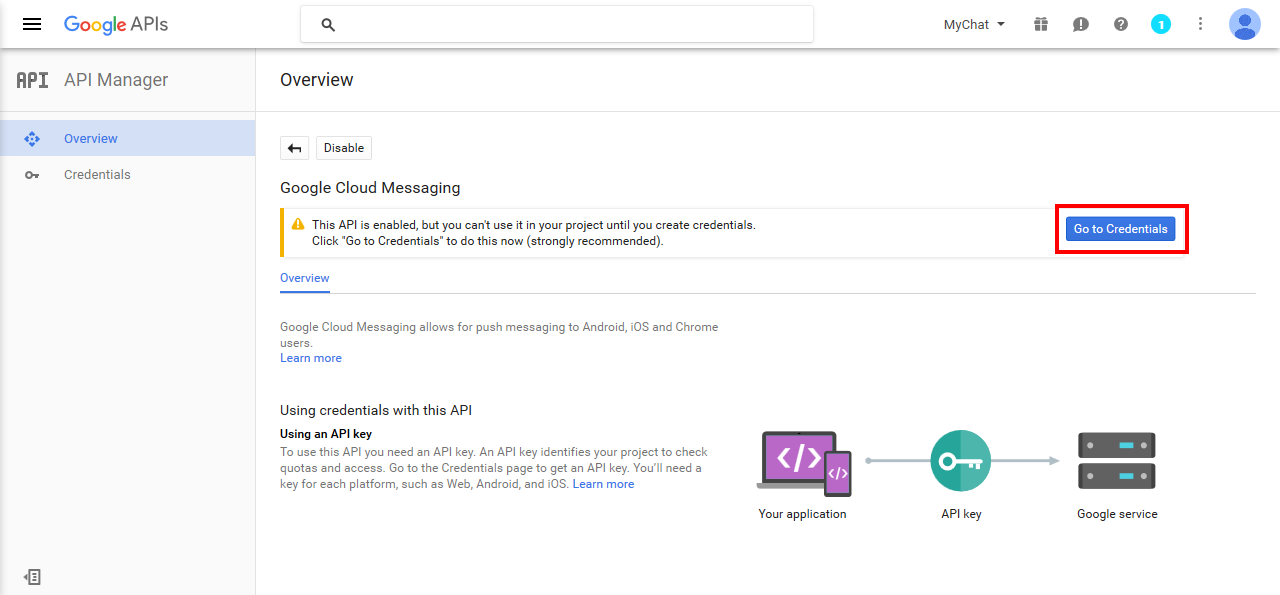
Click Go to Credentials.
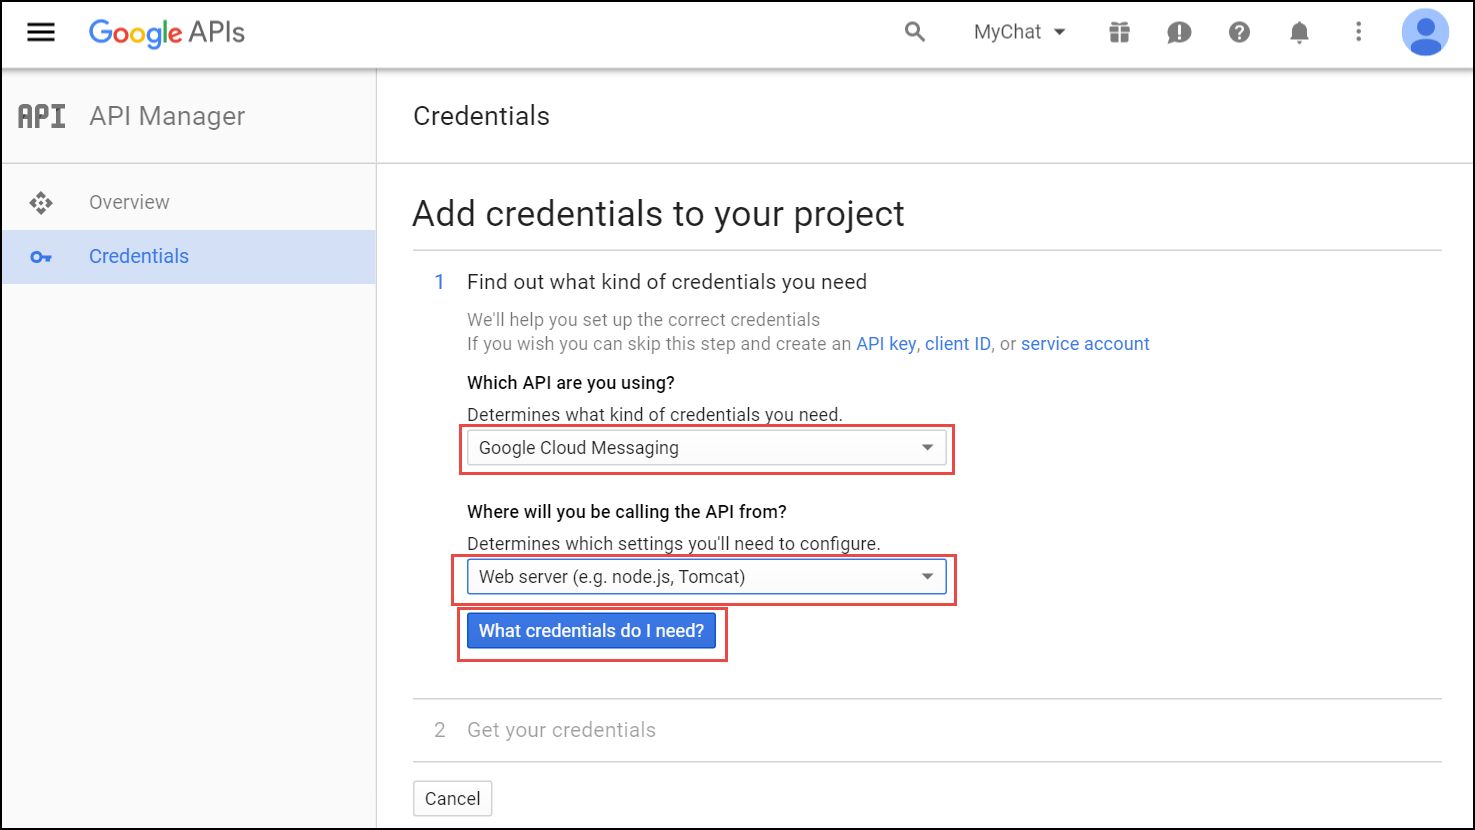
Select Google Cloud Messaging and Web Server from the corresponding lists and click What credentials do I need?
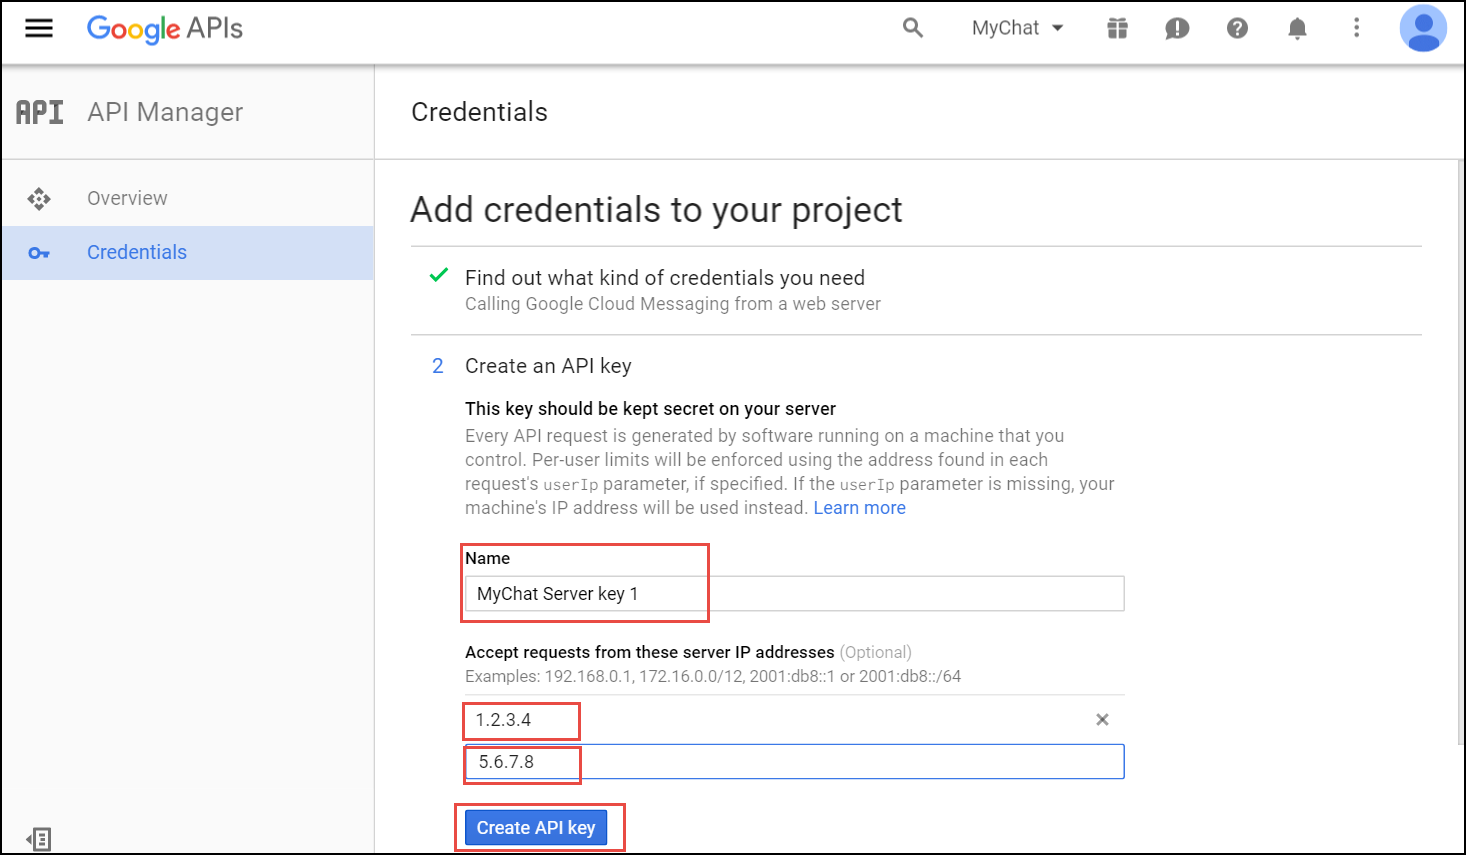
Adjust the API Key name and input the IP addresses of all your load balancers under Accept requests from these server IP addresses. Click Create API key.
info You may skip adding the IP addresses, otherwise list ALL your load balancers.
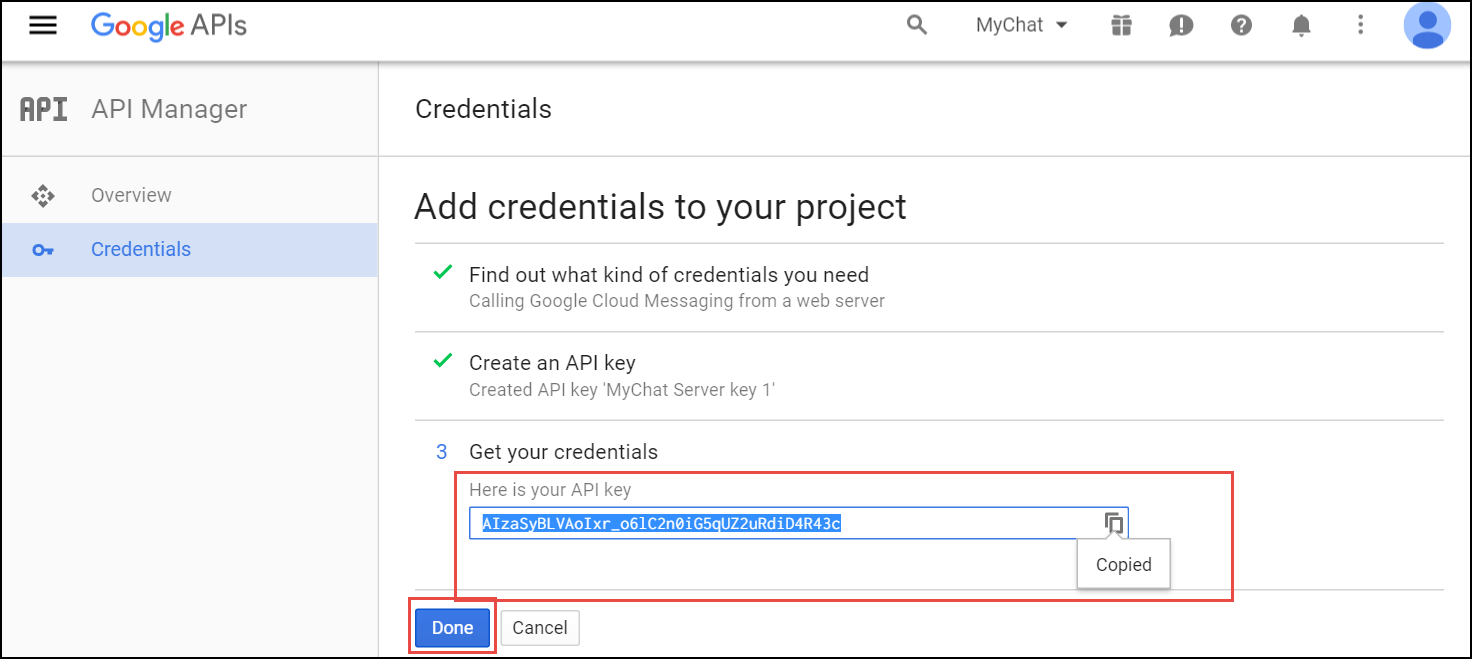
Copy your API key and click Done. Save the API key for future use.
Please, provide Sipwise developers with the following files and information so that they can make beta builds and submit the application to the App Store:
- Access to your Apple developer account
- The trusted SSL certificate and its private key
- The Apple SSL certificate and its private key
For the Android application, provide the following:
- Access to your Google developer account
- Google application API key
- Upload the Apple SSL certificate (PushChatCert.pem) and the private key (PushChatKey.pem) to /etc/ngcp-config/ssl/
- Upload the trusted SSL certificate (CAsigned.crt) and the private key (CAsigned.key) to /etc/ngcp-config/ssl/
Specify the corresponding paths and names in the pushd section of the config.yml file:
apns: section (For iOS mobile application)
- certificate: '/etc/ngcp-config/ssl/PushChatCert.pem'
- enable: yes
- key: '/etc/ngcp-config/ssl/PushChatKey.pem'
- enable: yes
gcm: section (for Android mobile application)
- enable: yes
- key: 'google_server_api_key_here'
- ssl: yes
- sslcertfile: /etc/ngcp-config/ssl/CAsigned.crt
sslcertkeyfile: /etc/ngcp-config/ssl/CAsigned.key
You can find an example of /etc/ngcp-config/config.yml configuration in the config.yml overview section.
- Apply your changes:
ngcpcfg apply 'enabled the backup feature.'
ngcpcfg push all
Check that your NS and A DNS records are correctly configured.
Let’s consider the following example: * the load-balancers have the lb01a.example.com and the lb01b.example.com names * the shared name is lb01.example.com and the shared IP address is 1.1.1.1 * the service name is voipservice.example.com
The following DNS records must be present:
Server Name | Record type | IP Address |
lb01a.example.com | A | 1.2.3.4 |
lb01b.example.com | A | 5.6.7.8 |
lb01.example.com | A | 1.1.1.1 |
voipservice.example.com | A | 1.1.1.1 |
Add at least one record for each service: xmpp-server, xmpp-client, sips.
A regular SRV record has the following form:
_service._proto.name. TTL class SRV priority weight port target
- service: the symbolic name of the service (xmpp-server, xmpp-client, sips).
- proto: the transport protocol of the desired service (TCP).
- name: the domain name (ending in a dot).
- TTL: standard DNS time to live field.
- class: the standard DNS class field (this is always IN).
- priority: the priority of the target host (lower value means more preferred).
- weight: a relative weight for records with the same priority (the higher the value, the more requests will be sent).
- port: the TCP or UDP port of the service.
- target: the canonical hostname of the machine providing the service (ending in a dot).
Here are examples of the SRV records:
_xmpp-server._tcp.voipservice.example.com. 18000 IN SRV 10 50 5269 voipservice.example.com.
_xmpp-client._tcp.voipservice.example.com. 18000 IN SRV 10 50 5222 voipservice.example.com.
_sips._tcp.voipservice.example.com. 18000 IN SRV 10 100 5061 voipservice.example.com.
You can always check whether the required SRV records are configured by executing the following commands:
dig SRV _xmpp-client._tcp.voipservice.example.net
dig SRV _xmpp-server._tcp.voipservice.example.net
dig SRV _sips._tcp.voipservice.example.net
We strongly suggest that the clocks of all the nodes within the platform are synchronized. To ensure this, check that the NTP service is correctly configured on all your Sipwise C5 servers and works reliably. Execute the following command for quick test of time synchronization:
ntpq –p
If the current node synchronizes with an NTP server, this server will be marked by the star (*) symbol.
It can be enabled for a domain or separate subscribers in the Admin Panel.
To enable the service for a domain:
- Go to Settings→Domains and click on the Preferences button of the domain you want to enable Apple/Google Mobile Push for.
- Go to the Internals group and enable the mobile_push_enable parameter.
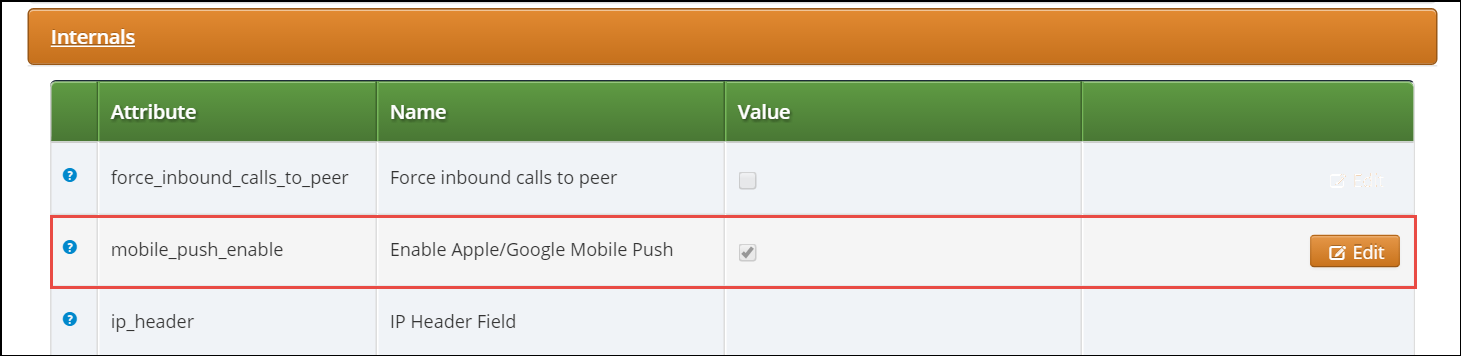
Perform tests when the application is available:
- Download and install the application.
- Open the application and input your registration username in the username@domain.name format and password.
- Review the quality of application branding.
- Make test calls.
- Test the presence functionality.
- Test the chat and group chat.
- Test messaging.
- Test the sharing functionality (e.g. pictures, video and voice messages and maps).
- Check the application phone book integration with the phone’s one
Make sure that the subscribers can start using your services in the easiest possible way.
The Sipwise Sipwise C5, as a communications platform carrying voice, fax and messaging data has to provide means for lawful interception of the content of communication by third party entities. Those Law Enforcement Agencies (LEAs) have to be able to connect to Sipwise C5 platform in a standardized way — ETSI, 3GPP and other organisations define the interface (and data exchange) between telecommunication operators and LEAs.
High level overview of lawful interception is shown in the following figure:
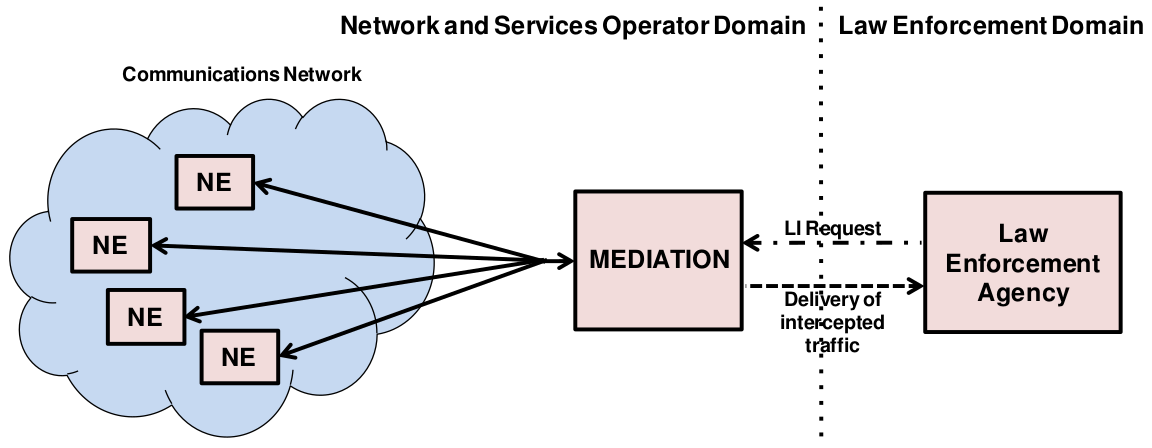
Main interfaces of lawful interception according to ETSI standard:
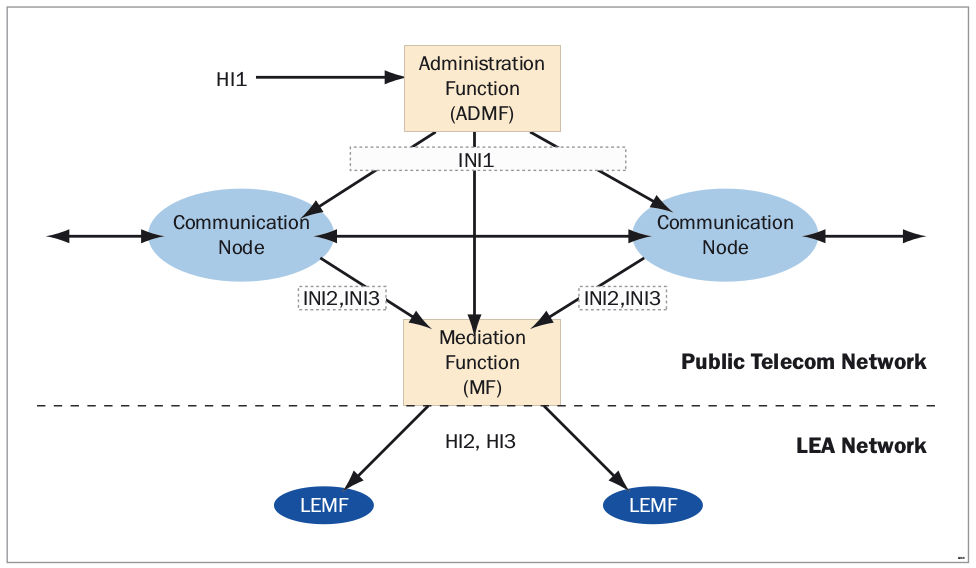
- Content of Communication (CC)
Information exchanged between two or more users of a telecommunications service, excluding Intercept Related Information.
info This includes information which may, as part of some telecommunications service, be stored by one user for subsequent retrieval by another.
- CC Internal Interception Function (CC-IIF)
- The CC-IIF shall cause the CC, specified by the CCTF, via the CCCI to be duplicated and passed to the MF.
- Content of Communication Control Interface (CCCI)
- Carries controls information from the CCTF to the CC-IIF.
- CC Trigger Function (CCTF)
- The purpose of the CCTF is to determine the location of the CC-IIF device associated to the target CC traffic, and to control the CC-IIF via the CCCI interface.
- Content of Communication Trigger Interface (CCTI)
- Carries trigger information from the IRI-IIF to the CCTF.
- Handover Interface (HI)
- Physical and logical interface across which the interception measures are requested from an operator, and the results of interception are delivered from an operator to an LEMF.
- Intercept Related Information (IRI)
- Collection of information or data associated with telecommunication services involving the target identity, specifically call or service associated information or data (e.g. call identifier, unsuccessful call attempts) and location information.
- Intercept Related Information Internal Interception Function (IRI-IIF)
- The purpose of the IRI-IIF is to generate IRI information associated with sessions, calls, connections and any other information involving interception targets identified by Law Enforcement Agency (LEA) sessions.
- Internal Network Interface (INI)
- Network’s internal interface between the Internal Intercepting Function and a mediation function.
- Law Enforcement Agency (LEA)
- Organization authorized, by a lawful authorization based on a national law, to request interception measures and to receive the results of telecommunications interceptions.
- Law Enforcement Monitoring Facility (LEMF)
- Law enforcement facility designated as the transmission destination for the results of interception relating to a particular interception subject.
- Lawful Interception Administration Function (AF)
- The AF ensures that an intercept request from a LEA for IRI or CC or both is provisioned for collection from the network, and subsequent delivery to the LEMF.
- Lawful Interception Mediation Function (MF)
Mechanism which passes information between an access provider or network operator or service provider and a handover interface.
- Firstly it receives information related to active intercepts from the IRI-IIF(s) and CC-IIF(s) within the service provider network.
- Secondly correlates and formats that IRI and CC information in real time for delivery to the LEMF over the HI2 and HI3 handover Interfaces.
- X1, X2 and X3 Interfaces
- The 3GPP standard for Lawful Interception defines the handover interfaces with different names compared to the ETSI standard. The Xn interface corresponds to the INIn interface and is functionally identical to the INIn interface.
Sipwise Sipwise C5 platform implements the functions defined by LI requirements in a way that it relies on a third party provider for the Lawful Interception Mediation Function (MF).
Regarding other LI functions that are defined by ETSI / 3GPP standards there are 2 possible implementations:
Sipwise Sipwise C5 behaves as the Administration Function (AF) but the actual call data capturing is carried out by other SIP endpoints. In this case Sipwise C5 forwards the calls to be intercepted to its SIP peers dedicated for LI service. Within the scope of SIP peer based solution there are still 2 modes of operation:
- Call loopback to NGCP: the LI peer receives the call, extracts IRI and CC data and then routes the call back to NGCP. Sipwise C5 handles the looped back call as if that was initiated from Sipwise C5 and sets up the second call leg to the destination.
- Call forwarded by peer directly to destination: in this case Sipwise C5 will handle the call to LI peer as an ordinary second call leg to the destination.
Sipwise Sipwise C5 itself provides the required LI functions: AF and call data capturing; IRI and CC of intercepted calls are forwarded to the third party MF from NGCP. Sipwise C5 can be configured in two modes:
- Non-Distributed: The LI roles are hosted on the PROXY nodes. The REST API endpoint to LEA will be the usual MGMT nodes.
- Distributed: The LI roles are hosted on geographically distributed LB+RTP nodes, for example one pair of LB+RTP nodes per country, each of which has different law enforcement authorities. The LB+RTP nodes will provide an ngcp-panel instance, which due to privacy laws is specially configured to store intercepts locally (the node will operate on its own set of data), and the external party (law enforcement, LI integration, etc.) interacts with the pertinent LB+RTP nodes via the REST API (or SOAP for older installations).
This handbook will discuss the second setup in detail in the following sections.
The below figure illustrates the logical connection of LI functions on Sipwise C5.
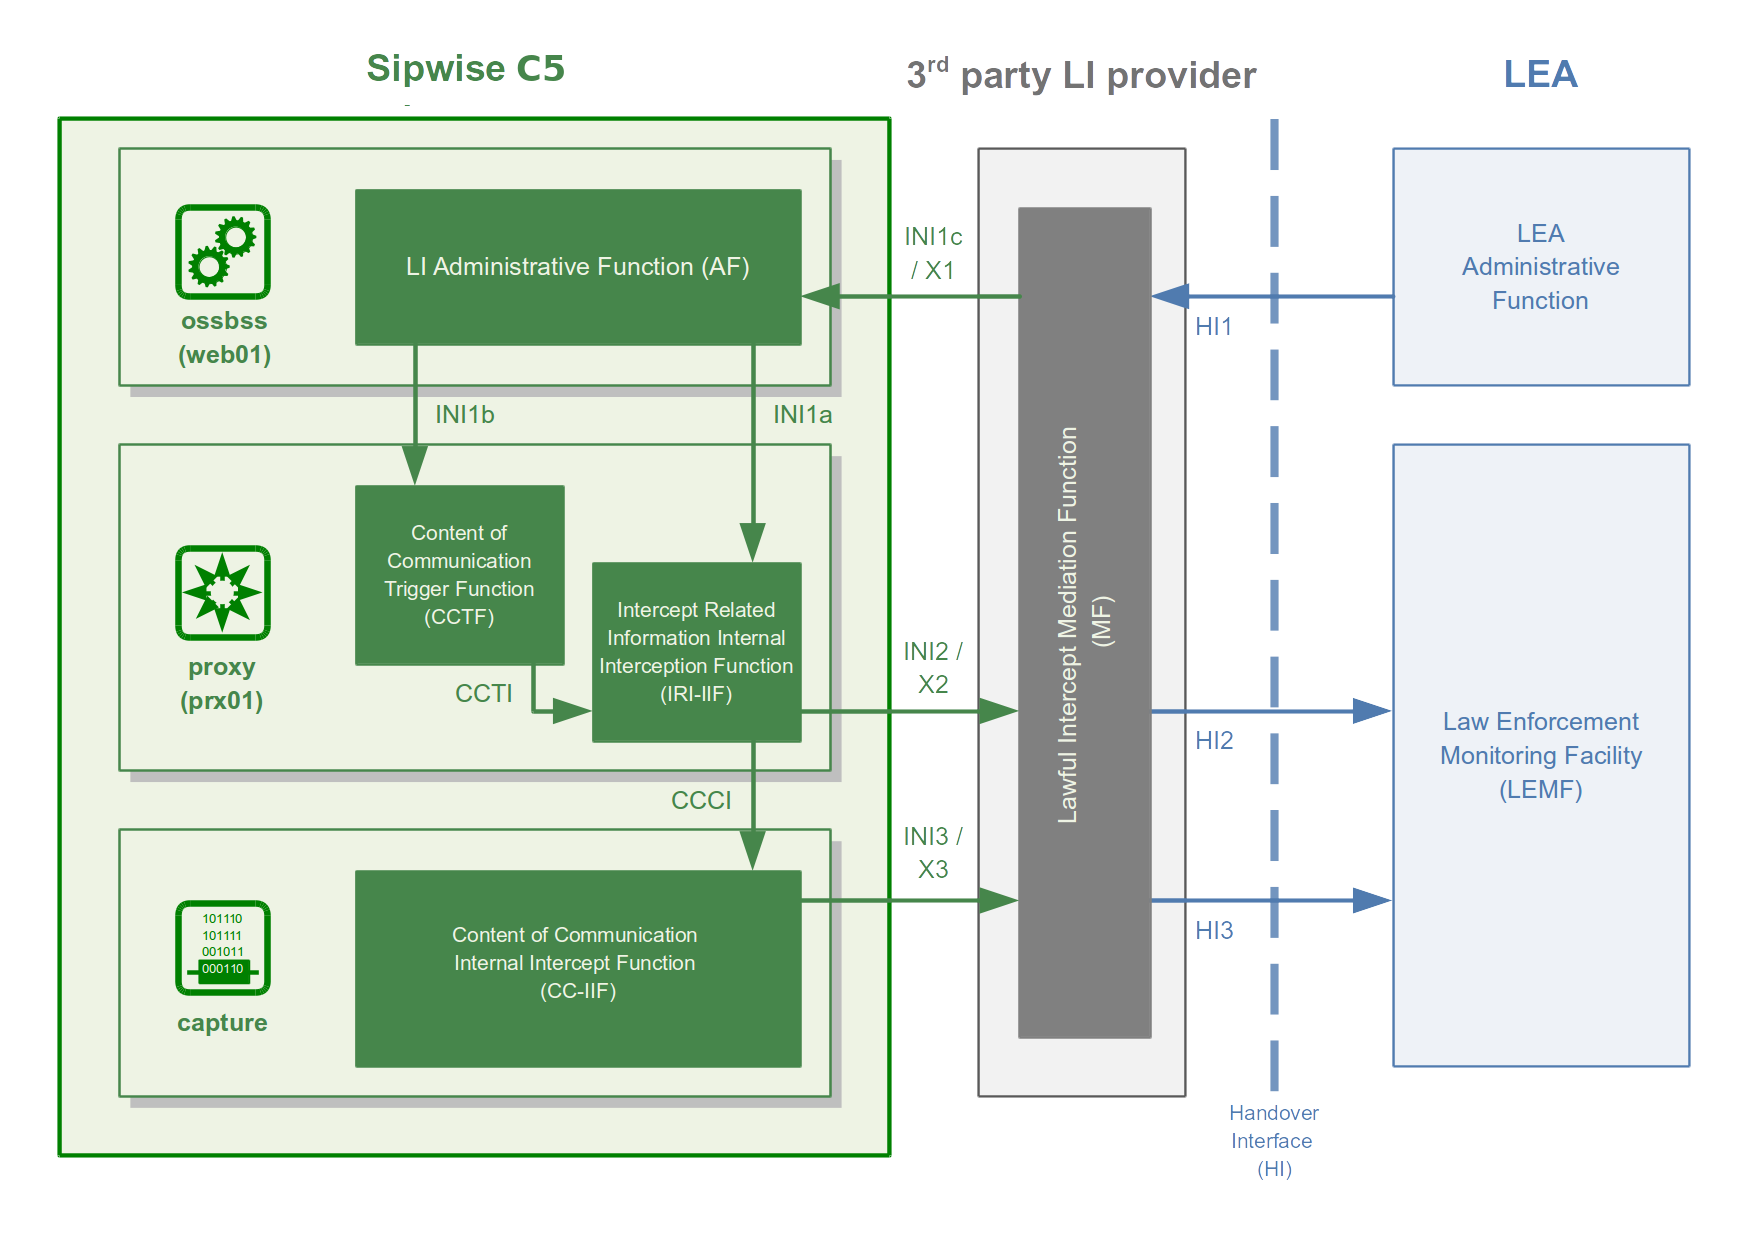
| info | |
This kind of LI implementation will be phased out in future Sipwise C5 releases.
A short description is kept here for reference, as Sipwise C5 still (as of version mr4.5.2)
supports LI services with |
The captagent based implementation of LI functions on Sipwise C5 includes the
following components:
captagent: a software module provided by a third party; its operation can be summarized as follows:
-
the
captagentprocess gets LI requests through an API - the process listens for and analyses SIP (INVITE) messages; based on the message headers it decides whether the SIP session must be intercepted
-
in case the session must be intercepted,
captagentsends IRI through X2 interface to the MF element - based on the SDP data, the process captures session media and forwards that through X3 interface to the MF element
-
the
-
third party MF: Group2000’s LIMA system playes the role of Mediation Function
(MF) and interacts with
captagentmodule, using X1, X2 and X3 interfaces.
Although the implementation of LI services with captagent is still available and
configurable on Sipwise C5, Sipwise suggests deploying a revised solution with
its voisniff-ng software module. This newer implementation also relies on a 3rd
party LI provider representing the LI Mediation Function (MF), where Sipwise currently
(as of Sipwise C5 version mr4.5.2) cooperates with Group2000, Pine and Utimaco.
Sipwise C5 components providing LI functions:
ngcp-panel: this module is responsible for managing REST API for the whole NGCP in general
-
runs on: the active node (
sp1 / sp2) on a Sipwise C5 platform - LI functions: AF; INI1 / X1 interface towards the MF
-
runs on: the active node (
kamailio-proxy: this module serves as a generic call control function on the NGCP
-
runs on: the active node (
sp1 / sp2) on a Sipwise C5 platform - LI functions: CCTF and IRI-IIF; INI2 / X2 interface towards the MF
-
runs on: the active node (
voisniff-ng: this module is a generic element for capturing SIP and RTP traffic on the NGCP
-
runs on: the active node (
sp1 / sp2) on a Sipwise C5 platform - LI functions: CC-IIF; INI3 / X3 interface towards the MF
-
runs on: the active node (
| info | |
The |
Authentication and Confidentiality
It is required that the communication between the telecommunication operator’s network element (that is: Sipwise C5) and the MF be authenticated and confidential, since the intercepted session related data and content of communication must not be disclosed to any 3rd party. For this purpose NGCP’s LI service applies authentication and LI session data encryption based on public key cryptography mechanism (TLS).
Both Sipwise C5 and the MF must authenticate themselves by certificates, for this reason Sipwise C5 operator must ensure that valid certificates are deployed on the system. There is a need to contact the 3rd party LI provider, so that he can provide the necessary client certificates that Sipwise C5 will use to setup secured connection to the MF on X2 and X3 interfaces.
Similarly, the MF provider must contact Sipwise C5 operator to offer him valid client certificates that the MF element will use to establish secured connection to the Sipwise C5 on X1 interface.
To enable LI services on Sipwise C5 the platform administrator
has to enable lawful interception through the main configuration
file (config.yml).
For a distributed setup, the cluster_sets.type variable has to be set to distributed (see Section 1.8, “cluster_sets” for more information) , and the lb nodes need to be assigned the li role. For a non-distributed setup, the proxy nodes need to be assigned the li role.
From the user and program point of view, the li role will only be visible in a node if the intercept.enable setting is set to yes. When the cluster is set up in a distributed mode (that is cluster_sets.type is set to distributed), the nodes will also have the li_dist virtual role visible, so that these can check for a single condition instead of multiple.
Here below is a sample configuration, which shows parameters of intercept and
voisniff sections.
intercept:
  captagent:
    cin_max: '3000'
    cin_min: '0'
    country_code: '49'
    debug: '7'
    filter: 'port 5080'
    license: ''
    port: '18090'
    prefix_len: '3'
    schema: http
  enable: no
  peer:
    acc: no
    inbound_prefix: LI_
    outbound_prefix: intercept_
  type: none

voisniff:
  admin_panel: yes
  daemon:
    bpf: 'port 5060 or 5062 or ip6 proto 44 or ip[6:2] & 0x1fff != 0'
    external_interfaces: eth0 eth2
    filter:
      exclude:
      - active: '0'
        case_insensitive: '1'
        pattern: '\ncseq: *\d+ +(register|notify|options)'
      include: []
    internal_interfaces: lo
    li_x1x2x3:
      call_id:
        suffix:
        - _pbx-1
        - _b2b-1
        - _xfer-1
      client_certificate: ''
      enable: no
      fix_checksums: no
      fragmented: no
      interface:
        excludes: []
      local_name: sipwise
      x1:
        port: '18090'
    mysql_dump:
      enable: yes
      num_threads: '4'
    mysql_dump_threads: '2'
    start: yes
    threads_per_interface: '2'
  partitions:
    increment: '700000'
    keep: '10'
Configuration Parameters
-
intercept.enable -
Set it to
yesif you want to activate LI service. Default:no -
intercept.peer.acc -
Calls to be intercepted may be forwarded to LI peers. The LI peer may forward
the call to the original destination, without looping the call back to NGCP.
Set this parameter to
yesif you want to enable billing for such calls. Default:no -
intercept.peer.inbound_prefix -
Calls to be intercepted may be forwarded to LI peers. This parameter specifies
the prefix that is prepended to SIP usernames when the call is looped back to
NGCP, in order to avoid sending the call again to any LI peer. Used by Sipwise C5 internally.
Default:
LI_ -
intercept.peer.outbound_prefix -
Calls to be intercepted may be forwarded to LI peers. This parameter specifies
the prefix that is prepended to SIP usernames when the call is routed to an LI
peer. It will be stripped off by rewrite rules of the peer, before sending the
call effectively to the peer. Used by Sipwise C5 internally.
Default:
intercept_ -
intercept.type The LI service provider module; allowed values are:
-
none: LI service is not activated -
peer: LI service is activated and call data capturing is performed by SIP peers -
captagent: LI service is activated and call data capturing is performed bycaptagentmodule -
voisniff: LI service is activated and call data capturing is performed byvoisniffmodule
Default:
none-
-
voisniff.admin_panel,voisniff.daemon.mysql_dump.*,voisniff.partitions.* - These parameters are not used in LI configuration, but only for call statistics which can be retrieved through the Admin web interface.
-
voisniff.daemon.bpf This sets the basic packet filter applied by
voisniff-ngmodule when capturing packets on network interfaces. Default:"port 5060 or 5062 or ip6 proto 44 or ip[6:2] & 0x1fff != 0"info The default value basically allows capturing SIP traffic only. It is usually necessary to modify the parameter in order to capture both SIP and RTP traffic. An example of such a value:
"udp or ip6 proto 44 or ip[6:2] & 0x1fff != 0".-
voisniff.daemon.external_interfaces This is a list of network interfaces (typically VLAN IDs) where
voisniff-ngshould listen for and capture packets.tip VLAN interfaces have to be listed when they are used for intercepted calls. On the other hand virtual interfaces for additional IP addresses (e.g. eth0:1) do not have to be listed separately, because the base interface (e.g. eth0) will be used to capture packets.
-
voisniff.daemon.filter.exclude Additional filter to determine packets that need to be excluded from capturing. This configuration parameter is a list of items, each of them has 3 components:
-
active: Determines whether the filter is active or not. Allowed values are:
0(false/inactive; this is the default) or1(true/active). -
case_insensitive: Determines whether the
patternis case-insensitive (1; this is the default) or not (0). - pattern: A regular expression providing the matching pattern for packets that have to be filtered.
-
active: Determines whether the filter is active or not. Allowed values are:
-
voisniff.daemon.filter.include -
Additional filter to determine packets that need to be included in capturing.
The parameter has the same syntax as
voisniff.daemon.filter.exclude. -
voisniff.daemon.internal_interfaces -
A list of network interfaces which are considered only for internal communication
between
voisniff-ngand other Sipwise C5 components. Packets on these interfaces are not captured. -
voisniff.daemon.li_x1x2x3.call_id.suffix List of NGCP-internal Call-ID suffix patterns that should be ignored when determining the original SIP Call-ID of an intercepted call.
caution Please do not change these patterns unless instructed to do so by a Sipwise engineer! Changing the patterns may result in falsely recognised Call-IDs and eventually missed SIP messages during an intercepted call.
-
voisniff.daemon.li_x1x2x3.client_certificate - The client certificate that Sipwise C5 uses to connect over TLS to a 3rd party LI provider.
-
voisniff.daemon.li_x1x2x3.enable -
Set it to
yesto enable LI services via X1, X2 and X3 interfaces. Default:no -
voisniff.daemon.li_x1x2x3.fix_checksums -
When enabled (=
yes), Sipwise C5 will calculate UDP header checksum for packets sent out on X2 and X3 interfaces. This is necessary when the checksum calculation is normally left to the network interface hardware and therefore the UDP header checksum is inherently incorrect on application level. Also the UDP checksum must be calculated by voisniff-ng on re-assembled packets, so enable this option if there are fragmented packets in intercepted call traffic. Default: disabled (=no) -
voisniff.daemon.li_x1x2x3.fragmented -
When disabled (=
no), voisniff-ng defragments all packets and sends out only reassembled packets via X2 and X3 interfaces. If the option is enabled (=yes), voisniff-ng will instead send out the original fragments via X2 and X3. Default:no -
voisniff.daemon.li_x1x2x3.interface.excludes -
This is a list of interfaces that must be excluded from the interception procedures.
The list contains regular expressions that describe the to-be-exluded interfaces,
for example:
- ^lo$to exclude the loopback interface. Default: empty list -
voisniff.daemon.li_x1x2x3.local_name This parameter maps to the
header.sourcefield of the X2 protocol. It’s an arbitrary string and can be used to identify the sending Sipwise C5 system. Default:sipwiseinfo As of Sipwise C5 version mr4.5.2, this is currently not used.
-
voisniff.daemon.li_x1x2x3.private_key - The private key that Sipwise C5 uses to connect over TLS to a 3rd party LI provider. Only necessary if the client certificate file does not include the private key.
-
voisniff.daemon.li_x1x2x3.x1.port The port number on which
voisniff-nglistens for incoming X1 messages. Default:18090caution You should leave the parameter set to the default value, unless there is a good reason to change it. The default value ensures backward compatibility with
captagentLI module.-
voisniff.daemon.start -
Determines whether
voisniffservice must be started on the platform. Set it toyesif you’d like to activatevoisniffthat is needed for LI service too. Default:yes -
voisniff.daemon.threads_per_interface This is a performance tuning option and controls how many threads per enabled sniffing interface should be launched. Example: if it’s set to 10 and 3 interfaces are enabled for sniffing, a total of 30 threads will be launched. Default:
2caution Do not set it to a high number, or simply leave it at its default value, unless there is a performance problem with
voisniffservice. Please keep in mind that a high number of threads might also decrease the overall system performance of NGCP!
Short description of Xn interfaces:
- The X1 interface is used by an LI provider to create, modify, delete and list interceptions on Sipwise C5 . It is designed as RESTful HTTP interface using JSON (with JSON-HAL in responses from the NGCP) as content type to provision interceptions.
- The X2 interface is a TLV based interface with JSON payload with a simple request/response mechanism over a secure TLS connection, used to pass intercepted signaling data towards an LI provider.
- The X3 interface is also a TLV based interface with a binary payload encapsulating the intercepted RTP data.
The resource used to work with interceptions is always https://ngcp-ip:1443/api/interceptions/
Authentication
Authentication and authorization on Sipwise C5 API is performed via HTTP Basic Auth or SSL Client certificates.
HTTP Basic Auth: With cURL use
--user username:passwordoption to specify your access credentials.curl -i -X GET --user myuser:mypassword https://example.org:1443/api/interceptions/
Additionally use the
--insecureoption if you are testing against a self-signed server certificate.SSL Client Authentication: You can generate and download client certificates for administrators and resellers via Sipwise C5 Panel in the Administrators view.
For the actual client authentication, you will need two files which you can download from the panel after creating the client certificates:
- The client certificate generated via Sipwise C5 Panel. This is usually labelled NGCP-API-client-certificate-xxxxx.pem.
- The CA certificate used to sign the server certificate, in case it as been self-signed or the CA is not recognized by the client host environment.
With cURL use
--cert /path/to/NGCPAPIclientcertificatexxxxx.pemto specify the client certificate, and --cacert /path/to/cacert.pemto specify the CA certificate in case of a self-signed server certificate.curl -i -X GET --cert /path/to/NGCPAPIclientcertificatexxxxx.pem \ --cacert /path/to/cacert.pem https://example.org:1443/api/interceptions/
Additionally use the
--insecureoption if you are testing against a self-signed server certificate.
API Description
- Collection Actions
Allowed methods for the collection as in METHOD
/api/interceptions/- OPTIONS
- POST
- GET
- HEAD
- Item Actions
Allowed methods for a collection item as in METHOD
/api/interceptions/id- PATCH
- OPTIONS
- DELETE
- PUT
- GET
- HEAD
- Properties
-
liid(Number): The LI ID for this interception. -
number(String): The number to intercept. -
x2_host(String): The IP address of the X2 interface. -
x2_password(null, String): The password for authenticating on the X2 interface. -
x2_port(Number): The port of the X2 interface. -
x2_user(null, String): The username for authenticating on the X2 interface. -
x3_host(null, String): The IP address of the X3 interface. -
x3_port(null, Number): The port of the X3 interface. -
x3_required(null, Boolean): Whether to also intercept call content via X3 interface (falseby default).
-
- Query Parameters
-
liid: Filter for interceptions of a specific interception ID -
number: Filter for interceptions of a specific number (in E.164 format) -
order_by: Order collection by a specific attribute. Possible values are:id, reseller_id, liid, number, cc_required, delivery_host, delivery_port, delivery_user, delivery_pass, modify_timestamp, create_timestamp, deleted, uuid, sip_username, sip_domain, cc_delivery_host, cc_delivery_port -
order_by_direction: Direction which the collection should be ordered by. Possible values are:asc (default), desc
-
API Examples
Get a specific interception
Request:
curl -i --insecure --user administrator:administrator -X GET https://localhost:1443/api/interceptions/528
Response:
HTTP/1.1 200 OK Server: nginx Date: Tue, 01 Dec 2015 09:43:41 GMT ContentType: application/hal+json; profile="http://purl.org/sipwise/ngcpapi/"; charset=utf8 ContentLength: 634 Connection: keepalive Link: </api/interceptions/>; rel=collection Link: <http://purl.org/sipwise/ngcpapi/>; rel=profile Link: </api/interceptions/528>; rel="item self" SetCookie: ngcp_panel_session=35b56d921c36c1fc6edb8fcd0a86dd9af61ec62a; path=/; expires=Tue, 01Dec 2015 10:43:41 GMT; HttpOnly StrictTransportSecurity: maxage=15768000 { "_links" : { "collection" : { "href" : "/api/interceptions/" }, "curies" : { "href" : "http://purl.org/sipwise/ngcpapi/#rel{rel}", "name" : "ngcp", "templated" : true }, "profile" : { "href" : "http://purl.org/sipwise/ngcpapi/" }, "self" : { "href" : "/api/interceptions/528" } }, "id" : 528, "liid" : 918273, "number" : "0014155550132", "x2_host" : "192.168.42.42", "x2_password" : null, "x2_port" : 3002, "x2_user" : null, "x3_host" : "192.168.42.42", "x3_port" : 3003, "x3_required" : true }
Get all interceptions for a number
Request:
curl -i --insecure --user administrator:administrator -X GET \ https://localhost:1443/api/interceptions/?number=0014155550132
Response:
HTTP/1.1 200 OK Server: nginx Date: Tue, 01 Dec 2015 09:47:36 GMT ContentType: application/hal+json; profile="http://purl.org/sipwise/ngcpapi/"; charset=utf8 ContentLength: 1283 Connection: keepalive SetCookie: ngcp_panel_session=238550c5737058db619b183d925b5f9a61261cfe; path=/; expires=Tue, 01 Dec 2015 10:47:36 GMT; HttpOnly StrictTransportSecurity: maxage=15768000 { "_embedded" : { "ngcp:interceptions" : { "_links" : { "collection" : { "href" : "/api/interceptions/" }, "curies" : { "href" : "http://purl.org/sipwise/ngcpapi/#rel{rel}", "name" : "ngcp", "templated" : true }, "profile" : { "href" : "http://purl.org/sipwise/ngcpapi/" }, "self" : { "href" : "/api/interceptions/520" } }, "id" : 520, "liid" : 1, "number" : "0014155550132", "x2_host" : "192.168.42.42", "x2_password" : null, "x2_port" : 3002, "x2_user" : null, "x3_host" : "192.168.42.42", "x3_port" : 3003, "x3_required" : true } }, "_links" : { "curies" : { "href" : "http://purl.org/sipwise/ngcpapi/#rel{rel}", "name" : "ngcp", "templated" : true }, "ngcp:interceptions" : { "href" : "/api/interceptions/520" }, "profile" : { "href" : "http://purl.org/sipwise/ngcpapi/" }, "self" : { "href" : "/api/interceptions/?page=1&rows=10" } }, "total_count" : 1 }
Get all interceptions for all numbers
Request:
curl -i --insecure --user administrator:administrator -X GET \ https://localhost:1443/api/interceptions/
Response:
HTTP/1.1 200 OK Server: nginx Date: Tue, 01 Dec 2015 09:43:18 GMT ContentType: application/hal+json; profile="http://purl.org/sipwise/ngcpapi/"; charset=utf8 ContentLength: 2364 Connection: keepalive SetCookie: ngcp_panel_session=68398eea5bdd3885ad0517e1f6d367ccc80111fa; path=/; expires=Tue, 01 Dec 2015 10:43:18 GMT; HttpOnly StrictTransportSecurity: maxage=15768000 { "_embedded" : { "ngcp:interceptions" : [ { "_links" : { "collection" : { "href" : "/api/interceptions/" }, "curies" : { "href" : "http://purl.org/sipwise/ngcpapi/#rel{rel}", "name" : "ngcp", "templated" : true }, "profile" : { "href" : "http://purl.org/sipwise/ngcpapi/" }, "self" : { "href" : "/api/interceptions/520" } }, "id" : 520, "liid" : 1, "number" : "0014155550132", "x2_host" : "192.168.42.42", "x2_password" : null, "x2_port" : 3002, "x2_user" : null, "x3_host" : "192.168.42.42", "x3_port" : 3003, "x3_required" : true }, { "_links" : { "collection" : { "href" : "/api/interceptions/" }, "curies" : { "href" : "http://purl.org/sipwise/ngcpapi/#rel{rel}", "name" : "ngcp", "templated" : true }, "profile" : { "href" : "http://purl.org/sipwise/ngcpapi/" }, "self" : { "href" : "/api/interceptions/528" } }, "id" : 528, "liid" : 918273, "number" : "0014155550132", "x2_host" : "192.168.42.42", "x2_password" : null, "x2_port" : 3002, "x2_user" : null, "x3_host" : "192.168.42.42", "x3_port" : 3003, "x3_required" : true } ] }, "_links" : { "curies" : { "href" : "http://purl.org/sipwise/ngcpapi/#rel{rel}", "name" : "ngcp", "templated" : true }, "ngcp:interceptions" : [ { "href" : "/api/interceptions/520" }, { "href" : "/api/interceptions/528" } ], "profile" : { "href" : "http://purl.org/sipwise/ngcpapi/" }, "self" : { "href" : "/api/interceptions/?page=1&rows=10" } }, "total_count" : 2 }
Get interception for specific LIID
Request:
curl -i --insecure --user administrator:administrator -X GET \ https://localhost:1443/api/interceptions/?liid=9876
Response:
HTTP/1.1 200 OK Server: nginx Date: Tue, 01 Dec 2015 09:50:41 GMT ContentType: application/hal+json; profile="http://purl.org/sipwise/ngcpapi/"; charset=utf8 ContentLength: 1283 Connection: keepalive SetCookie: ngcp_panel_session=23960dde6bb90f0c5c84575890194c53cce120ce; path=/; expires=Tue, 01 Dec 2015 10:50:40 GMT; HttpOnly StrictTransportSecurity: maxage=15768000 { "_embedded" : { "ngcp:interceptions" : { "_links" : { "collection" : { "href" : "/api/interceptions/" }, "curies" : { "href" : "http://purl.org/sipwise/ngcpapi/#rel{rel}", "name" : "ngcp", "templated" : true }, "profile" : { "href" : "http://purl.org/sipwise/ngcpapi/" }, "self" : { "href" : "/api/interceptions/520" } }, "id" : 520, "liid" : 1, "number" : "0014155550132", "x2_host" : "192.168.42.42", "x2_password" : null, "x2_port" : 3002, "x2_user" : null, "x3_host" : "192.168.42.42", "x3_port" : 3003, "x3_required" : true } }, "_links" : { "curies" : { "href" : "http://purl.org/sipwise/ngcpapi/#rel{rel}", "name" : "ngcp", "templated" : true }, "ngcp:interceptions" : { "href" : "/api/interceptions/520" }, "profile" : { "href" : "http://purl.org/sipwise/ngcpapi/" }, "self" : { "href" : "/api/interceptions/?page=1&rows=10" } }, "total_count" : 1 }
Create interception for a specific number
Request:
curl -i --insecure --user administrator:administrator -X POST \ -H "ContentType: application/json" --data \ '{"liid":123, "number":"31032222203", "x2_host":"127.0.0.1", "x2_port":12345, "x3_required":true, "x3_host":"127.0.0.2", "x3_port":23456}' \ https://localhost:1443/api/interceptions/Response:
HTTP/1.1 201 Created TransferEncoding: chunked Connection: close Location: /api/interceptions/528 SetCookie: ngcp_panel_session=e7817079d121fae4d86448b10e1fa21d0201c526; path=/; expires=Tue, 01 Dec 2015 10:43:18 GMT; HttpOnly StrictTransportSecurity: maxage=15768000
The path to the newly created interception is found in the Location header of the response.
Update specific interception
Request:
curl -i --insecure --user administrator:administrator -X PUT \ -H "ContentType: application/json" -H 'Prefer: return=representation' --data \ '{"liid":918273, "number":"0014155550132", "x2_host":"192.168.42.42", "x2_port":5000, "x3_required":false}' \ https://localhost:1443/api/interceptions/123Response:
HTTP/1.1 200 OK ContentType: application/hal+json; profile="http://purl.org/sipwise/ngcpapi/"; charset=utf8 ContentLength: 621 Link: </api/interceptions/>; rel=collection Link: <http://purl.org/sipwise/ngcpapi/>; rel=profile Link: </api/interceptions/530>; rel=self PreferenceApplied: return=representation SetCookie: ngcp_panel_session=0b56e4a197b0e9f6e22a998e85473a0184770740; path=/; expires=Tue, 01 Dec 2015 10:56:17 GMT; HttpOnly { "_links" : { "collection" : { "href" : "/api/interceptions/" }, "curies" : { "href" : "http://purl.org/sipwise/ngcpapi/#rel{rel}", "name" : "ngcp", "templated" : true }, "profile" : { "href" : "http://purl.org/sipwise/ngcpapi/" }, "self" : { "href" : "/api/interceptions/530" } }, "id" : 530, "liid" : 918273, "number" : "0014155550132", "x2_host" : "192.168.42.42", "x2_password" : null, "x2_port" : 5000, "x2_user" : null, "x3_host" : null, "x3_port" : null, "x3_required" : false }The Prefer: return=representation header forces the API to return the content, otherwise status 201 with no content is returned.
Update only certain items for a specific interception
Request:
curl -i --insecure --user administrator:administrator -X PATCH \ -H "ContentType: application/jsonpatch+json" -H 'Prefer: return=representation' \ --data '[{"op":"replace", "path":"/x2_host", "value":"192.168.42.42"},{"op":"replace", "path":"/x2_port", "value":4000}]' \ https://localhost:1443/api/interceptions/530Response:
HTTP/1.1 200 OK Server: nginx Date: Tue, 01 Dec 2015 10:06:06 GMT ContentType: application/hal+json; profile="http://purl.org/sipwise/ngcpapi/"; charset=utf8 ContentLength: 620 Connection: close Link: </api/interceptions/>; rel=collection Link: <http://purl.org/sipwise/ngcpapi/>; rel=profile Link: </api/interceptions/530>; rel=self PreferenceApplied: return=representation SetCookie: ngcp_panel_session=0693129d63d543a85f96d464ff9a8f807cfc4d18; path=/; expires=Tue, 01 Dec 2015 11:06:06 GMT; HttpOnly StrictTransportSecurity: maxage=15768000 { "_links" : { "collection" : { "href" : "/api/interceptions/" }, "curies" : { "href" : "http://purl.org/sipwise/ngcpapi/#rel{rel}", "name" : "ngcp", "templated" : true }, "profile" : { "href" : "http://purl.org/sipwise/ngcpapi/" }, "self" : { "href" : "/api/interceptions/530" } }, "id" : 530, "liid" : 918273, "number" : "0014155550132", "x2_host" : "192.168.42.42", "x2_password" : null, "x2_port" : 4000, "x2_user" : null, "x3_host" : null, "x3_port" : null, "x3_required" : false }
Delete specific interception
Request:
curl -i --insecure --user administrator:administrator -X DELETE \ https://localhost:1443/api/interceptions/123
Response:
HTTP/1.1 204 No Content Server: nginx Date: Tue, 01 Dec 2015 10:08:49 GMT Connection: keepalive SetCookie: ngcp_panel_session=570c66b66732629766f86b8ed9bd0d64902ae73e; path=/; expires=Tue, 01 Dec 2015 11:08:49 GMT; HttpOnly XCatalyst: 5.90042 StrictTransportSecurity: maxage=15768000
The communication via the X2 interface consists of request-response pairs.
Request
The request is formatted as: X2/<bodylength>/<body>
Body part has the following items:
Table 24. X2 Message Body Items
| Element | Type | Length | Description |
|---|---|---|---|
/x2/header/source | String | arbitrary length | identifier of Sipwise node which captured the data |
/x2/header/destination | String | arbitrary length | identifier of LI mediation system |
/x2/header/type | String | arbitrary length | always "sip" (but later potentially "xmpp" and others too) |
/x2/header/version | PosInteger | arbitrary length | always "1" |
/x2/header/timestamp | String | 27 chars | format: YYYY-MM-DDThh:mm:ss.ffffffZ; timestamp in UTC when the X2 package is sent to mediation |
/x2/body/dialogid | PosInteger | arbitrary length | globally increasing counter for each new communication dialog (e.g. call) |
/x2/body/messageid | PosInteger | arbitrary length | increasing counter for each new x2 message within a dialog, starting from 0 |
/x2/body/timestamp | String | 27 chars | format: YYYY-MM-DDThh:mm:ss.ffffffZ; timestamp in UTC when the package has been captured on the wire |
/x2/body/interceptions | one or more elements containing the following information, one element per intercepted target: | ||
/x2/body/interceptions/liid | PosInteger | arbitrary length | interception id ("liid") as set via X1 interface |
/x2/body/interceptions/direction | String | arbitrary length | either "totarget" or "fromtarget" from the soft-switch perspective (if target is the called party, it is "totarget", if target is the calling party, it is "fromtarget"). |
/x2/body/data | Base64 encoded | arbitrary | content of full IP frame and up on the OSI layer; packets fragmented on the wire are provided in fully assembled format |
Example of full message:
X2/418/
{
"header": {
"source": "prx01a.example.com",
"destination": "x2destination.example.com",
"type": "sip",
"version": 1,
"timestamp": "20150311T09:18:04.729803Z"
},
"body": {
"dialogid": 4,
"messageid": 0,
"timestamp": "20150311T09:18:04.729123Z",
"interceptions": [
{ "liid": 174, "direction": "fromtarget" },
{ "liid": 175, "direction": "totarget" }
],
"data": "<base64 encoded ip,udp/tcp,sip frame>"
}
}Response
-
Success:
X2-ACK/0/ -
Error:
X2-ERR/<length>/<error string>
Keep-Alive Mechanism
A regular keep-alive mechanism with a default value of 10s is used on the connection if it is re-used across multiple messages.
-
Request:
X2/0/ -
Response:
X2-ACK/0/
On the X3 interface TLV based packets are sent via secured (TLS) connection on a pre-established stream. X3 messages do not need to be acknowledged, except for keep-alive messages.
X3 Message Structure
Table 25. X3 Message Structure
| Field | Length |
|---|---|
Header | arbitrary |
CCCID | 4 bytes |
MessageId | 4 bytes |
Timestamp | 8 bytes |
Payload | arbitrary |
Header Details
Table 26. X3: Header Details
| Field | Length | Content |
|---|---|---|
type | 2 bytes | always "X3" |
delimiter | 1 byte | always "/" |
length | arbitrary | ASCII string |
delimiter | 1 byte | always "/" |
CCCID Details
dialogid (32 bit in network byte order, reset to 0 after 232-1)
The dialogid is referencing the /x2/body/dialogid field in order to correlate
an X3 packet to an X2 call.
MessageId Details
messageid (32 bit in network byte order, reset to 0 after 232-1)
The messageid is a counter within a dialog sequencing the X3 packets sent from
the NGCP. This counter is not correlated in any way with X2, rather than starting
at 0 with the first RTP packet captured within a dialog.
Timestamp Details
-
seconds(32 bit in network byte order) -
fraction(32 bit in network byte order)
The timestamp represents the Unix epoch starting from 1970-01-01.
Payload Details
Table 27. X3: Payload Details
| Field | Length |
|---|---|
original ip header | 20 bytes for v4, 40 bytes for v6 |
original udp header | 8 bytes |
original rtp header | variable, 12-72 bytes |
original rtp payload | arbitrary |
Keep-Alive Mechanism
A regular keep-alive mechanism with a default value of 10s is used on the connection if it is re-used across multiple messages.
-
Request:
X3/0/ -
Response:
X3-ACK/0/
The Sipwise C5 offers the possibility to perform call control through 3rd party applications. This functionality, called Party Call Control and referred to as "PCC" throughout this handbook, is available since mr5.1.1 release.
Incoming calls to local subscribers may be signalled to a 3rd party CAC (Call Admission Control) server. Before accepting (that is: sending the SIP INVITE request to the called subscriber) or rejecting the call, Sipwise C5 will wait for an explicit reply from the CAC / PCC server, or a timeout.
Short Messages received by Sipwise C5 for a local subscriber may also be signalled to the PCC server. After an explicit reply with "accepted" status from the PCC server, Sipwise C5 will forward the SM to the final recipient.
| important | |
Sipwise C5 does not support delivering SMs to the local subscribers directly. Local subscribers can define a Call Forward for SMS instead, thus allowing themselves to receive SMs on their mobile phones. |
3rd party call control may be implemented in many ways, such as by server-side or client-side applications (e.g. smartphone app).
| info | |
Please note that Sipwise C5 implements a proprietary protocol for PCC deployments and adapting the protocol to customer needs requires software development from Sipwise. |
The following figure presents the schema of incoming call processing when PCC is involved:
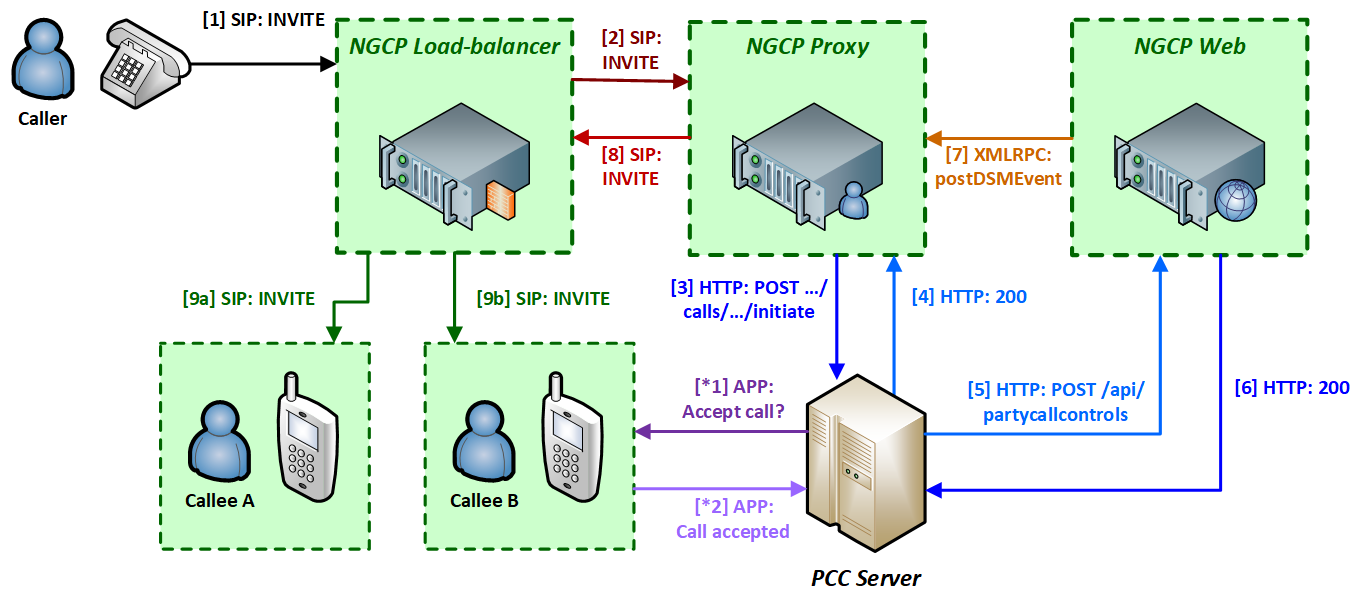
The messages / interactions of PCC call processing are:
- Sipwise C5 Load-Balancer receives a SIP INVITE message from the caller.
- The LB forwards the INVITE to the PROXY component as usual with every incoming call.
- The PROXY (kamailio-proxy module) checks whether the called subscriber has the PCC feature activated. If this is the case, it will send an HTTP POST or GET request (configurable) to the PCC server with the most important details of the call (such as calling and called party numbers, call-ID, a token for internal identification of the session).
The PCC server replies with 200 OK HTTP status in order to indicate that it understood the request and will provide the final status (such as ACCEPTED or REJECTED) of the call later.
Optional:
- *1) The PCC server requests the subscriber’s confirmation to accept the call for instance via a smartphone app.
- *2) The subscriber indicates accepting the call to the PCC server.
- The PCC server send an HTTP POST request to the WEB component of NGCP, using Sipwise C5 REST API, to signal accepting the call.
- The WEB will reply with 200 OK HTTP status.
- The WEB sends an internal XMLRPC request to PROXY indicating that the incoming call can be accepted.
- The PROXY sends the SIP INVITE message to the LB, i.e. it continues the call setup as usual.
- The LB sends the INVITE to the subscriber.
There are more software modules within NGCP’s components and those are shown separately on the diagrams in following sections of the handbook. For instance the PROXY component has the kamailio-proxy and ngcp-sems modules.
A subscriber with PCC activated will not receive the SIP INVITE request directly, but only after a series of intermediate CAC (Call Admission Control) steps, involving Sipwise C5 Proxy and the PCC server. First of those steps is the call initiation at the PCC server:
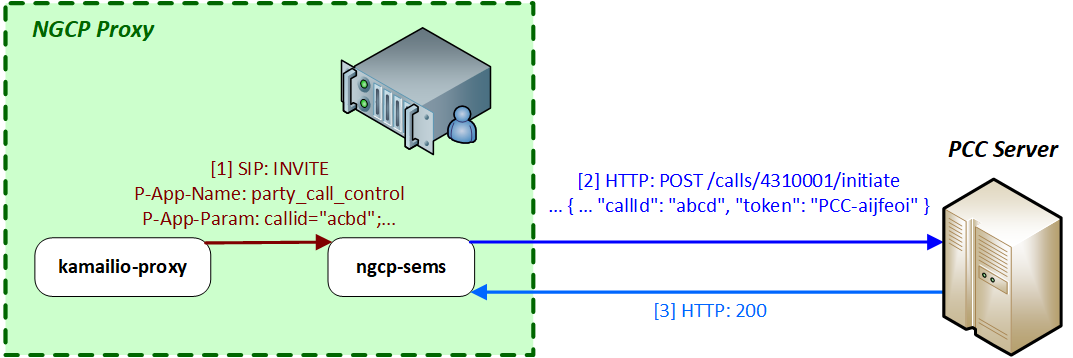
When kamailio-proxy receives the INVITE request from Sipwise C5 LB, it will forward the message to ngcp-sems module with 2 private SIP headers:
P-App-Name: party_call_control
P-App-Param: callid="acbd";caller="4369912345";callee="4310001";caller_clir="0";
These headers will activate the PCC function in ngcp-sems and it will send an HTTP POST request to the PCC server, instead of creating the second call leg directly towards Sipwise C5 LB. An example of such a request (not all details included):
POST /calls/4310001/initiate HTTP/1.1
Content-Type: application/json

{
  "actualMsisdn": 4369912345,
  "callingMsisdn": 4310001,
  "actualClir": 0,
  "callId": "abcd",
  "token": "PCC-aijfeoi"
}
where:
-
actualMsisdn: calling party number -
callingMsisdn: called party number -
actualClir: non-0 if CLIR is active -
callid: the SIP Call-ID token: a generated token that identifies the session between Sipwise C5 and the PCC serverThe target URL has the format:
/calls/<called_party_num>/initiate
-
- The PCC server replies with HTTP 200 OK if it understood the request and can proceed with working on that.
The ngcp-sems module on Sipwise C5 Proxy will wait for a response from PCC server, once it has sent the "initiate" request to it. If the PCC server responds with an HTTP error status, such as any 4xx, then ngcp-sems reports the error condition of PCC server with a SIP 487 Request Terminated reply to kamailio-proxy.
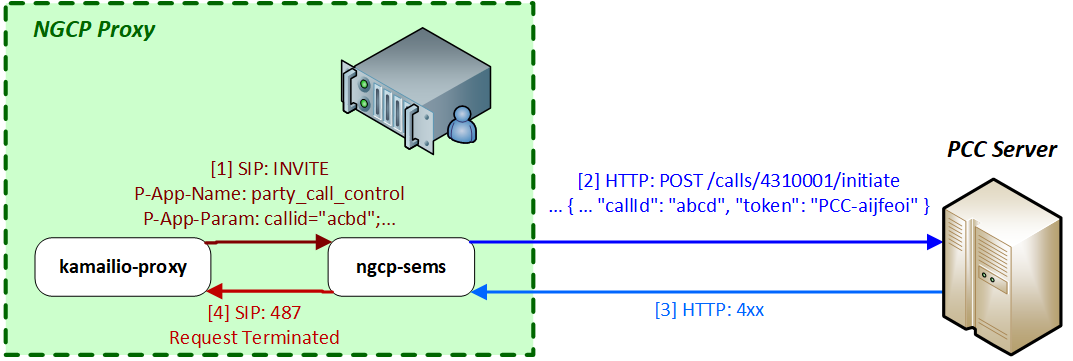
The ngcp-sems module on Sipwise C5 Proxy will wait for a response from PCC server, once it has sent the "initiate" request to it. If the PCC server does not respond with HTTP 200 OK within 30 seconds (configurable) then ngcp-sems considers the PCC is not available. In such a case ngcp-sems sends a SIP 408 Timeout reply to kamailio-proxy.
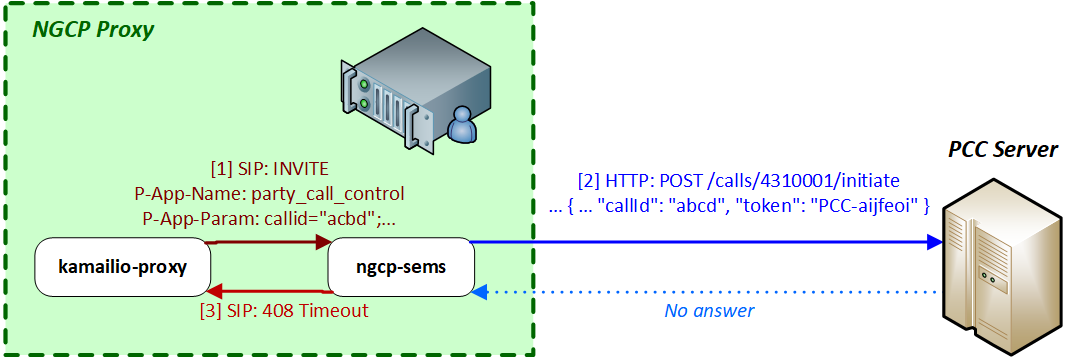
If the PCC server (eventually this may also be the called subscriber) accepts the
call, the PCC server will send an HTTP POST request to the REST API interface
of Sipwise C5 (Web/Management component). This request must contain a status field with
the content ACCEPT (configurable) so that Sipwise C5 continues the call setup towards
called party. Example:
POST /api/partycallcontrols HTTP/1.1
Content-Type: application/json

{
  "type": "pcc",
  "caller": 4369912345,
  "callee": 4310001,
  "status": "ACCEPT",
  "callId": "abcd",
  "token": "PCC-aijfeoi"
}
The target URL of the request: /api/partycallcontrols. The type parameter
must have a value of pcc.
You can see the flow of messages in the diagram below:
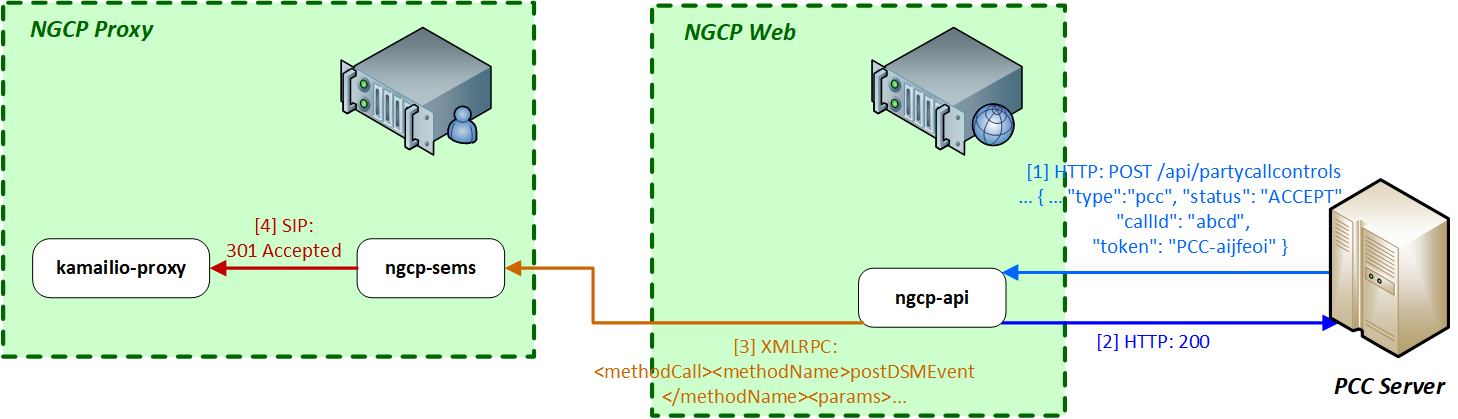
- The PCC server sends an HTTP POST request to NGCP’s REST API.
- Sipwise C5 Web will reply with 200 OK HTTP status once the request is validated.
The ngcp-panel module generates an XMLRPC call to the ngcp-sems module on the PROXY. An example is shown here:
 <?xml version="1.0"?>
 <methodCall>
   <methodName>postDSMEvent</methodName>
   <params>
     <param>
       <value><string>PCC-aijfeoi</string></value>
     </param>
     <param>
       <value><array><data>
         <value><array><data>
           <value><string>cmd</string></value>
           <value><string>handleCall</string></value>
         </data></array></value>
         <value><array><data>
           <value><string>callid</string></value>
           <value><string>abcd</string></value>
         </data></array></value>
         <value><array><data>
           <value><string>caller</string></value>
           <value><string>4369912345</string></value>
         </data></array></value>
         <value><array><data>
           <value><string>callee</string></value>
           <value><string>4310001</string></value>
         </data></array></value>
         <value><array><data>
           <value><string>status</string></value>
           <value><string>ACCEPT</string></value>
         </data></array></value>
       </data></array></value>
     </param>
   </params>
 </methodCall>
At this point ngcp-sems examines the following:
-
whether the token (listed as first
paramparameter ofpostDSMEvent) matches any of the saved session tokens -
whether the
callidparameter’s value matches the session’s SIP Call-ID whether the
statusparameter’s value isACCEPT(configurable)and if all those conditions are valid it will indicate to kamailio-proxy module that the call can be accepted (i.e. call setup towards the callee may continue).
-
whether the token (listed as first
-
ngcp-sems module sends 301 Accepted SIP response to kamailio-proxy and
the latter can forward the SIP INVITE message to Sipwise C5 LB. If the
statusparameter’s value is notACCEPT(configurable), ngcp-sems will reply 487 Request Terminated to kamailio-proxy.
In the same manner as call initiation happens, call termination is also reported by Sipwise C5 towards the PCC server.
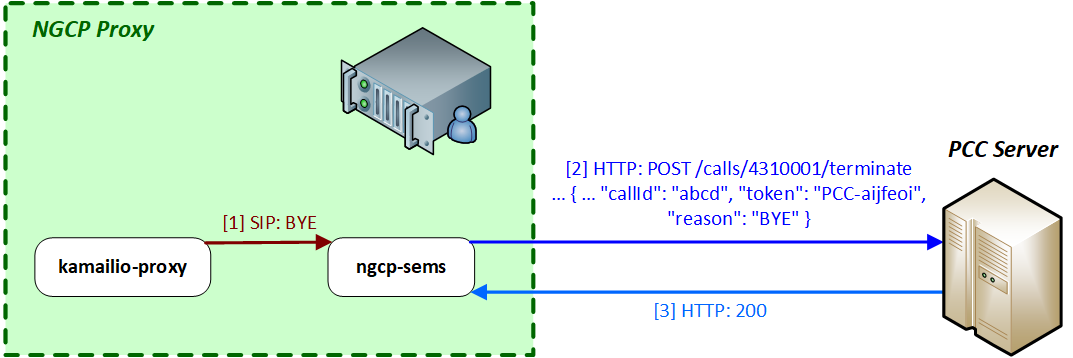
The target URL of the HTTP POST request for the call termination case looks like:
/calls/<called_party_num>/terminate
The body of the request must contain the following element: "reason": "BYE",
where the reason can be one of BYE, CANCEL, NOANSWER and REJECT. An example
of a call termination request:
POST /calls/4310001/terminate HTTP/1.1
Content-Type: application/json

{
  "actualMsisdn": 4369912345,
  "callingMsisdn": 4310001,
  "actualClir": 0,
  "callId": "abcd",
  "token": "PCC-aijfeoi",
  "reason": "BYE"
}
Sipwise C5 will not take the response of PCC server into consideration, because the call has already been terminated at SIP protocol level.
The PCC call control framework may also be used for voicemail notifications. The Sipwise C5 involves its elements: asterisk (Voicemail server) and ngcp-vmnotify in the process of the notification.

- The asterisk voicemail server triggers the ngcp-vmnotify script when a caller leaves a voicemail message in the callee’s voicebox.
ngcp-vmnotify sends an HTTP POST request to the PCC server, as given in the example below:
 POST /voicemail/4310001/notify HTTP/1.1
 Content-Type: application/json

 {
   "caller": 4369912345,
   "callee": 4310001,
   "recording_id":  45235 ,
   "timestamp": "2017-06-13T14:21:17T+01:00",
   "duration": 17
 }
The target URL is:
/voicemail/<called_party_num>/notify- The PCC server replies with 200 OK if it properly processed the request.
The Sipwise C5 also supports voicemail notifications in form of short messages, using the built-in SMS modules. In such a case the ngcp-vmnotify module will send an HTTP POST request to the REST API (Sipwise C5 Web), that will contain the short message and finally be stored in the central database. Afterwards the short message will be sent to the recipient by Sipwise C5 Proxy.
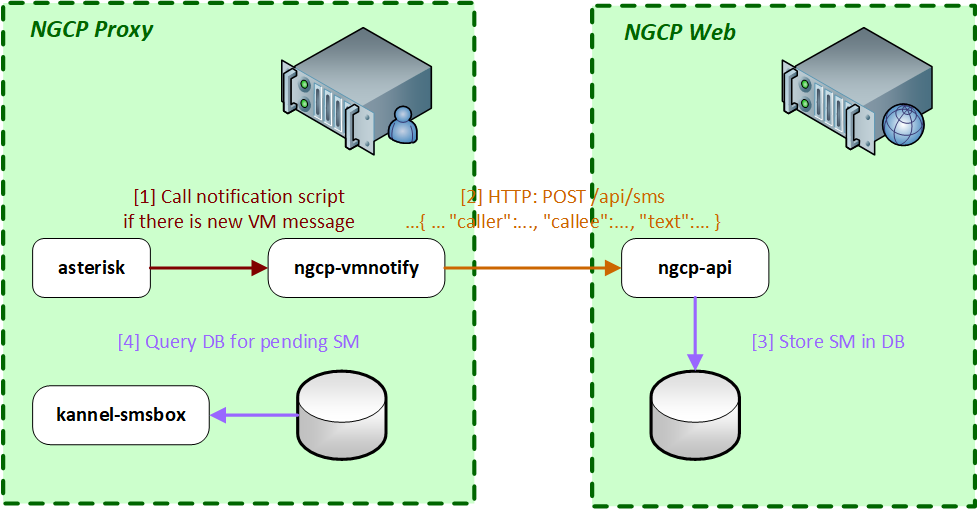
- The asterisk voicemail server triggers the ngcp-vmnotify script when a caller leaves a voicemail message in the callee’s voicebox.
ngcp-vmnotify sends an API request to ngcp-api module, as given in the example below:
 POST /api/sms/?skip_checks=true&skip_journal=false HTTP/1.1
 Content-Type: application/json

 {
   "subscriber_id": 90
   "caller": 4369912345,
   "callee" : 4310001,
   "text":  "user1 4310001 17 Tue 13 Jun 2017 14:21:17 +01:00"
 }
The target URL is:
/api/sms- The ngcp-api stores the message in the database.
- The kannel-smsbox module of Sipwise C5 Proxy will query the database for messages waiting for delivery and send the SM to its recipient through Sipwise C5 LB.
The PCC server may also serve as a control point for incoming short messages. The Sipwise C5 may indicate an incoming SM to the PCC server, which in turn must explicitly accept the message, so that the message will be forwarded to the recipient.
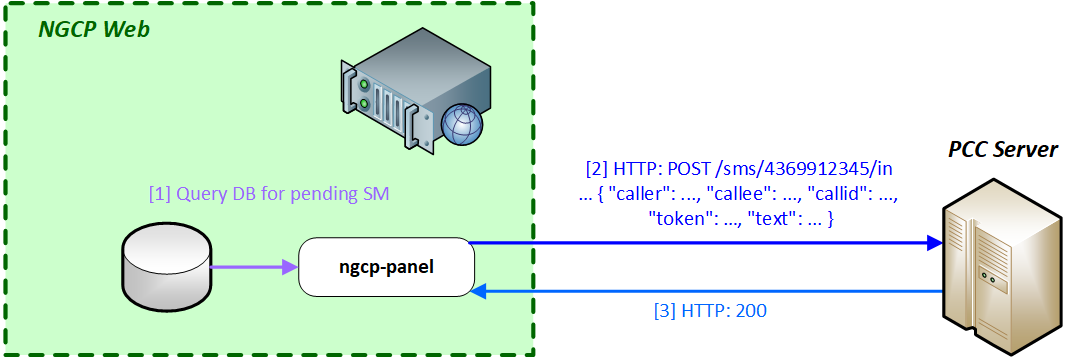
- The ngcp-panel module on Sipwise C5 Web component will query the central database for pending incoming SMs.
The ngcp-panel will send an HTTP POST request to the PCC server if there is a message waiting for a subscriber. An example of such request is shown here:
 POST /sms/4310001/in HTTP/1.1
 Content-Type: application/json

 {
   "caller": 4369912345,
   "callee": 4310001,
   "token": "PCC-aijfeoi",
   "callId": "abcd",
   "text": "This is the SM text"
 }
The target URL in this case is:
/sms/<called_party_num>/in- The PCC server replies with 200 OK HTTP status if it properly understood the request.
As in the case of an incoming call, the PCC server will send an HTTP POST request to the REST API of NGCP, in order to signal the acceptance of the SM.
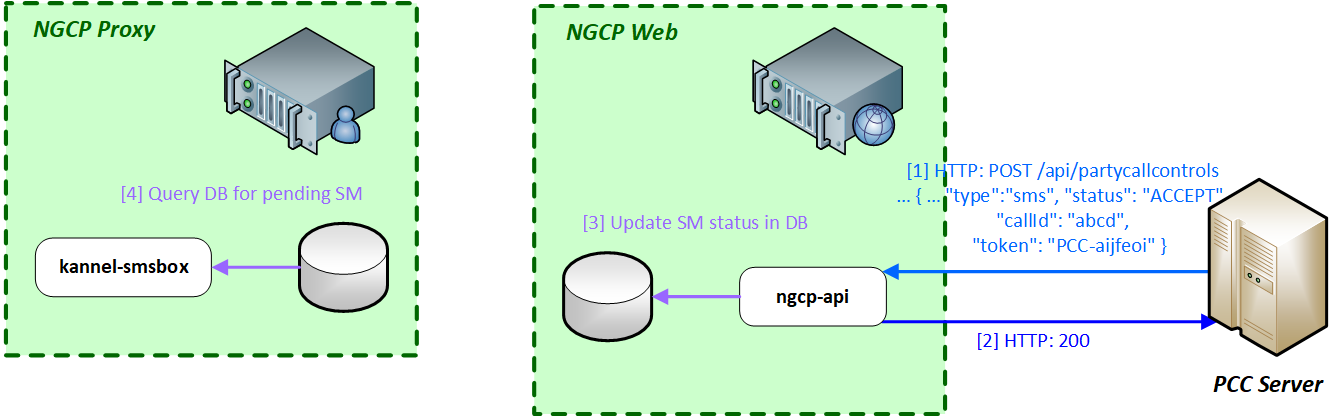
The PCC server sends the request to Sipwise C5 Web component, where ngcp-api module will process it. An example:
POST /api/partycallcontrols HTTP/1.1
Content-Type: application/json

{
  "type": "sms",
  "caller": 4369912345,
  "callee": 4310001,
  "status": "ACCEPT",
  "callId": "abcd",
  "token": "PCC-aijfeoi"
}
The target URL of the request:
/api/partycallcontrols. Thetypeparameter must have a value ofsms.- The ngcp-api module responds with 200 OK HTTP status if it properly understood the request.
- The ngcp-api updates the status of the SM in the database so that the SM may be forwarded to the recipient.
- The kannel-smsbox module on Sipwise C5 Proxy will query the central database for SMs to be delivered and will forward the SM towards an SMSC, via Sipwise C5 LB.
The configuration of the PCC feature is done via the main configuration file:
/etc/ngcp-config/config.yml. The relevant section is: apps.party_call_control,
the example below shows the default values of the parameters.
apps:
  party_call_control:
    accepted_reply: 200*
    enable: no
    pcc_server_url: https://127.0.0.1:9090/pcc/${prefix}${callee}${suffix}
    request_timeout: '30'
    trigger_on_hangup: yes
The configuration parameters are:
-
accepted_reply: defines the value ofstatusdata element (in the PCC server’s POST request sent to/api/partycallcontrolsAPI resource) that means the "accepted" status of the call. For instance the handbook showed the valueACCEPTin previous sections, instead of the default200* -
enable: must be set toyesin order to enable the PCC feature pcc_server_url: the URL, pointing to the PCC server, where HTTP POST requests must be sent. The variables${prefix}, ${callee}and${suffix}will be replaced with actual values when a request is sent. Please do not change this part of the URL! Possible values are:- prefix = calls, suffix = initiate
- prefix = calls, suffix = terminate
- prefix = voicemail, suffix = notify
- prefix = sms, suffix = in
- callee = <called_party_num>
-
request_timeout: time in seconds until Sipwise C5 will wait for an HTTP reply from the PCC server, once Sipwise C5 has sent a request to it -
trigger_on_hangup: if set toyes, Sipwise C5 will send a "terminate" request to the PCC server at the end of the call
The Sipwise C5 will provide logs of its activities that are very useful for troubleshooting the call processing with PCC feature. This section will provide examples from various log files that can help to find potential problems in call setup.
PCC activation at ngcp-sems module
Oct 17 17:00:45 prx01a proxy[3206]: NOTICE: <script>: Call to PCC (Party Call Control) - R=sip:2133339@192.168.10.11:5060;user=phone ID=1849964028_125696279@10.0.0.121 UA='<null>'
Call accepted by PCC server
Oct 17 17:00:16 prx01a proxy[3210]: NOTICE: <script>: NAT-Reply - S=301 - Accepted M=INVITE IP=192.168.10.12:5080 (192.168.10.12:5080) ID=1850250074_83465152@10.0.0.121 UA='<null>'
Oct 17 17:00:16 prx01a proxy[3210]: INFO: <script>: Received 200 OK (Accepted) from PCC Server, routing the call to its original callee - ID=1850250074_83465152@10.0.0.121 UA='<null>'
Initiate call at PCC
Oct 17 17:10:47 prx01a sems[5059]: [#7f73237f7700] [mod_py_log, PyDSM.cpp:42] INFO: PCC http request to http://example.com/pcc/calls/4366811112222/initiate - callid 1851794724_134068006@10.0.0.121
Oct 17 17:10:47 prx01a sems[5059]: [#7f73237f7700] [mod_py_log, PyDSM.cpp:42] INFO: PCC form data: {'actualMsisdn': '4369933334444', 'actualClir': '0', 'token': 'PCC-12DBBD25-59E61D770001841C-237F7700', 'callingMsisdn': '4366811112222', 'callId': '1851794724_134068006@10.0.0.121'} - callid 1851794724_134068006@10.0.0.121
Oct 17 17:10:47 prx01a sems[5059]: [#7f73237f7700] [mod_py_log, PyDSM.cpp:42] INFO: PCC ret: 0 num_handles: 1
Oct 17 17:10:47 prx01a sems[5059]: [#7f73237f7700] [mod_py_log, PyDSM.cpp:42] INFO: RT: 0 1 0 [] []
...
Oct 17 17:10:47 prx01a sems[5059]: [#7f73237f7700] [mod_py_log, PyDSM.cpp:42] INFO: RT: 0 0 0 [<pycurl.Curl object at 0x7f7378067c50>] []
Oct 17 17:10:47 prx01a sems[5059]: [#7f73237f7700] [mod_py_log, PyDSM.cpp:42] INFO: PCC reply for callid 1851794724_134068006@10.0.0.121: 200
Call accepted by PCC server
Oct 17 17:10:51 prx01a sems[5059]: [#7f7323efe700] [execute, XMLRPC2DI.cpp:714] INFO: XMLRPC2DI 'postDSMEvent': function 'postDSMEvent'
Oct 17 17:10:51 prx01a sems[5059]: [#7f7323efe700] [execute, XMLRPC2DI.cpp:718] INFO:  params: <['PCC-12DBBD25-59E61D770001841C-237F7700', [['cmd', 'handleCall'], ['callid', '1851794724_134068006@10.0.0.121'], ['caller', '4369933334444'], ['callee', '4366811112222'], ['status', 'ACCEPT']]]>
Oct 17 17:10:51 prx01a sems[5059]: [#7f7323efe700] [execute, XMLRPC2DI.cpp:724] INFO:  result: <[200, 'OK']>
Oct 17 17:10:51 prx01a sems[5059]: [#7f73237f7700] [execute, DSMCoreModule.cpp:521] INFO: FSM:  'PCC RESULT -- ACCEPT'
Terminate call at PCC
Oct 17 17:10:53 prx01a sems[5059]: [#7f73235f5700] [mod_py_log, PyDSM.cpp:42] INFO: PCC http request to http://example.com/pcc/calls/4366811112222/terminate - callid 1851794724_134068006@10.0.0.121
Oct 17 17:10:53 prx01a sems[5059]: [#7f73235f5700] [mod_py_log, PyDSM.cpp:42] INFO: PCC form data: {'actualMsisdn': '4369933334444', 'callId': '1851794724_134068006@10.0.0.121', 'callingMsisdn': '4366811112222', 'reason': 'CANCEL', 'token': 'PCC-12DBBD25-59E61D770001841C-237F7700', 'actualClir': '0'} - callid 1851794724_134068006@10.0.0.121SM notification at PCC server
Oct 18 09:10:16 web01a ngcp-panel: INFO: pcc is set to 1 for prov subscriber id 18451
Oct 18 09:10:16 web01a ngcp-panel: INFO: >>>> source check for booking.com passed, continue with time check
Oct 18 09:10:16 web01a ngcp-panel: INFO: >>>> time check for 1508310615 passed, use destination set
Oct 18 09:10:16 web01a ngcp-panel: INFO: >>>> proceed sms forwarding
Oct 18 09:10:16 web01a ngcp-panel: INFO: >>>> forward sms to 4369933334444
Oct 18 09:10:16 web01a ngcp-panel: INFO: sending pcc request for sms with id 305125 to http://example.com/pcc/sms/4366811112222/in
Oct 18 09:10:16 web01a ngcp-panel: INFO: sending pcc request succeeded
Oct 18 09:10:16 web01a ngcp-panel: INFO: status for pcc sms of 305125 is BUSY, don't forward sms
In the last line the status is BUSY. The purpose of this is to prevent forwarding
the SM to the mobile phone of the recipient. Otherwise, in order to let Sipwise C5 forward
the message to the recipient, the status is ACCEPT.
Call accepted by PCC server
Oct 18 10:19:39 web01a ngcp-panel: INFO: IP=192.168.10.20 CALLED=API[POST]/api/partycallcontrols/ TX=14EE9C4CD2599A70 USER=username DATA={} MSG="" LOG="{"type":"pcc","caller":"4365033334444","callee":"4366811112222","status":"ACCEPT","token":"PCC-273C2CDA-59E70E96000BE0C4-231F1700","callid":"406885946_117428858@10.0.0.121"}"
Oct 18 10:19:39 web01a ngcp-panel: INFO: IP=192.168.10.20 CALLED=API[POST 200]/api/partycallcontrols/ TX=14EE9C4CD2599A70 USER=username DATA={} MSG="" LOG=""
SM accepted by PCC server
Oct 18 10:20:30 web01a ngcp-panel: INFO: IP=192.168.10.20 CALLED=API[POST]/api/partycallcontrols/ TX=14EE9C58CEA4D960 USER=username DATA={} MSG="" LOG="{"type":"sms","caller":"15556666","callee":"4366811112222","status":"ACCEPT","token":"1482d9e2-a9fc-40ee-bdaf-de6f7fc239f8","callid":"305175"}"
Oct 18 10:20:30 web01a ngcp-panel: INFO: IP=192.168.10.20 CALLED=API[POST 200]/api/partycallcontrols/ TX=14EE9C58CEA4D960 USER=username DATA={} MSG="" LOG=""The voicemail notifier script (/usr/bin/vmnotify) writes its log messages into
the system log (/var/log/syslog). An example:
Oct 18 09:53:34 prx01a vmnotify[20072]: Arguments: default 4366811112222 1 0 0 0 4365033334444 2017-10-18T09:53:34+0200 8
Where the Arguments are:
-
default: Asterisk voicemail context - the voicemail box owner
-
1: number of new messages -
0: number of old messages -
0: number of urgent messages -
0: message ID of the latest message - who left the message (caller)
- date and time of the message
-
8: duration of the message in seconds