Usually, everything required for PBX devices autoprovisioning is uploaded automatically as described in Section 17.1.1, “PBX Device Provisioning”. In case you would like to introduce changes into a PBX device configuration, create a custom PBX device profile or even upload a newer firmware, this section will help you.
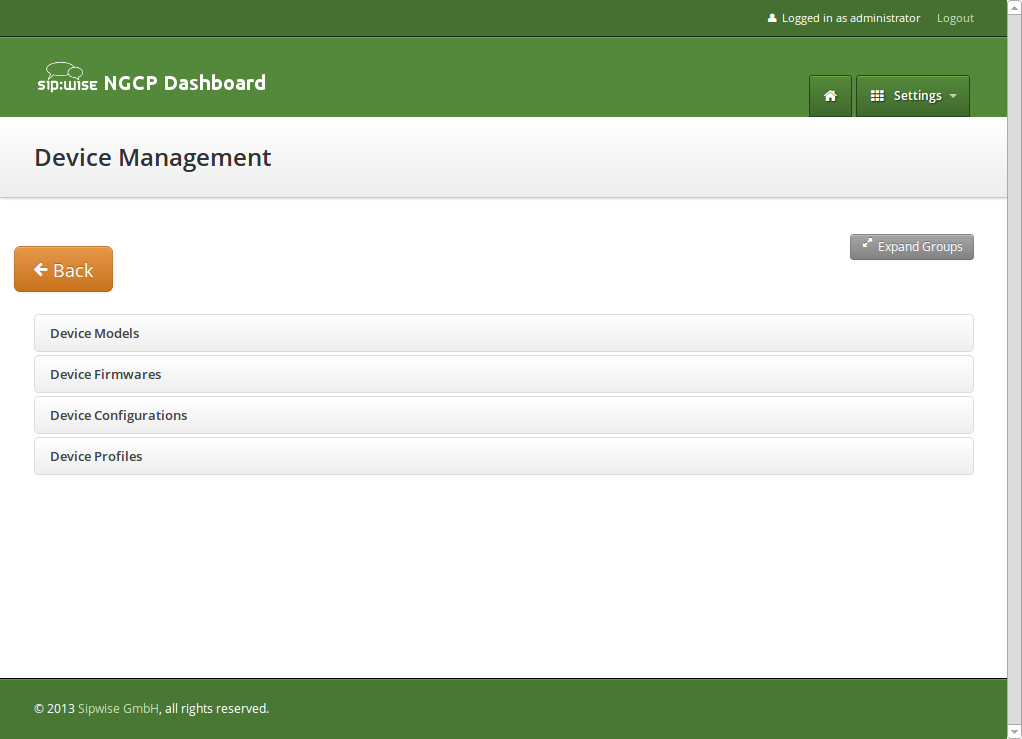
The Device Management is used by admins and resellers to define the list of device models, firmwares and configurations available for end customer usage. These settings are pre-configured for the default reseller up-front by Sipwise and have to be set up for every reseller separately, so a reseller can choose the devices he’d like to serve and potentially tweak the configuration for them. List of available pre-configured devices Section 17.1.13, “List of available pre-configured devices”.
End customers choose from a list of Device Profiles, which are defined by a specific Device Model, a list of Device Firmwares and a Device Configuration. The following sections describe the setup of these components.
To do so, go to Settings→Device Management.
A Device Model defines a specific hardware device, like the vendor, model name, the number of keys and their capabilities. For example a Cisco SPA504G has 4 keys, which can be used for private lines, shared lines (SLA) and busy lamp field (BLF). If you have an additional attendant console, you get 32 more buttons, which can only do BLF.
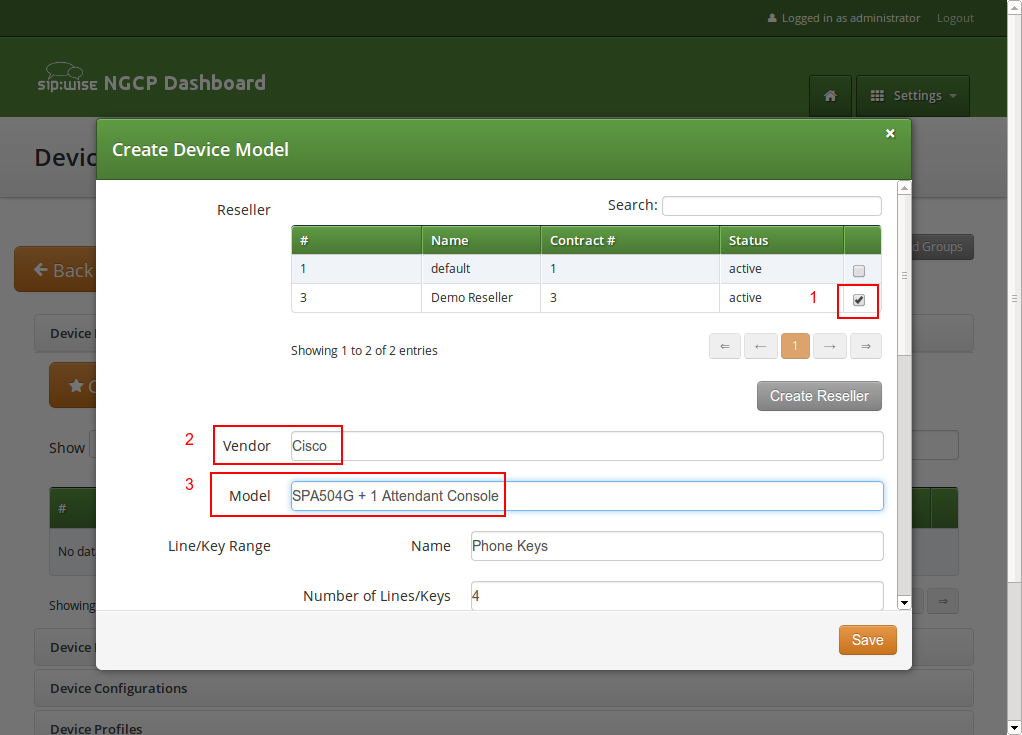
In this example, we will create a Cisco SPA504G with an additional Attendant Console.
Expand the Device Models row and click Create Device Model.
First, you have to select the reseller this device model belongs to, and define the vendor and model name.
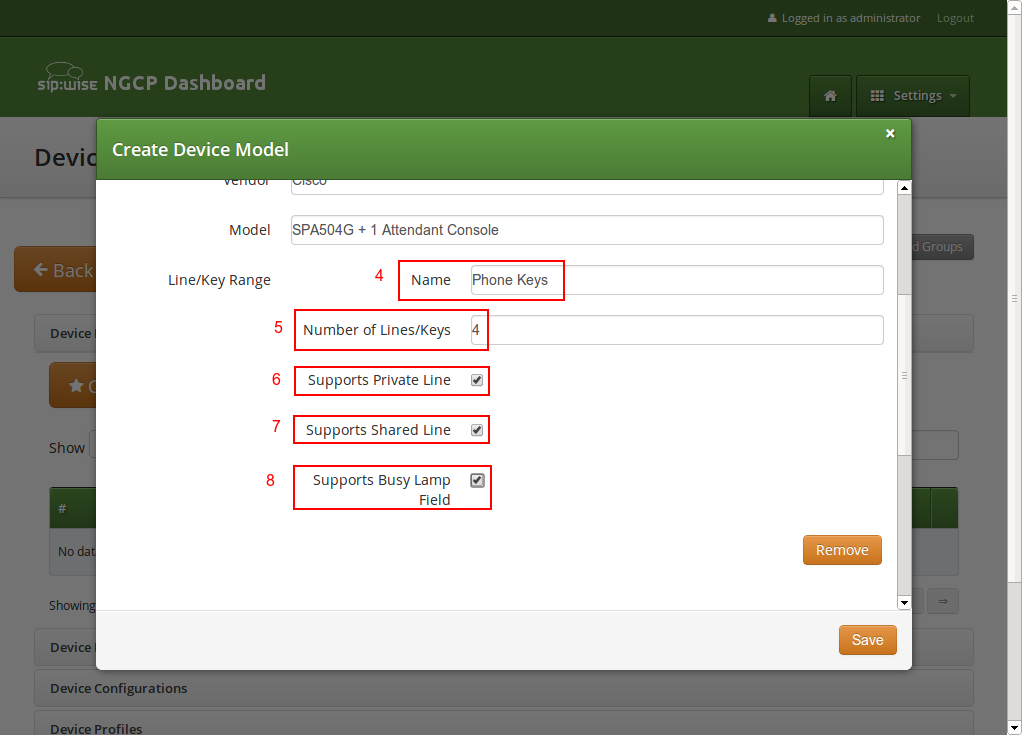
In the Line/Key Range section, you can define the first set of keys, which we will label Phone Keys. The name is important, because it is referenced in the configuration file template, which is described in the following sections. The SPA504G internal phone keys support private lines (where the customer can assign a normal subscriber, which is used to place and receive standard phone calls), shared lines (where the customer can assign a subscriber which is shared across multiple people) and busy lamp field (where the customer can assign other subscribers to be monitored when they get a call, and which also acts as speed dial button to the subscriber assigned for BLF), so we enable all 3 of them.
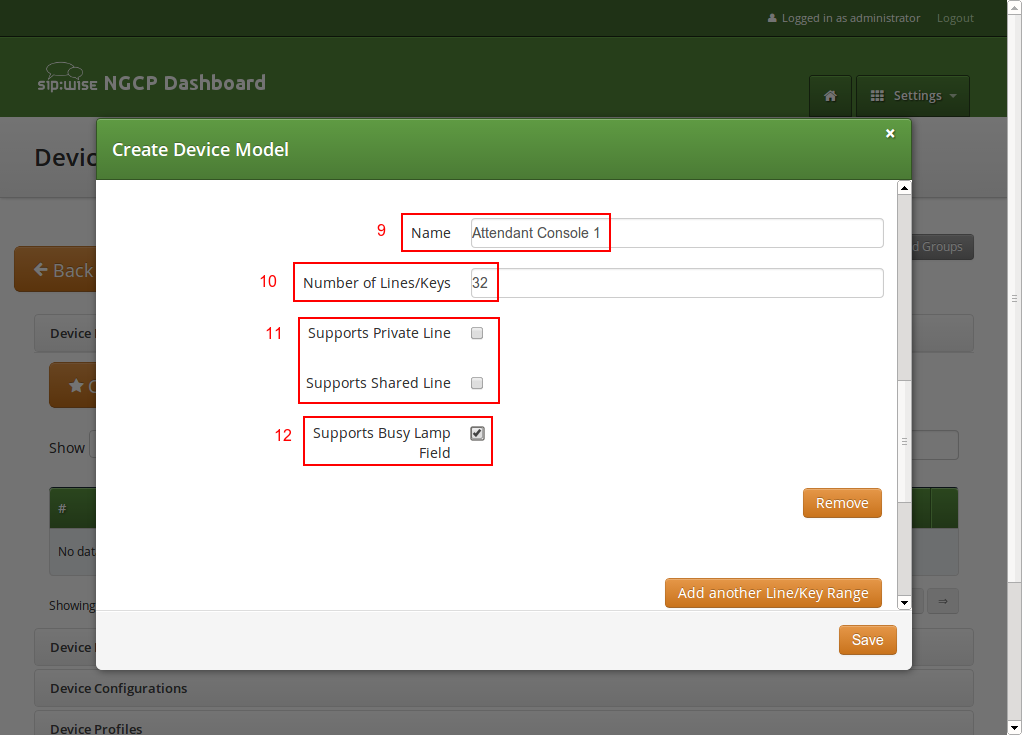
In order to also configure the attendant console, press the Add another Line/Key Range button to specify the attendant console keys.
Again provide a name for this range, which will be Attendant Console 1 to match our configuration defined later. There are 32 buttons on the attendant console, so set the number accordingly. Those 32 buttons only support BLF, so make sure to uncheck the private and shared line options, and only check the busy lamp field option.
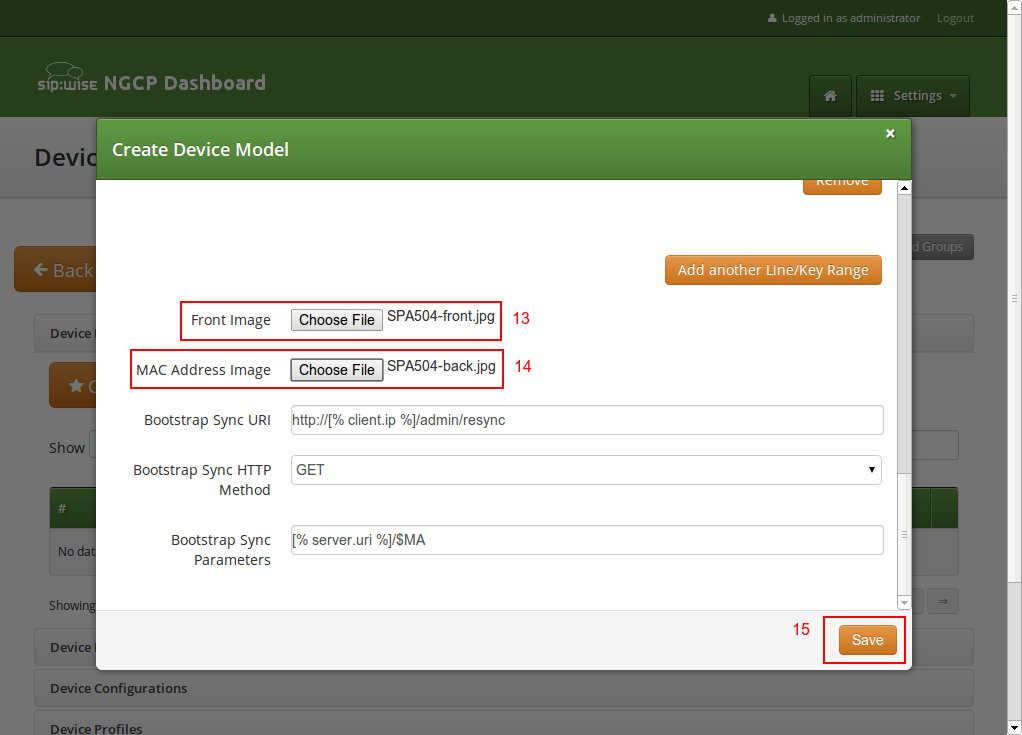
The last two settings to configure are the Front Image and MAC Address Image fields. Upload a picture of the phone here in the first field, which is shown to the customer for him to recognize easily how the phone looks like. The MAC image is used to tell the customer where he can read the MAC address from. This could be a picture of the back of the phone with the label where the MAC is printed, or an instruction image how to get the MAC from the phone menu.
The rest of the fields are left at their default values, which are set to work with Cisco SPAs. Their meaning is as follows:
- Bootstrap Sync URI: If a stock phone is plugged in for the first time, it needs to be provisioned somehow to let it know where to fetch its configuration file from. Since the stock phone doesn’t know about your server, you have to define an HTTP URI here, where the customer is connected with his web browser to set the according field.
- Bootstrap Sync HTTP Method: This setting defines whether an HTTP GET or POST is sent to the Sync URI.
- Bootstrap Sync Params: This setting defines the parameters appended to the Sync URI in case of a GET, or posted in the request body in case of POST, when the customer presses the Sync button later on.
Finally press Save to create the new device model.
A device model can optionally have one or more device firmware(s). Some devices like the Cisco SPA series don’t support direct firmware updates from an arbitrary to the latest one, but need to go over specific firmware steps. In the device configuration discussed next, you can return the next supported firmware version, if the phone passes the current version in the firmware URL.
Since a stock phone purchased from any shop can have an arbitrary firmware version, we need to upload all firmwares needed to get from any old one to the latest one. In case of the Cisco SPA3x/SPA5x series, that would be the following versions, if the phone starts off with version 7.4.x:
- spa50x-30x-7-5-1a.bin
- spa50x-30x-7-5-2b.bin
- spa50x-30x-7-5-5.bin
So to get an SPA504G with a firmware version 7.4.x to the latest version 7.5.5, we need to upload each firmware file as follows.
Open the Device Firmware row in the Device Management section and press Upload Device Firmware.
Select the device model we’re going to upload the firmware for, then specify the firmware version and choose the firmware file, then press Save.
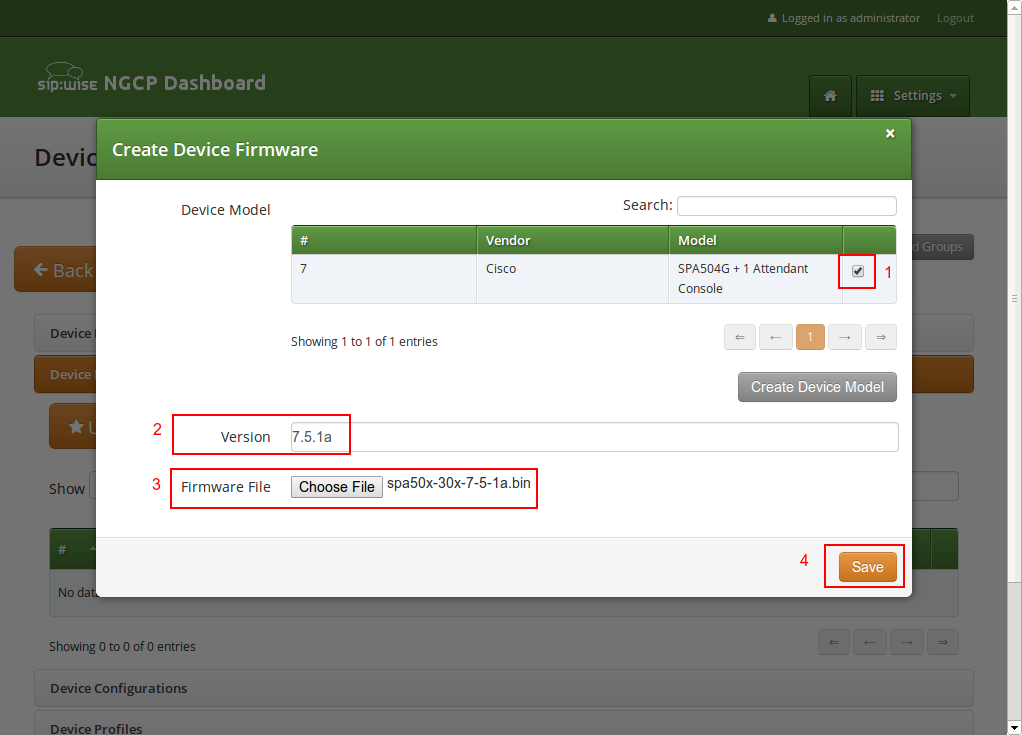
Repeat this step for every firmware in the list above (and any new firmware you want to support when it’s available).
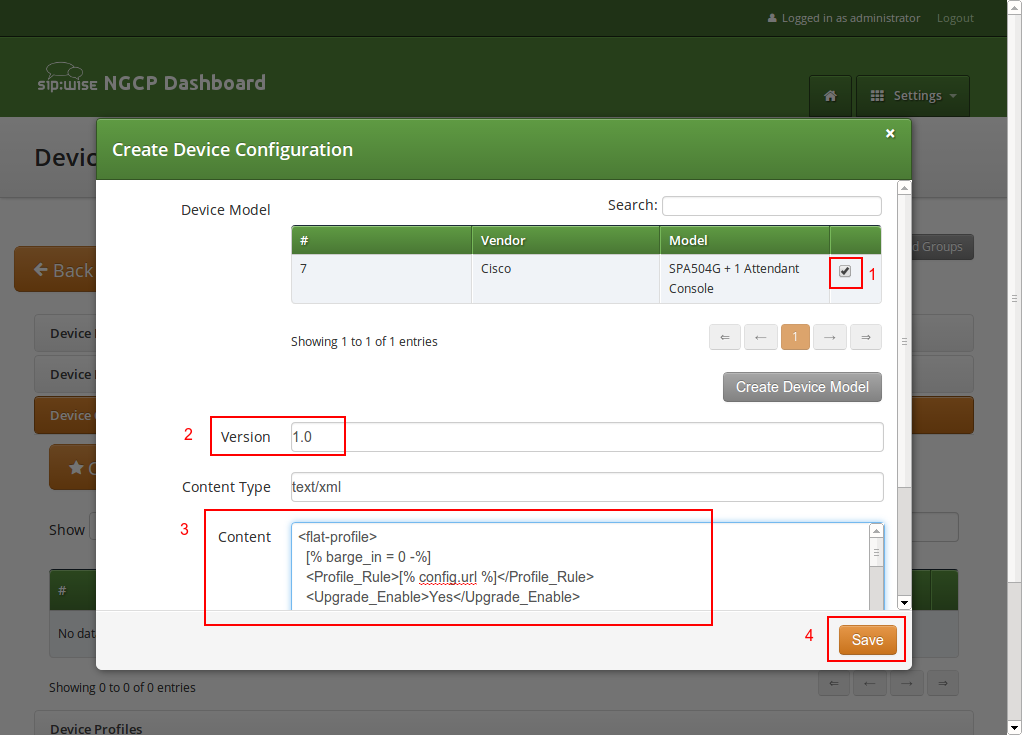
Each customer device needs a configuration file, which defines the URL to perform firmware updates, and most importantly, which defines the subscribers and features configured on each of the lines and keys. Since these settings are different for each physical phone at all the customers, the Cloud PBX module provides a template system to specify the configurations. That way, template variables can be used in the generic configuration, which are filled in by the system individually when a physical device fetches its configuration file.
To upload a configuration template, open the Device Configuration row and press Create Device Configuration.
Select the device model and specify a version number for this configuration (it is only for your reference to keep track of different versions). For Cisco SPA phones, keep the Content Type field to text/xml, since the configuration content will be served to the phone as XML file.
For devices other than the Cisco SPA, you might set text/plain if the configuration file is plain text, or application/octet-stream if the configuration is compiled into some binary form.
Finally paste the configuration template into the Content area and press Save.
The templates for certified device models are provided by Sipwise, but you can also write your own. The following variables can be used in the template:
-
config.url: The URL to the config file, including the device identifier (e.g.http://sip.example.org:1444/device/autoprov/config/001122334455). -
firmware.maxversion: The latest firmware version available on the system for the specific device. -
firmware.baseurl: The base URL to download firmwares (e.g.http://sip.example.org:1444/device/autoprov/firmware). To fetch the next newer firmware for a Cisco SPA, you can use the template line[% firmware.baseurl %]/$MA/from/$SWVER/next. -
phone.stationname: The name of the station (physical device) the customer specifies for this phone. Can be used to show on the display of the phone. phone.lineranges: An array of lines/keys as specified for the device model. Each entry in the array has the following keys:-
name: The name of the line/key range as specified in the Device Model section (e.g.Phone Keys). -
num_lines: The number of lines/keys in the line range (e.g.4in ourPhone Keysexample, or32in ourAttendant Console 1example). lines: An array of lines (e.g. subscriber definitions) for this line range. Each entry in the array has the following keys:-
keynum: The index of the key in the line range, starting from 0 (e.g.keynumwill be 3 for the 4th key of ourPhone Keysrange). -
rangenum: The index of the line range, starting from 0. The order of line ranges is as you have specified them (e.g.Phone Keyswas specified first, so it gets rangenum 0,Auto Attendant 1gets rangenum 1). -
type: The type of the line/key, on ofprivate,sharedorblf. -
username: The SIP username of the line. -
domain: The SIP domain of the line. -
password: The SIP password of the line. -
displayname: The SIP Display Name of the line.
-
-
In the configuration template, you can adjust embedded variable references for the existing variables. If you need other specific variables, please request their development from Sipwise.
| tip | |
In order to change the provisioning base IP and port (default 1444), you have to access |
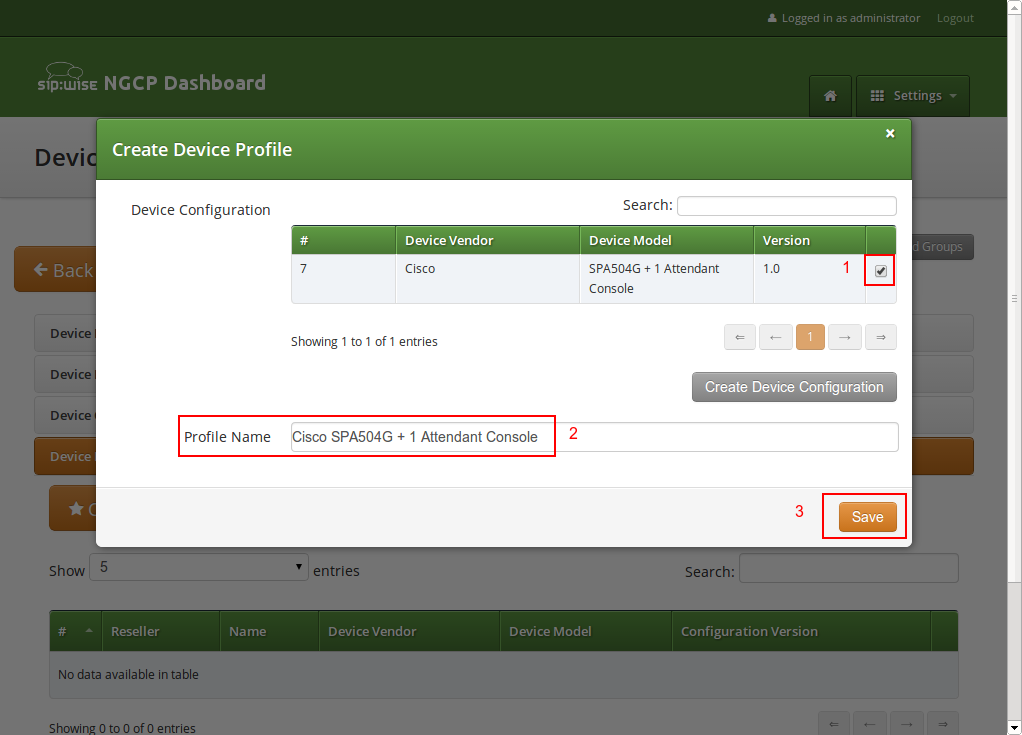
When the customer configures his own device, he doesn’t select a Device Model directly, but a Device Profile. A device profile specifies which model is going to be used with which configuration version. This allows the operator to create new configuration files and assign them to a profile, while still keeping older configuration files for reference or roll-back scenarios. It also makes it possible to test new firmwares by creating a test device model with the new firmware and a specific configuration, without impacting any existing customer devices.
To create a Device Profile for our phone, open the Device Profile row in the Device Management section and press Create Device Profile.
Select the device configuration (which implicitly identifies a device model) and specify a Profile Name. This name is what the customer sees when he is selecting a device he wants to provision, so pick a descriptive name which clearly identifies a device. Press Save to create the profile.
Repeat the steps as needed for every device you want to make available to customers.