For an initial installation of the sip:provider CE, it is mandatory that your production environment meets the following criteria:
Hardware Requirements
- Recommended: Dual-core, x86_64 compatible, 3GHz, 4GB RAM, 128GB HDD
- Minimum: Single-core, x86_64 compatible, 1GHz, 2GB RAM, 16GB HDD
Supported Operating Systems
- Debian Jessie (v8) 64-bit
Internet Connection
- Hardware needs connection to the Internet
| important | |
Only Debian Jessie (v8) 64-bit is currently supported as a host system for the sip:provider CE. |
| important | |
It is HIGHLY recommended that you use a dedicated server (either a physical or a virtual one) for sip:provider CE, because the installation process will wipe out existing MySQL databases and modify several system configurations. |
The custom Sipwise NGCP install CD provides the ability to easily install sip:provider CE, including automatic partitioning and installation of the underlying Debian system. You can install the latest available or Long Term Support (LTS) sip:provider CE release using sip:provider CE install CD image (checksums: sha1, md5).
| important | |
The NGCP install CD automatically takes care of partitioning, any present data will be overwritten! While the installer prompts for the disk that should be used for installation before its actual execution, it’s strongly recommended to boot the ISO in an environment with empty disks or disks that you don’t plan to use for anything else than the newly installed NGCP system. |
To configure network options please choose the according boot menu entries with either DHCP or static NW (static network configuration) in its name.
Press the <tab> key on the menu entry you want to boot, then adjust the ip=... and dns=... boot options as needed.
| tip | |
When DHCP is available in your infrastructure then you shouldn’t have to configure anything, just choose |
Also, you can use sip:provider CE install CD to boot the Grml (Debian based live system) rescue system, check RAM using a memory testing tool or install plain Debian squeeze/wheezy/jessie system for manual installation using NGCP installer.
You need to install Debian Jessie (v8) 64-bit on the server. A basic installation without any additional task selection (like Desktop System, Web Server etc.) is sufficient.
| tip | |
Sipwise recommends using the latest Netinstall ISO as installation medium. |
| important | |
If you use other kinds of installation media (e.g. provided by your hosting provider), prepare for some issues that might come up during installation. For example, you might be forced to manually resolve package dependencies in order to install the sip:provider CE. Therefore, it is HIGHLY RECOMMENDED to use a clean Debian installation to simplify the installation process. |
| info | |
If you installed your system using the Debian CDs/DVDs (so neither using the NGCP install CD nor the Debian Netinstall ISO) apt-get might prompt to insert disk to proceed during NGCP installation. The prompt won’t be visible for you and installation hangs. Please disable the cdrom entries in /etc/apt/sources.list and enable a Debian mirror (e.g. http://http.debian.net/debian) instead. |
If you plan to install the sip:provider CE on Virtual Hosting Providers like Dreamhost with their provided Debian installer, you might need to manually prepare the system for the NGCP installation, otherwise the installer will fail installing certain package versions required to function properly.
Using Dreamhost Virtual Private Server
A Dreamhost virtual server uses apt-pinning and installs specific versions of MySQL and apache, so you need to clean this up beforehand.
| info | |
Apache is not used by default since mr3.6.1, still better to remove pinned Apache version. |
apt-get remove --purge mysql-common ndn-apache22
mv /etc/apt/preferences /etc/apt/preferences.bak
apt-get update
apt-get dist-upgrade
| warning | |
Be aware that this step will break your web-based system administration provided by Dreamhost. Only do it if you are certain that you won’t need it. |
The sip:provider CE is based on the Sipwise NGCP, so download and install the latest Sipwise NGCP installer package:
PKG=ngcp-installer-mr5.4.1.deb
wget http://deb.sipwise.com/spce/${PKG}
dpkg -i ${PKG}
Run the installer as root user:
ngcp-installer
| info | |
You can find the previous versions of Sipwise NGCP installer package here. |
The installer will ask you to confirm that you want to start the installation. Read the given information carefully, and if you agree, proceed with y.
The installation process will take several minutes, depending on your network connection and server performance. If everything goes well, the installer will (depending on the language you use), show something like this:
Installation finished. Thanks for choosing NGCP sip:provider Community Edition.
During the installation, you can watch the background processing by executing the following command on a separate console:
tail -f /tmp/ngcp-installer.log
For quick test deployments, pre-installed virtualization images are provided. These images are intended to be used for quick test, not recommended for production use.
Vagrant is an open-source software for creating and configuring virtual development environments. Sipwise provides a so called Vagrant base box for your service, to easily get direct access to your own sip:provider CE Virtual Machine without any hassles.
| info | |
The following software must be installed to use Vagrant boxes: |
Get your copy of sip:provider CE by running:
vagrant init spce-mr5.4.1 http://deb.sipwise.com/spce/images/sip_provider_CE_mr5.4.1_vagrant.box
vagrant up
As soon as the machine is up and ready you should have your local copy of sip:provider CE with the following benefits:
- all the software and database are automatically updated to the latest available version
- the system is configured to use your LAN IP address (received over DHCP)
- basic SIP credentials to make SIP-2-SIP calls out of the box are available
Use the following command to access the terminal:
vagrant ssh
or login to Administrator web-interface at https://127.0.0.1:1443/login/admin (with default user administrator and password administrator).
There are two ways to access VM resources, through NAT or Bridge interface:
| info | |
a.b.c.d is IP address of VM machine received from DHCP; x.y.z.p is IP address of your host machine |
Table 1. Vagrant based VirtualBox VM interfaces:
| Description | Host-only address | LAN address | Notes |
|---|---|---|---|
SSH | ssh://127.0.0.1:2222 | ssh://a.b.c.d:22 or ssh://x.y.z.p:2222 | Also available via "vagrant ssh" |
Administrator interface | https://a.b.c.d:1443/login/admin or https://x.y.z.p:1443/login/admin | ||
New Customer self care interface | new self-care interface based on powerful ngcp-panel framework | ||
Old Customer self care interface | will be removed in upcoming releases | ||
Provisioning interfaces | |||
SIP interface | not available | sip://a.b.c.d:5060 | Both TCP and UDP are available. |
| info | |
VM ports smaller then 1024 mapped to ports 22<vm_port> through NAT, otherwise root on host machine requires to map them. It means SSH port 22 mapped to port 2222, WEB port 443 → 22443. |
VM IP address (a.b.c.d), as well as SIP credentials will be printed to terminal during "vagrant up" stage, e.g.:
[20_add_sip_account] Adding SIP credentials...
[20_add_sip_account]   - removing domain 192.168.1.103 with subscribers
[20_add_sip_account]   - adding domain 192.168.1.103
[20_add_sip_account]   - adding subscriber 43991002@192.168.1.103 (pass: 43991002)
[20_add_sip_account]   - adding subscriber 43991003@192.168.1.103 (pass: 43991003)
[20_add_sip_account]   - adding subscriber 43991004@192.168.1.103 (pass: 43991004)
[20_add_sip_account]   - adding subscriber 43991005@192.168.1.103 (pass: 43991005)
[20_add_sip_account]   - adding subscriber 43991006@192.168.1.103 (pass: 43991006)
[20_add_sip_account]   - adding subscriber 43991007@192.168.1.103 (pass: 43991007)
[20_add_sip_account]   - adding subscriber 43991008@192.168.1.103 (pass: 43991008)
[20_add_sip_account]   - adding subscriber 43991009@192.168.1.103 (pass: 43991009)
[20_add_sip_account] You can USE your VM right NOW:  https://192.168.1.103:1443/login/admin
To turn off your sip:provider CE virtual machine, just type:
vagrant halt
To completely remove sip:provider CE virtual machine, use:
vagrant destroy
vagrant box remove spce-mr5.4.1
Further documentation for Vagrant is available at the official Vagrant website.
Vagrant usage tips:
- Default SSH login is root and password is sipwise. SSH connection details can be displayed via:
vagrant ssh-config
You can download a VirtualBox image from here (checksums: sha1, md5). Once you have downloaded the file you can import it to VirtualBox via its import utility.
The format of the image is ova. If you have VirtualBox 3.x running, which is not compatible with ova format, you need to extract the file with any tar compatible software and import the ovf file which is inside the archive.
On Linux, you can do it like this:
tar xvf sip_provider_CE_mr5.4.1_virtualbox.ova
On Windows, right-click on the ova file, choose Open with and select WinZIP or WinRAR or any other application able to extract tar archives. Extract the files to any place and import the resulting ovf file in VirtualBox.
Considerations when using this virtual machine:
- You will need a 64bit guest capable VirtualBox setup.
- The root password is sipwise
- You should use bridge mode networking (adjust your bridging interface in the virtual machine configuration) to avoid having the sip:provider CE behind NAT.
- You’ll need to adjust your timezone and keyboard layout.
- The network configuration is set to DHCP. You’ll need to change it to the appropriate static configuration.
- As the virtual image is a static file, it won’t contain the most updated versions of our software. Please upgrade the system via apt as soon as you boot it for the first time.
You can download a VMware image from here (checksums: sha1, md5). Once you have downloaded the file just extract the zip file and copy its content to your virtual machines folder.
Considerations when using this virtual machine:
- You will need a 64bit guest capable vmware setup.
- The root password is sipwise
- You’ll need to adjust your timezone and keyboard layout.
- The network configuration is set to DHCP. You’ll need to change it to the appropriate static configuration.
- As the virtual image is a static file, it won’t contain the most updated versions of our software. Please upgrade the system via apt as soon as you boot it for the first time.
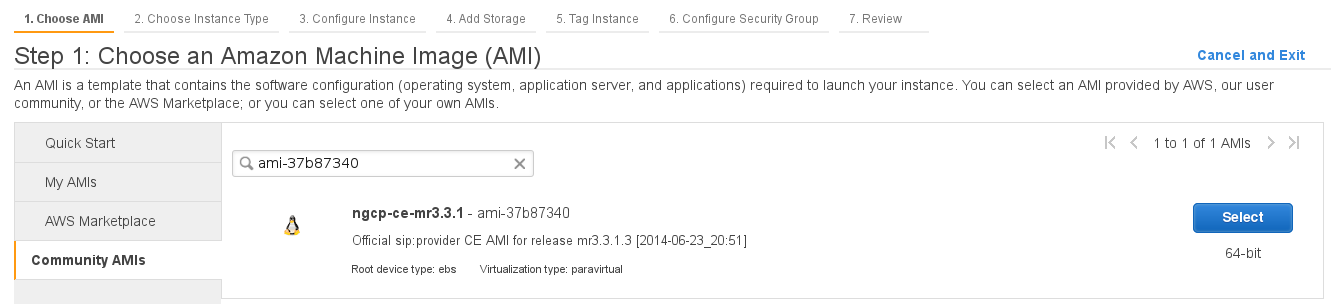
Sipwise provides AMI (Amazon Machine Images) images in all Amazon EC2 regions for the latest and LTS sip:provider CE releases. Please find the appropriate AMI ID for your region in release announcement.
| info | |
The following documentation will use Amazon region eu-west-1 with AMI ID ami-8bef6cfc as an example. Please find the appropriate AMI ID for your region in the latest release announcement. |
As a next step please visit https://console.aws.amazon.com/ec2/v2/home?region=eu-west-1 with your EC2 account.
Choose "Launch Instance":

Select "Community AMIs" option, enter "ami-8bef6cfc" inside the search field and press "Select" button:
Select the Instance Type you want to use for running sip:provider CE (recommended: >=2GB RAM):
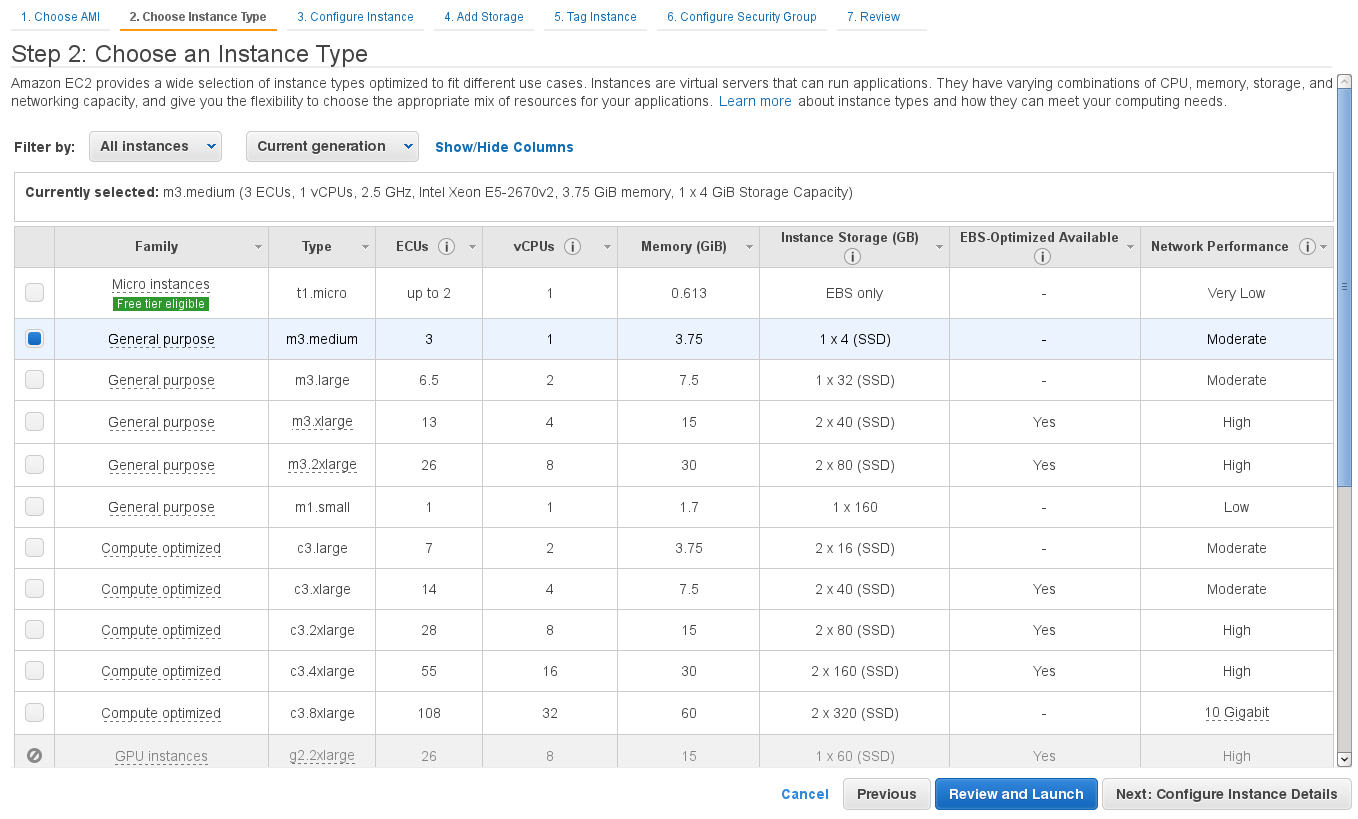
| tip | |
Do not forget to tune necessary sip:provider CE performance parameters depending on Amazon EC2 instance type and performance you are looking for. Sipwise image is tunned for minimum performance to fit Micro instances. Feel free to read more about sip:provider CE performance tuning in Section 14.6, “System Requirements and Performance”. |
Run through next configuration options
- Configure Instance: optional (no special configuration required from sip:provider CE)
- Add Storage: choose >=8GB disk size (no further special configuration required from sip:provider CE)
- Tag Instance: optional (no special configuration required from sip:provider CE)
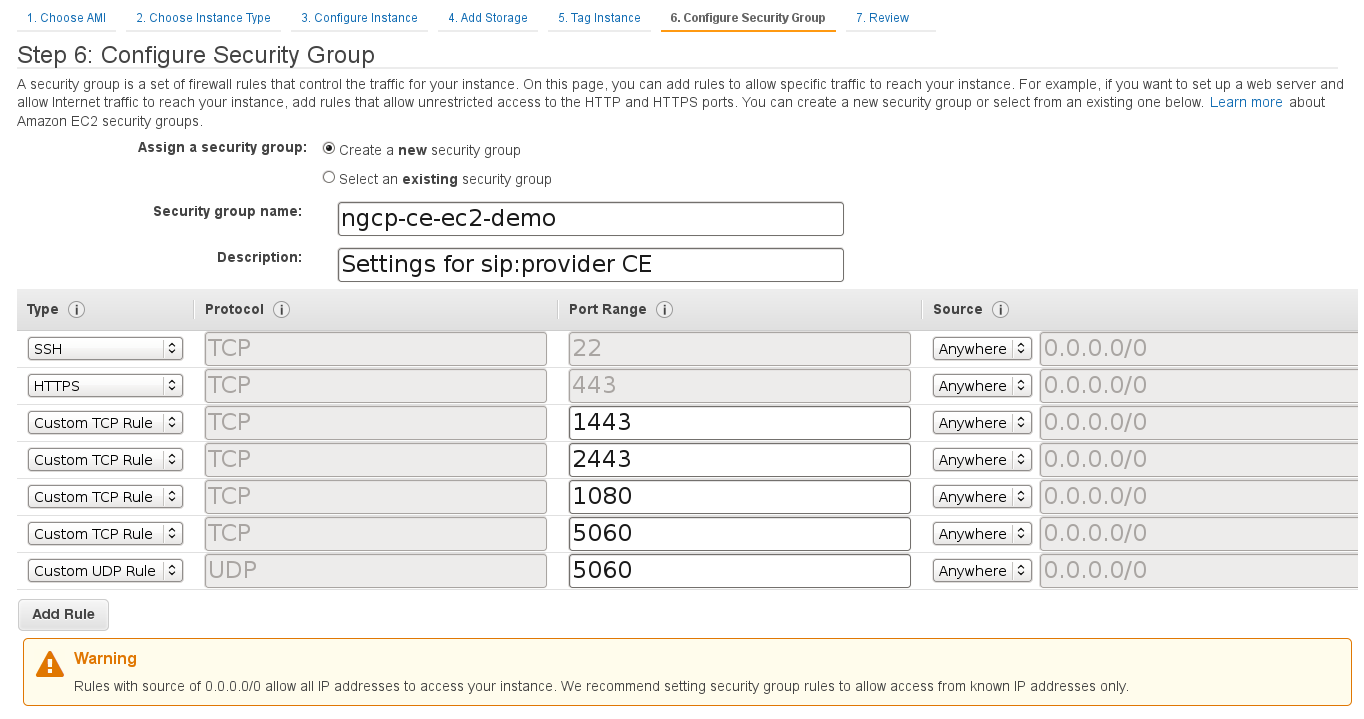
- Configure Security Group: create a new security group (SSH on port 22, HTTPS on port 443, TCP on ports 1443, 2443, 1080 and 5060 as well as UDP on port 5060 are suggested)
| info | |
Please feel free to restrict the Source options in your Security Group to your own (range of) IP addresses. |
Finally Review instance launch and press "Launch" button:
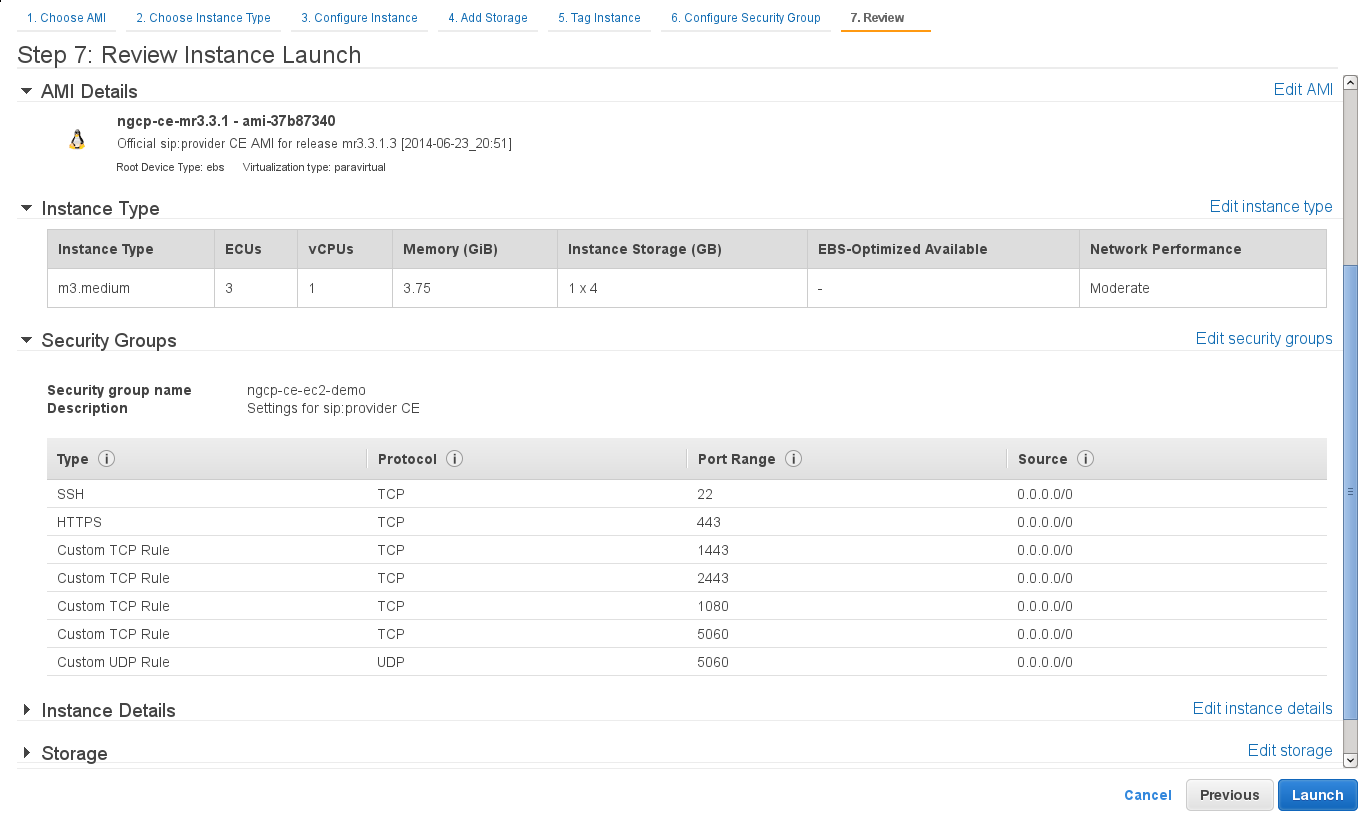
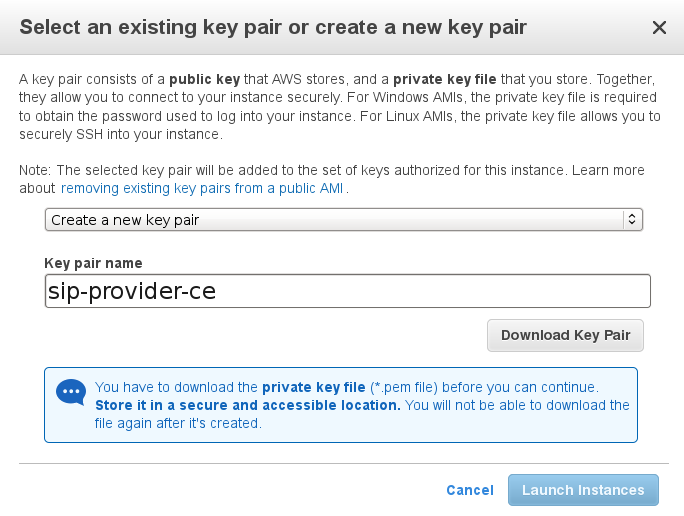
Choose an existing key pair which you want to use for logging in, or create a new one if you don’t have one.
You should have a running instance after a few seconds/minutes now (check DNS name/IP address).

First step should be logging in to the Admin panel (username administrator, password administrator) and changing the default password: https://$DNS:1443/login/admin and then follow Section 14, “Platform Security, Performance and Troubleshooting” to secure your installation.
Logging in via SSH should work now, using the key pair name (being sip-provider-ce.pem as $keypair in our example) and the DNS name/IP address the system got assigned.
ssh -i $keypair.pem admin@$DNS
Now you can increase your privileges to user root for further system configuration:
sudo -s
Don’t forget to add the Advertised IP for kamailio lb instance, since it’s required by the Amazon EC2 network infrastructure:
ngcp-network --set-interface=eth0 --advertised-ip=<your_public_amazon_ip>
and apply your changes:
ngcpcfg apply 'add advertised-ip on interface eth0'
Now feel free to use your newly started Amazon EC2 sip:provider CE instance!
| warning | |
Do not forget to stop unnecessary instance(s) to avoid unexpected costs (see http://aws.amazon.com/ec2/pricing/). |