- 6.1. Managing System Administrators
- 6.2. Access Control for SIP Calls
- 6.3. Call Forwarding and Call Hunting
- 6.4. Local Number Porting
- 6.5. Header Manipulation
- 6.6. SIP Trunking with SIPconnect
- 6.7. Trusted Subscribers
- 6.8. Voicemail System
- 6.9. Configuring Subscriber IVR Language
- 6.10. Sound Sets
- 6.11. Conference System
- 6.12. Malicious Call Identification (MCID)
- 6.13. Subscriber Profiles
- 6.14. SIP Loop Detection
- 6.15. Invoices and Invoice Templates
- 6.16. Email Reports and Notifications
- 6.17. The Vertical Service Code Interface
- 6.18. Handling WebRTC Clients
- 6.19. XMPP and Instant Messaging
The sip:provider CE provides plenty of subscriber features to offer compelling VoIP services to end customers, and also to cover as many deployment scenarios as possible. In this chapter, we provide the features overview and describe their function and use cases.
The sip:provider CE offers the platform operator with an easy to use interface to manage users with administrative privileges. Such users are representatives of resellers, and are entitled to manage configuration of services for Customers, Subscribers, Domains, Billing Profiles and other entities on Sipwise NGCP.
Administrators, as user accounts, are also used for client authentication on the REST API of NGCP.
There is a single administrator, whose account is enabled by default and who belongs to the default reseller. This user is the superuser of the NGCP administrative web interface (the so-called "admin panel"), and he has the right to modify administrators of other Resellers as well.
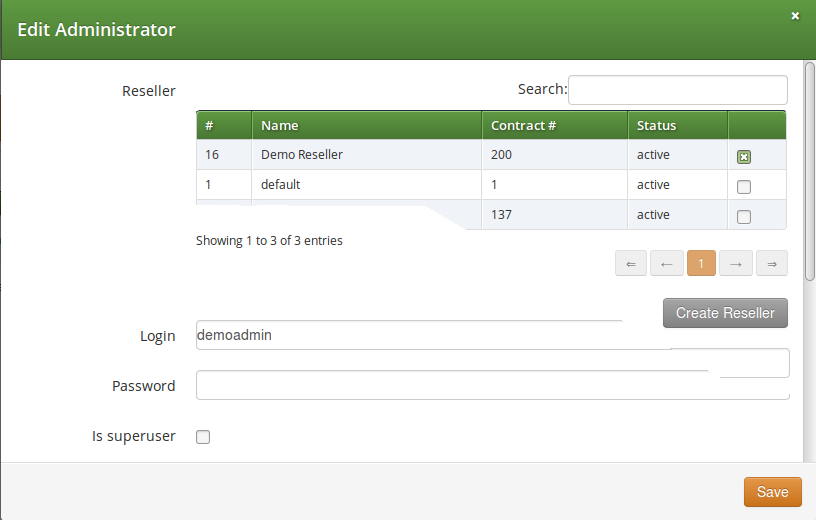
Configuration of access rights of system administrators is possible through the admin panel of NGCP. In order to do that, please navigate to Settings → Administrators.

You have 2 options:
- If you’d like to create a new administrator user press Create Administrator button.
- If you’d like to update an existing administrator user press Edit button in its row.
There are some generic attributes that have to be set for each administrator:
-
Reseller: each administrator user must belong to a Reseller. There is always
a default reseller (ID:
1, Name:default), but the administrator has to be assigned to his real reseller, if such an entity (other thandefault) exists. - Login: the login name of the administrator user
- Password: the password of the administrator user for logging in the admin panel, or for authentication on REST API
The second set of attributes is a list of access rights that are discussed in subsequent section of the handbook.
The various access rights of administrators are shown in the figure and summarized in the table below.
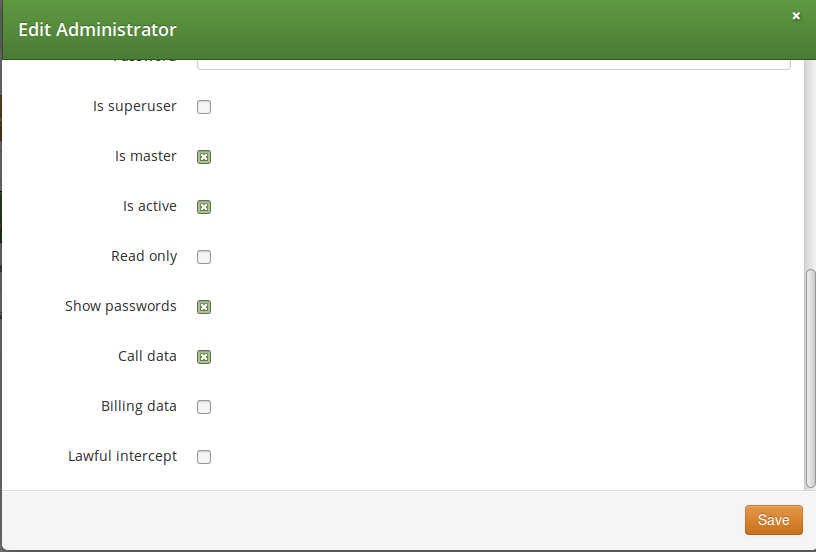
Table 2. Access Rights of System Administrators
Label in admin list | Access Right | Description | |||
|---|---|---|---|---|---|
not shown | Is superuser | The user is allowed to modify data on Reseller level and — among others — is able to modify administrators of other resellers. There should be only 1 user on Sipwise NGCP with this privilege. | |||
Master | Is master | The user is allowed to create, delete or modify other Admins who belong to the same Reseller. | |||
Active | Is active | The user account is active, i.e. the admin user can login on the web panel or authenticate himself on REST API; otherwise user authentication will fail. | |||
Read Only | Read only | The user will only be able to list various data but is not allowed to modify anything.
| |||
Show Passwords | Show passwords | The user sees subscriber passwords (in plain text) on the web interface.
| |||
Show CDRs | Call data | This privilege has effect on 2 items that will be displayed on admin panel of NGCP, when Subscriber → Details is selected:
| |||
Show Billing Info | Billing data | Some REST API resources that are related to billing are disabled: HTTP requests
on | |||
Lawful Intercept | Lawful intercept | If the privilege is selected then the REST API for interceptions (that is:
|
There are two different methods to provide fine-grained call admission control to both subscribers and admins. One is Block Lists, where you can define which numbers or patterns can be called from a subscriber to the outbound direction and which numbers or patterns are allowed to call a subscriber in the inbound direction. The other is NCOS Levels, where the admin predefines rules for outbound calls, which are grouped in certain levels. The subscriber can then just choose the level, or the admin can restrict a subscriber to a certain level. Also sip:provider CE offers some options to restrict the IP addresses that subscriber is allowed to use the service from. The following sections describe these features in detail.
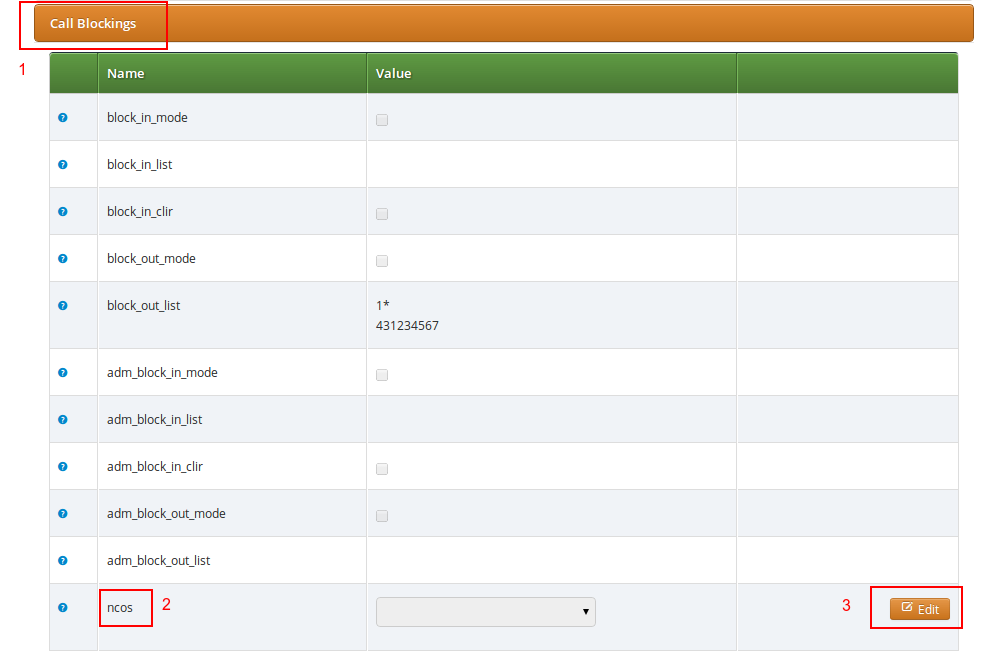
Block Lists provide a way to control which users/numbers can call or be called, based on a subscriber level, and can be found in the Call Blockings section of the subscriber preferences.
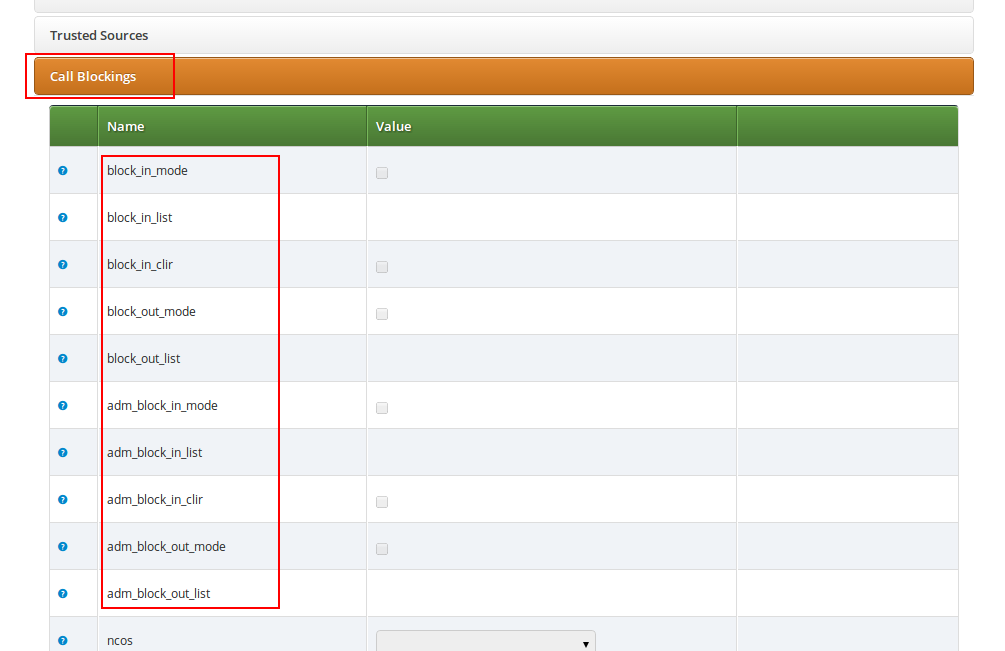
Block Lists are separated into Administrative Block Lists (adm_block_*) and Subscriber Block Lists (block_*). They both have the same behaviour, but Administrative Block Lists take higher precedence. Administrative Block Lists are only accessible by the system administrator and can thus be used to override any Subscriber Block Lists, e.g. to block certain destinations. The following break-down of the various block features apply to both types of lists.
Block lists can either be whitelists or blacklists and are controlled by the User Preferences block_in_mode, block_out_mode and their administrative counterparts.
- The blacklist mode (option is not checked tells the system to allow anything except the entries in the list. Use this mode if you just want to block certain numbers and allow all the rest.
- The whitelist mode indicates to reject anything except the entries in the list. Use this mode if you want to enforce a strict policy and allow only selected destinations or sources.
You can change a list mode from one to the other at any time.
The list contents are controlled by the User Preferences block_in_list, block_out_list and their administrative counterparts. Click on the Edit button in the Preferences view to define the list entries.
In block list entries, you can provide shell patterns like * and []. The behavior of the list is controlled by the block_xxx_mode feature (so they are either allowed or rejected). In our example above we have block_out_mode set to blacklist, so all calls to US numbers and to the Austrian number +431234567 are going to be rejected.
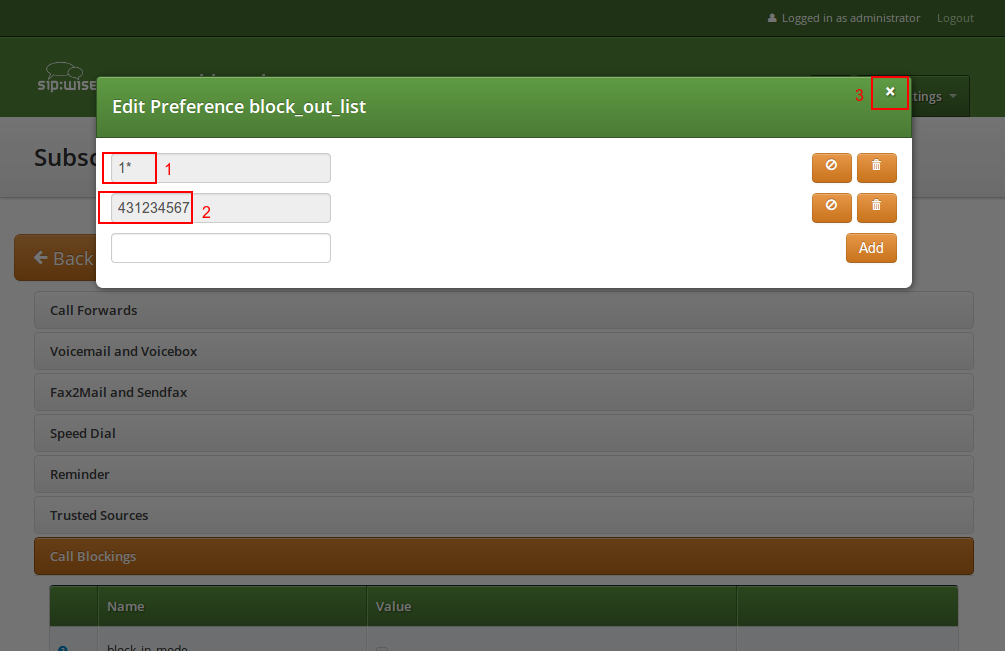
Click the Close icon once you’re done editing your list.
For incoming call, the User Preference block_in_clir and adm_block_in_clir controls whether or not to reject incoming calls with number supression (either "[Aa]nonymous" in the display- or user-part of the From-URI or a header Privacy: id is set). This flag is independent from the Block Mode.
NCOS Levels provide predefined lists of allowed or denied destinations for outbound calls of local subscribers. Compared to Block Lists, they are much easier to manage, because they are defined on a global scope, and the individual levels can then be assigned to each subscriber. Again there is the distinction for user- and administrative-levels.
If case of a conflict, when the Block Lists feature allows a number and NCOS Levels rejects the same number or vice versa, the number will be rejected.
NCOS levels can either be whitelists or blacklists.
- The blacklist mode indicates to allow everything except the entries in this level. This mode is used if you want to just block certain destinations and allow all the rest.
- The whitelist mode indicates to reject anything except the entries in this level. This is used if you want to enforce a strict policy and allow only selected destinations.
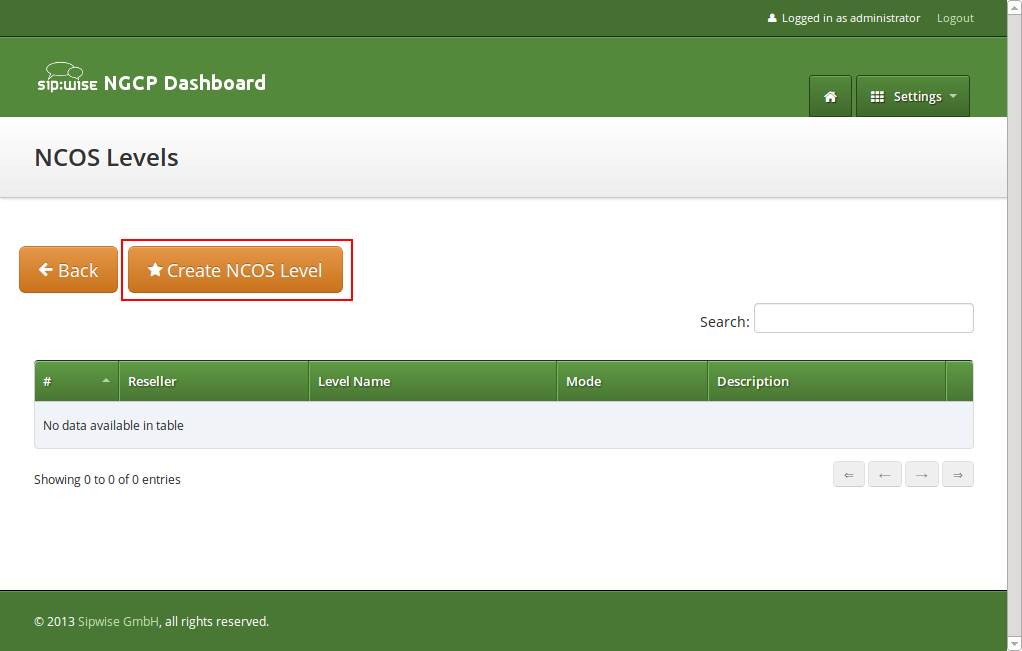
To create an NCOS Level, go to Settings→NCOS Levels and press the Create NCOS Level button.
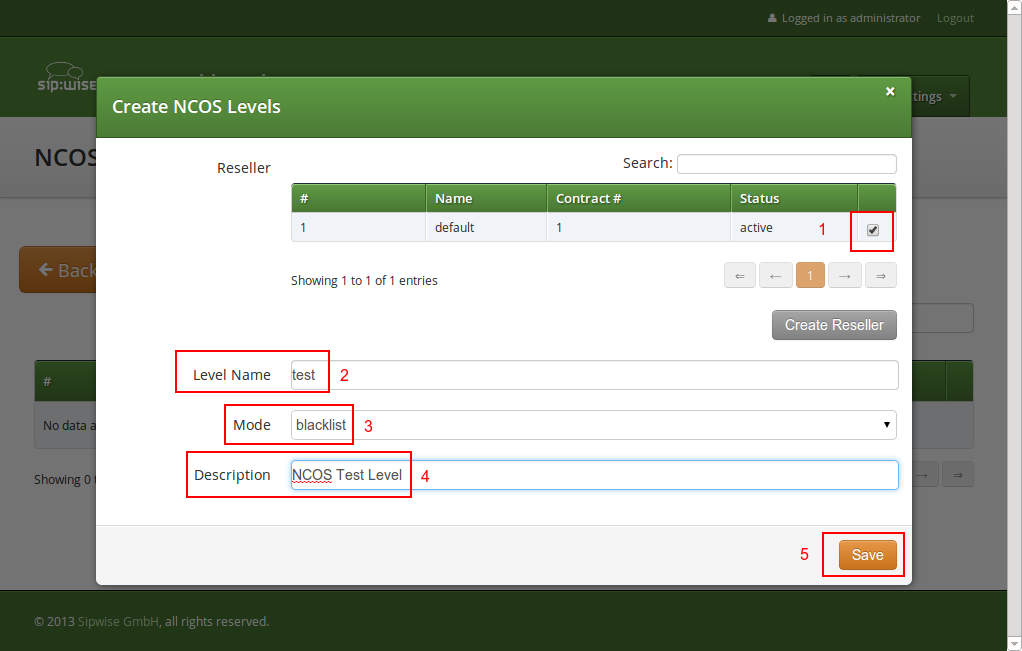
Select a reseller, enter a name, select the mode and add a description, then click the Save button.
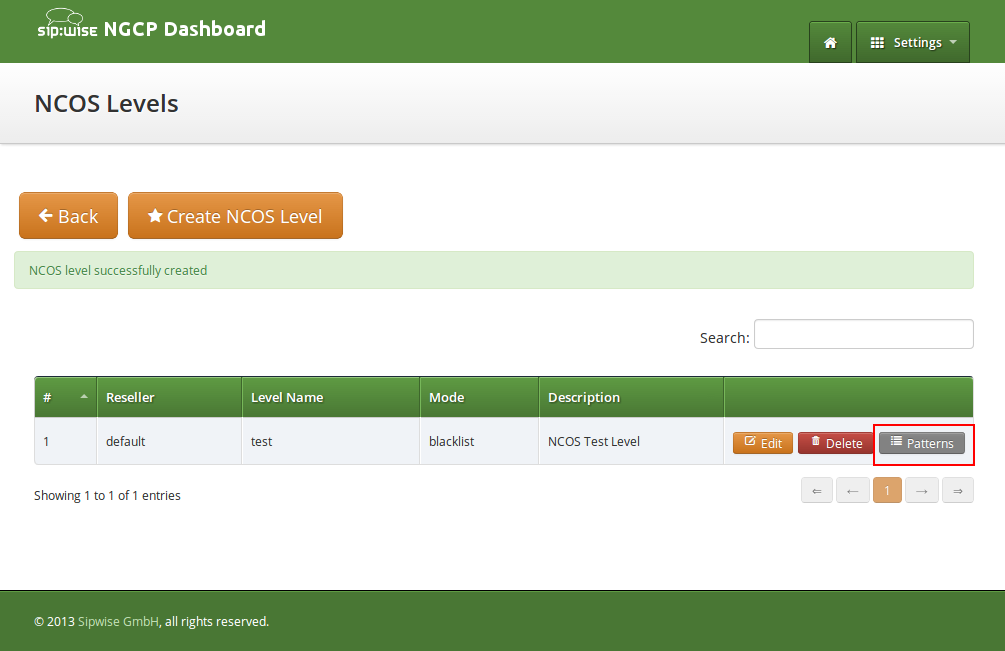
To define the rules within the newly created NCOS Level, click on the Patterns button of the level.
In the Number Patterns view you can create multiple patterns to define your level, one after the other. Click on the Create Pattern Entry Button on top and fill out the form.
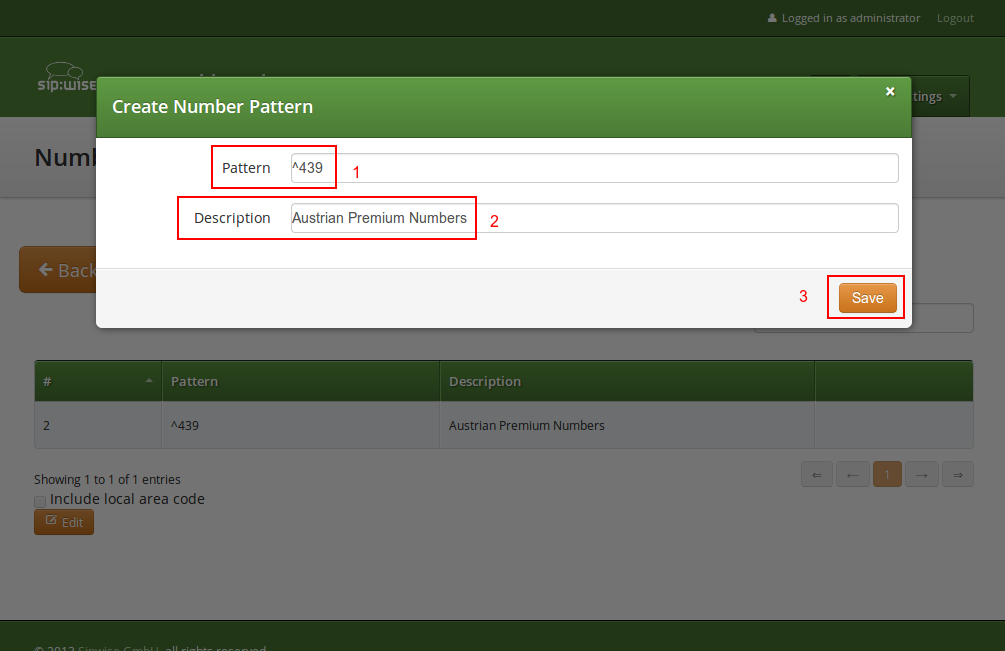
In this example, we block (since the mode of the level is blacklist) all numbers starting with 439. Click the
Save button to save the entry in the level.
The option include local area code in list for a blacklist means that calls within the area code of the subscribers are
denied, and for whitelist that they are allowed, respectively. For example if a subscriber has country-code 43 and area-code 1,
then selecting this checkbox would result in an implicit entry ^431.
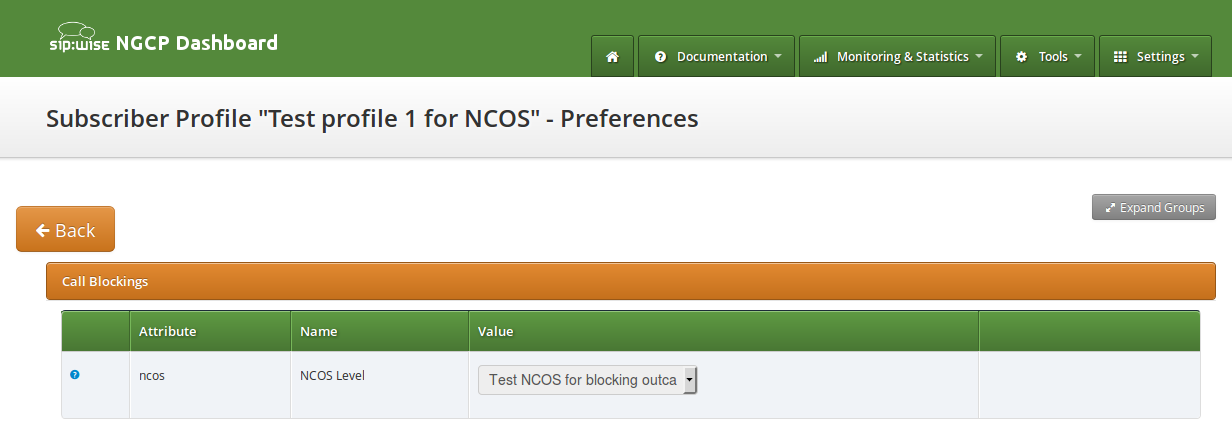
Once you’ve defined your NCOS Levels, you can assign them to local subscribers. To do so, navigate to Settings→Subscribers, search for the subscriber you want to edit, press the Details button and go to the Preferences View. There, press the Edit button on either the ncos or adm_ncos setting in the Call Blockings section.
You can assign the NCOS level to all subscribers within a particular domain. To do so, navigate to Settings→Domains, select the domain you want to edit and click Preferences. There, press the Edit button on either ncos or admin_ncos in the Call Blockings section.
Note: if both domain and subscriber have same NCOS preference set (either ncos or adm_ncos, or both) the subscriber’s preference is used. This is done so that you can override the domain-global setting on the subscriber level.
In some countries there are regulatory requirements that prohibit subscribers from forwarding their numbers to special numbers like emergency, police etc. While the sip:provider CE does not deny provisioning Call Forward to these numbers, the administrator can prevent the incoming calls from being actually forwarded to numbers defined in the NCOS list: just select the appropriate NCOS level in the domain’s or subscriber’s preference adm_cf_ncos. This NCOS will apply only to the Call Forward from the subscribers and not to the normal outgoing calls from them.
The sip:provider CE provides subscriber preference allowed_ips to restrict the IP addresses that subscriber is allowed to use the service from. If the REGISTER or INVITE request comes from an IP address that is not in the allowed list, the sip:provider CE will reject it with a 403 message. Also a voice message can be played when the call attempt is rejected (if configured).
By default, allowed_ips is an empty list which means that subscriber is not restricted. If you want to configure a restriction, navigate to Settings→Subscribers, search for the subscriber you want to edit, press Details and then Preferences and press Edit for the allowed_ips preference in the Access Restrictions section.
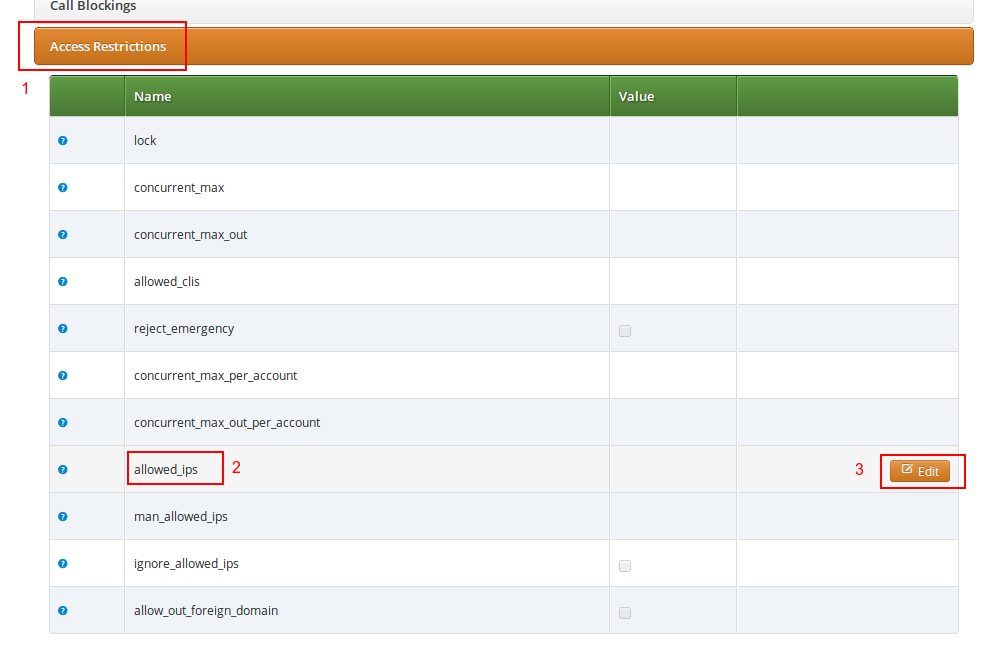
Press the Edit button to the right of empty drop-down list.
You can enter multiple allowed IP addresses or IP address ranges one after another. Click the Add button to save each entry in the list. Click the Delete button if you want to remove some entry.
The sip:provider CE provides the capabilities for normal call forwarding (deflecting a call for a local subscriber to another party immediately or based on events like the called party being busy or doesn’t answer the phone for a certain number of seconds) and serial call hunting (sequentially executing a group of deflection targets until one of them succeeds). Targets can be stacked, which means if a target is also a local subscriber, it can have another call forward or hunt group which is executed accordingly.
Call Forwards and Call Hunting Groups can either be executed unconditionally or based on a Time Set Definition, so you can define deflections based on time period definitions (e.g. Monday to Friday 8am to 4pm etc).
Go to your Subscriber Preferences and click Edit on the Call Forward Type you want to set (e.g. Call Forward Unconditional).
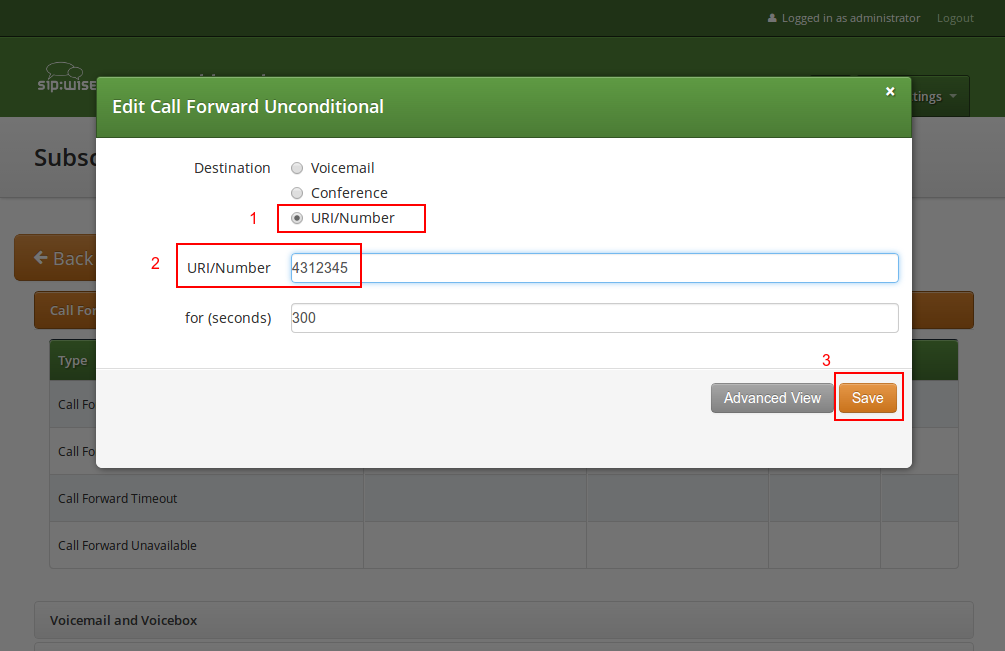
If you select URI/Number in the Destination field, you also have to set a URI/Number. The timeout defines for how long this destination should be tried to ring.
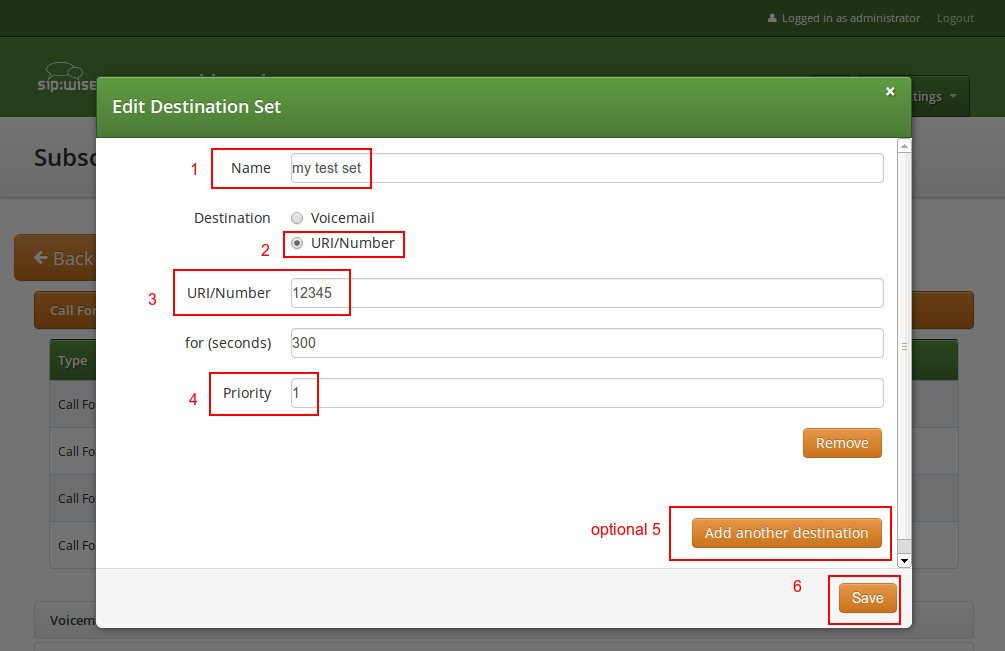
If you want multiple destinations to be executed one after the other, you need to change into the Advanced View when editing your call forward. There, you can select multiple Destination Set/Time Set pairs to be executed.
A Destination Set is a list of destinations to be executed one after another.
A Time Set is a time definition when to execute this Destination Set.
Click on Manage Destination Sets to see a list of available sets. The quickset_cfu has been implicitly created during our creation of a simple call forward. You can edit it to add more destinations, or you can create a new destination set.
When you close the Destination Set Overview, you can now assign your new set in addition or instead of the quickset_cfu set.
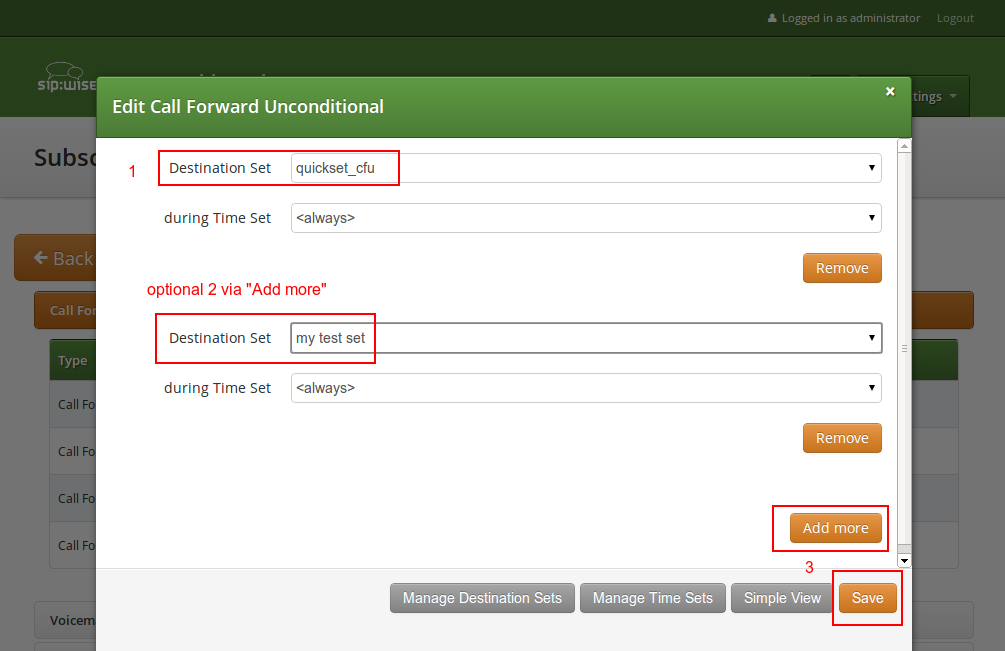
Press Save to store your settings.
Click on Manage Time Sets in the advanced call-forward menu to see a list of available time sets. By default there are none, so you have to create one.

You need to provide a Name, and a list of Periods where this set is active. If you only set the top setting of a date field (like the Year setting in our example above), then it’s valid for just this setting (like the full year of 2013 in our case). If you provide the bottom setting as well, it defines a period (like our Month setting, which means from beginning of April to end of September). For example, if a CF is set with the following timeset: "hour { 10-12 } minute { 20-30 }", the CF will be matched within the following time ranges:
- from 10.20am to 10:30am
- from 11.20am to 11:30am
- from 12.20am to 12:30am
| important | |
the period is a through definition, so it covers the full range. If you define an Hour definition 8-16, then this means from 08:00 to 16:59:59 (unless you filter the Minutes down to something else). |
If you close the Time Sets management, you can assign your new time set to the call forwards you’re configuring.
The Sipwise NGCP platform comes with two ways of accomplishing local number porting (LNP):
- one is populating the integrated LNP database with porting data,
- the other is accessing external LNP databases via the Sipwise LNP daemon using the LNP API.
| info | |
Accessing external LNP databases is available for PRO and CARRIER products only. |
The local LNP database provides the possibility to define LNP Carriers (the owners of certain ported numbers or number blocks) and their corresponding LNP Numbers belonging to those carriers. It can be configured on the admin panel in Settings→Number Porting or via the API. The LNP configuration can be populated individually or via CSV import/export both on the panel and the API.
LNP Carriers are defined by an arbitrary Name for proper identification (e.g. British Telecom) and contain a Prefix which can be used as routing prefix in LNP Rewrite Rules and subsequently in Peering Rules to route calls to the proper carriers. The LNP prefix is written to CDRs to identify the selected carrier for post processing and analytics purposes of CDRs. LNP Carrier entries also have an Authoritative flag indicating that the numbers in this block belong to the carrier operating the sip:provider CE. This is useful to define your own number blocks, and in case of calls to those numbers reject the calls if the numbers are not assigned to local subscribers (otherwise they would be routed to a peer, which might cause call loops). Finally the Skip Rewrite flag skips executing of LNP Rewrite Rules if no number manipulation is desired for an LNP carrier.
LNP Carriers contain one or more LNP Numbers. Those LNP Numbers are defined by a Number entry in E164 format (<cc><ac><sn>) used to match a number against the LNP database. Number matching is performed on a longest match, so you can define number blocks without specifying the full subscriber number (e.g. a called party number 431999123 is going to match an entry 431999 in the LNP Numbers).
For an LNP Numbers entry, an optional Routing Number can be defined. This is useful to translate e.g. premium 900 or toll-free 800 numbers to actual routing numbers. If a Routing Number is defined, the called party number is implicitly replaced by the Routing Number and the call processing is continued with the latter.
An optional Start Date and End Date allows to schedule porting work-flows up-front by populating the LNP database with certain dates, and the entries are only going to become active with those dates. Empty values for start indicate a start date in the past, while empty values for end indicate an end time in the future during processing of a call, allowing to define infinite date ranges. As intervals can overlap, the LNP number record with a start time closest to the current time is selected.
In order to activate Local LNP during routing, the feature must be activated in config.yml. Set kamailio→proxy→lnp→enabled to yes and kamailio→proxy→lnp→type to local.
Calls to non-authoritative Carriers
When a call arrives at the system, the calling and called party numbers are first normalized using the Inbound Rewrite Rules for Caller and Inbound Rewrite Rules for Callee within the rewrite rule set assigned to the calling party (a local subscriber or a peer).
If the called party number is not assigned to a local subscriber, or if the called party is a local subscriber and has the subscriber/domain preference lnp_for_local_sub set, the LNP lookup logic is engaged, otherwise the call proceeds without LNP lookup. The further steps assume that LNP is engaged.
If the call originated from a peer, and the peer preference caller_lnp_lookup is set for this peer, then an LNP lookup is performed using the normalized calling party number. The purpose for that is solely to find the LNP prefix of the calling peer, which is then stored as source_lnp_prefix in the CDR. If the LNP lookup does not return a result (e.g. the calling party number is not populated in the local LNP database), but the peer preference default_lnp_prefix is set for the originating peer, then the value of this preference is stored in source_lnp_prefix of the CDR.
Next, an LNP lookup is performed using the normalized called party number. If no number is found (using a longest match), no further manipulation is performed.
If an LNP number entry is found, and the Routing Number is set, the called party number is replaced by the routing number. Also, if the Authoritative flag is set in the corresponding LNP Carrier, and the called party number is not assigned to a local subscriber, the call is rejected. This ensures that numbers allocated to the system but not assigned to subscribers are dropped instead of routed to a peer.
| important | |
If the system is serving a local subscriber with only the routing number assigned (but not e.g. the premium number mapping to this routing number), the subscriber will not be found and the call will either be rejected if the called party premium number is within an authoritative carrier, or the call will be routed to a peer. This is due to the fact that the subscriber lookup is performed with the dialled number, but not the routing number fetched during LNP. So make sure to assign e.g. the premium number to the local subscriber (optionally in addition to the routing number if necessary using alias numbers) and do not use the LNP routing number mechanism for number mapping to local subscribers. |
Next, if the the LNP carrier does not have the Skip Rewriting option set, the LNP Rewrite Rules for Callee are engaged. The rewrite rule set used is the one assigned to the originating peer or subscriber/domain via the rewrite_rule_set preference. The variables available in the match and replace part are, beside the standard variables for rewrite rules:
-
${callee_lnp_prefix}: The prefix stored in the LNP Carrier -
${callee_lnp_basenumber}: The actual number entry causing the match (may be shorter than the called party number due to longest match)
Typically, you would create a rewrite rule to prefix the called party number with the callee_lnp_prefix by matching ^([0-9]+)$
and replacing it by ${callee_lnp_prefix}\1.
Once the LNP processing is completed, the system checks for further preferences to finalize the number manipulation. If the originating
local subscriber or peer has the preference lnp_add_npdi set, the Request URI user-part is suffixed with ;npdi. Next,
if the preference lnp_to_rn is set, the Request URI user-part is suffixed with ;rn=LNP_ROUTING_NUMBER, where
LNP_ROUTING_NUMBER is the Routing Number stored for the number entry in the LNP database, and the originally called number is
kept in place. For example, if lnp_to_rn is set and the number 1800123 is called, and this number has a routing number
1555123 in the LNP database, the resulting Request-URI is sip:1800123;rn=1555123@example.org.
Finally, the destination_lnp_prefix in the CDR table is populated either by the prefix defined in the Carrier of the LNP database if a match was found, or by the default_lnp_prefix prefrence of the destination peer or subscriber/domain.
If a call originated from a peer and the peer preference force_outbound_calls_to_peer is set to force_nonlocal_lnp (the if callee is not local and is ported selection in the panel), the call is routed back to a peer selected via the peering rules.
This ensures that if a number once belonged to your system and is ported out, but other carriers are still sending calls to you (e.g. selecting you as an anchor network), the affected calls can be routed to the carrier the number got ported to.
The LNP database can be exported to CSV, and in the same format imported back to the system. On import, you can decide whether to drop existing data prior to applying the data from the CSV.
The CSV file format contains the fields in the following order:
carrier_name carrier_prefix number routing_number start end authoritative skip_rewrite
Table 3. LNP CSV Format
Name | Description |
Carrier Name | The Name in the LNP Carriers table (string, e.g. My Carrier) |
Carrier Prefix | The Prefix in the LNP Carriers table (string, e.g. DD55) |
Number | The Number in the LNP Numbers table (E164 number, e.g. 1800666) |
Routing Number | The Routing Number in the LNP Numbers table (E164 number or empty, e.g. 1555666) |
Start | The Start in the LNP Numbers table (YYYY-MM-DD or empty, e.g. 2016-01-01) |
End | The End in the LNP Numbers table (YYYY-MM-DD or empty, e.g. 2016-12-30) |
Authoritative | The Authoritative flag in the LNP Carriers table (0 or 1) |
Skip Rewrite | The Skip Rewrite flag in the LNP Carriers table (0 or 1) |
Adding additional SIP headers to the initial INVITEs relayed to the callee (second leg) is possible by modifying the following template file: /etc/ngcp-config/templates/etc/ngcp-sems/etc/ngcp.sbcprofile.conf.customtt.tt2. The following section can be changed:
header_filter=whitelist
header_list=[%IF kamailio.proxy.debug == "yes"%]P-NGCP-CFGTEST,[%END%]
P-R-Uri,P-D-Uri,P-Preferred-Identity,P-Asserted-Identity,Diversion,Privacy,
Allow,Supported,Require,RAck,RSeq,Rseq,User-Agent,History-Info,Call-Info
[%IF kamailio.proxy.presence.enable == "yes"%],Event,Expires,
Subscription-State,Accept[%END%][%IF kamailio.proxy.allow_refer_method
== "yes"%],Referred-By,Refer-To,Replaces[%END%]
By default the system will remove from the second leg all the SIP headers which are not in the above list. If you want to keep some additional/custom SIP headers, coming from the first leg, into the second leg you just need to add them at the end of the header_list= list. After that, as usual, you need to apply the changes. In this way the system will keep your headers in the INVITE sent to the destination subscriber/peer.
| warning | |
DO NOT TOUCH the list if you don’t know what you are doing. |
Sometimes you may need to filter some audio CODEC from the SDP payload, for example if you want to force your subscribers to do not talk a certain codecs or force them to talk a particular one.
To achieve that you just need to change the /etc/ngcp-config/config.yml, in the following section:
sdp_filter:
      codecs: PCMA,PCMU,telephone-event
      enable: yes
      mode: whitelist
In the example above, the system is removing all the audio CODECS from the initial INVITE except G711 alaw,ulaw and telephone-event. In this way the callee will be notified that the caller is able to talk only PCMA. Another example is the blacklist mode:
sdp_filter:
      codecs: G729,G722
      enable: yes
      mode: blacklist
In this way the G729 and G722 will be removed from the SDP payload.
In order to apply the changes, as usual, you need to run ngcpcfg apply Enable CODEC filtering .
It may be useful and mandatory - specially with NGN interconnection - to enable SIP History header and/or Diversion header for outbound requests to a peer or even for on-net calls. In order to do so, you should enable the following preferences in Domain’s and Peer’s Preferences:
- Domain’s Prefererences: inbound_uprn = Forwarder’s NPN
- Peer’s Prefererences: outbound_history_info = UPRN
- Peer’s Prefererences: outbound_diversion = UPRN
- Domain’s Prefererences: outbound_history_info = UPRN (if you want to allow History Header for on-net call as well)
- Domain’s Prefererences: outbound_diversion = UPRN (if you want to allow Diversion Header for on-net call as well)
For the purpose of external SIP-PBX interconnect with sip:provider CE the platform admin should create a subscriber with multiple aliases representing the numbers and number ranges served by the SIP-PBX.
- Subscriber username - any SIP username that forms an "email-style" SIP URI.
- Subscriber Aliases - numbers in the global E.164 format without leading plus.
To configure the Subscriber, go to Settings→Subscribers and click Details on the row of your subscriber. There, click on the Preferences button on top.
You should look into the Number Manipulations and Access Restrictions sections in particular, which control the calling and called number presentation.
Enable preference Number Manipulations→e164_to_ruri for routing inbound calls to SIP-PBX. This ensures that the Request-URI will comprise a SIP-URI containing the dialed alias-number as user-part, instead of the user-part of the registered AOR (which is normally a static value).
The following sections describe the recommended configuration for correct call routing and CLI presentation according to the SIPconnect 1.1 recommendation.
The SIP PBX by default inherits the domain dialplan which usually has rewrite rules applied to normal Class 5 subscribers with inbound rewrite rules normalizing the dialed number to the E.164 standard. If most users of this domain are Class 5 subscribers the dialplan may supply calling number in national format - see Section 5.6, “Configuring Rewrite Rule Sets”. While the SIP-PBX trunk configuration can be sometimes amended it is a good idea in sense of SIPconnect recommendation to send only the global E.164 numbers.
Moreover, in mixed environments with the sip:provider CE Cloud PBX sharing the same domain with SIP trunking (SIP-PBX) customers the subscribers may have different rewrite rules sets assigned to them. The difference is caused by the fact that the dialplan for Cloud PBX is fundamentally different from the dialplan for SIP trunks due to extension dialing, where the Cloud PBX subscribers use the break-out code to dial numbers outside of this PBX.
The SIPconnect compliant numbering plan can be accommodated by assigning Rewrite Rules Set to the SIP-PBX subscriber. Below is a sample Rewrite Rule Set for using the global E.164 numbers with plus required for the calling and called number format compliant to the recommendation.
Inbound Rewrite Rule for Caller
-
Match Pattern:
^(00|\+)([1-9][0-9]+)$ -
Replacement Pattern:
\2 -
Description:
International to E.164 -
Direction:
Inbound -
Field:
Caller
Inbound Rewrite Rule for Callee
-
Match Pattern:
^(00|\+)([1-9][0-9]+)$ -
Replacement Pattern:
\2 -
Description:
International to E.164 -
Direction:
Inbound -
Field:
Callee
Outbound Rewrite Rule for Caller
-
Match Pattern:
^([1-9][0-9]+)$ -
Replacement Pattern:
+\1 -
Description:
For the calls to SIP-PBX add plus to E.164 -
Direction:
Outbound -
Field:
Caller
Outbound Rewrite Rule for Callee
-
Match Pattern:
^([1-9][0-9]+)$ -
Replacement Pattern:
+\1 -
Description:
For the calls to SIP-PBX add plus to E.164 -
Direction:
Outbound -
Field:
Callee
Assign the aforementioned Rewrite Rule Set to the SIP-PBX subscribers.
| warning | |
Outbound Rewrite Rules for Callee shall NOT be applied to the calls to normal SIP UAs like IP phones since the number with plus does not correspond to their SIP username. |
The following configuration is needed for your platform to populate the From and To headers and Request-URI of the INVITE request with "user=phone" parameter as per RFC 3261 Section 19.1.1 (if the user part of the URI contains telephone number formatted as a telephone-subscriber).
- Domain’s Prefererences: outbound_from_user_is_phone = Y
- Domain’s Prefererences: outbound_to_user_is_phone = Y
The following is our common configuration that covers the calling number presentation in a variety of use-cases, including the incoming calls, on-net calls and Call Forward by the platform:
- Domain’s Preferences: inbound_uprn = Forwarder’s NPN
- Domain’s Preferences: outbound_from_user = UPRN (if set) or User-Provided Number
- Domain’s Preferences: outbound_pai_user = UPRN (if set) or Network-Provided Number
- Domain’s Preferences: outbound_history_info = UPRN (if the called user expects History-Info header)
- Domain’s Preferences: outbound_diversion = UPRN (if the called user expects Diversion header)
- Domain’s Preferences: outbound_to_user = Original (Forwarding) called user if the callee expects the number of the subscriber forwarding the call, otherwise leave default.
The above parameters can be tuned to operator specifics as required. You can of course override these settings in the Subscriber Preferences if particular subscribers need special settings.
| tip | |
On outgoing call from SIP-PBX subscriber the Network-Provided Number (NPN) is set to the cli preference prefilled with main E.164 number. In order to have the full alias number as NPN on outgoing call set preference extension_in_npn = Y. |
Externally forwarded call. If the call forward takes place inside the SIP-PBX it can use one of the following specification for signaling the diversion number to the platform:
- using Diversion method (RFC 5806): configure Subscriber’s Prefererences: inbound_uprn = Forwarder’s NPN / Received Diversion
- using History-Info method (RFC 7044): NGCP platform extends the History-Info header received from the PBX by adding another level of indexing according to the specification RFC 7044.
- For correct calling number presentation on outgoing calls, you should include the pattern matching all the alias numbers of SIP-PBX or each individual alias number under the allowed_clis preference.
- If the signalling calling number (usually taken from From user-part, see inbound_upn preferences) does not match the allowed_clis pattern, the user_cli or cli preference (Network-Provided Number) will be used for calling number presentation.
SIP-PBX can use either Static or Registration Mode. While SIPconnect 1.1 continues to require TLS support at MUST strength, one should note that using TLS for signaling does not require the use of the SIPS URI scheme. SIPS URI scheme is obsolete for this purpose.
Static Mode. While SIPconnect 1.1 allows the use of Static mode, this poses additional maintenance overhead on the operator. The administrator should create a static registration for the SIP-PBX: go to Susbcribers, Details→Registered Devices→Create Permanent Registration and put address of the SIP-PBX in the following format: sip:username@ipaddress:5060 where username=username portion of SIP URI and ipaddress = IP address of the device.
Registration Mode. It is recommended to use the Registration mode with SIP credentials defined for the SIP-PBX subscriber.
| important | |
The use of RFC 6140 style "bulk number registration" is discouraged. The SIP-PBX should register one AOR with email-style SIP URI. The sip:provider CE will take care of routing the aliases to the AOR with e164_to_ruri preference. |
If a SIP-PBX can not be configured to perform digest authentication, you can enable IP-based authentication in sip:provider CE for it. For this go to the subscriber’s preferences (Details→Preferences→Trusted Sources) and specify the IP address of the SIP-PBX in the Source IP field.
When this feature is configured, the sip:provider CE will authenticate all calls of this user that arrive from the specified IP without sending a challenge.
| important | |
If the same IP address is mistakenly specified as trusted for different subscribers, the sip:provider CE will not know which subscriber should be responsible for the call and will randomly select one. |
In some cases, when you have a device that cannot authenticate itself towards sip:provider CE, you may need to create Trusted Subscriber. Trusted Subscribers use IP-based authentication and they have a Permanent SIP Registration URI in order to receive messages from sip:provider CE. In order to create a Trusted Subscriber you just need to create a normal subscriber, then Create a Permanent Registration via (Subscribers→Details→Registered Devices→Create Permanent Registration) and also you need to add the devices IP as Trusted Source in your subscriber’s preferences (Details→Preferences→Trusted Sources). In this way, all messages coming from your device IP will be trusted (and authenticate just via the source IP), on the other side all the SIP messages to your devices will be sent to the SIP URI specified in the Permanent Registration.
For a subscriber to manage his voicebox via IVR, there are two ways to access the voicebox. One is to call the URI voicebox@yourdomain from the subscriber itself, allowing password-less access to the IVR, as the authentication is already done on SIP level. The second is to call the URI voiceboxpass@yourdomain from any number, causing the system to prompt for a mailbox and the PIN. The PIN can be set in the Voicemail and Voicebox section of the Subscriber Preferences.
Since access might need to be provided from external networks like PSTN/Mobile, and since certain SIP phones do not support calling alphanumeric numbers to dial voicebox, you can map any number to the voicebox URIs using rewrite rules.
To do so, you can provision a match pattern e.g. ^(00|\+)12345$ with a replace pattern voicebox or voiceboxpass to map a number to either password-less or password-based IVR access respectively. Create a new rewrite rule with the Inbound direction and the Callee field in the corresponging rewrite rule set.
For inbound calls from external networks, assign this rewrite rule set to the corresponding incoming peer. If you also need to map numbers for on-net calls, assign the rewrite rule set to subscribers or the whole SIP domain.
When reaching voiceboxpass, the subscriber is prompted for her mailbox number and a password. All numbers assigned to a subscriber are valid input (primary number and any alias number). By default, the required format is in E.164, so the subscriber needs to enter the full number including country code, for example 4912345 if she got assigned a German number.
You can globally configure a rewrite rule in config.yml using asterisk.voicemail.normalize_match and asterisk.voicemail.normalize_replace, allowing you to customize the format a subscriber can enter, e.g. having ^0([1-9][0-9]+)$ as match part and 49$1 as replace part to accept German national format.
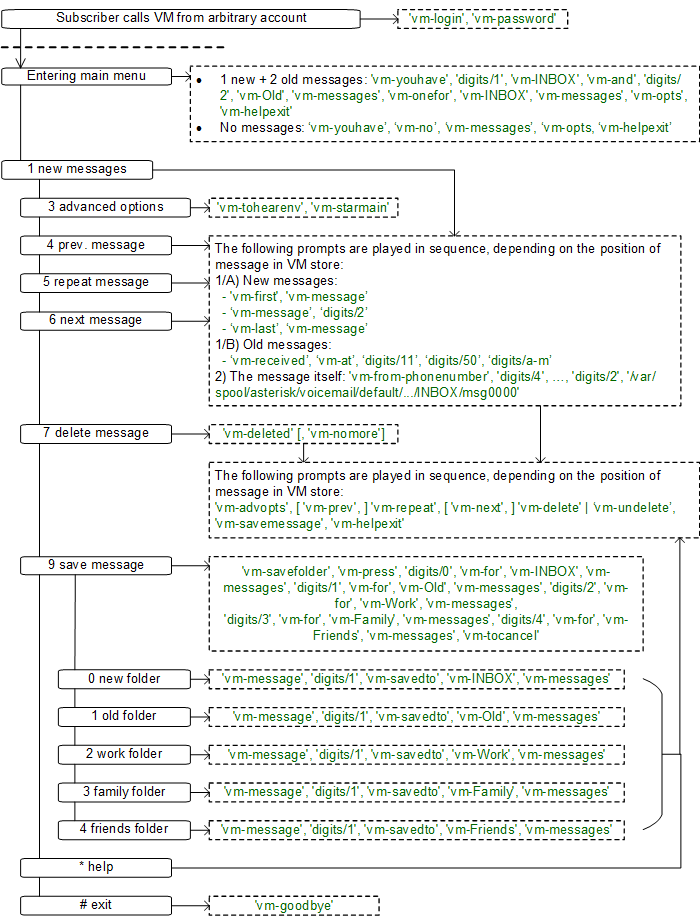
The following list shows you how the voicebox menu is structured.
1 Read voicemail messages
3 Advanced options
- 3 To Hear messages Envelope
- * Return to the main menu
- 4 Play previous message
- 5 Repeat current message
- 6 Play next message
- 7 Delete current message
9 Save message in a folder
- 0 Save in new Messages
- 1 Save in old Messages
- 2 Save in Work Messages
- 3 Save in Family Messages
- 4 Save in Friends Messages
- # Return to the main menu
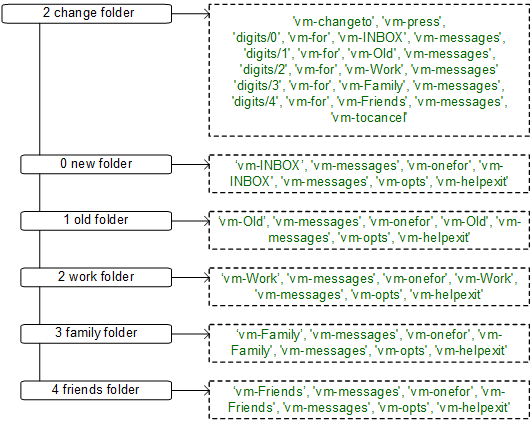
2 Change folders
- 0 Switch to new Messages
- 1 Switch to old Messages
- 2 Switch to Work Messages
- 3 Switch to Family Messages
- 4 Switch to Friends Messages
- # Get Back
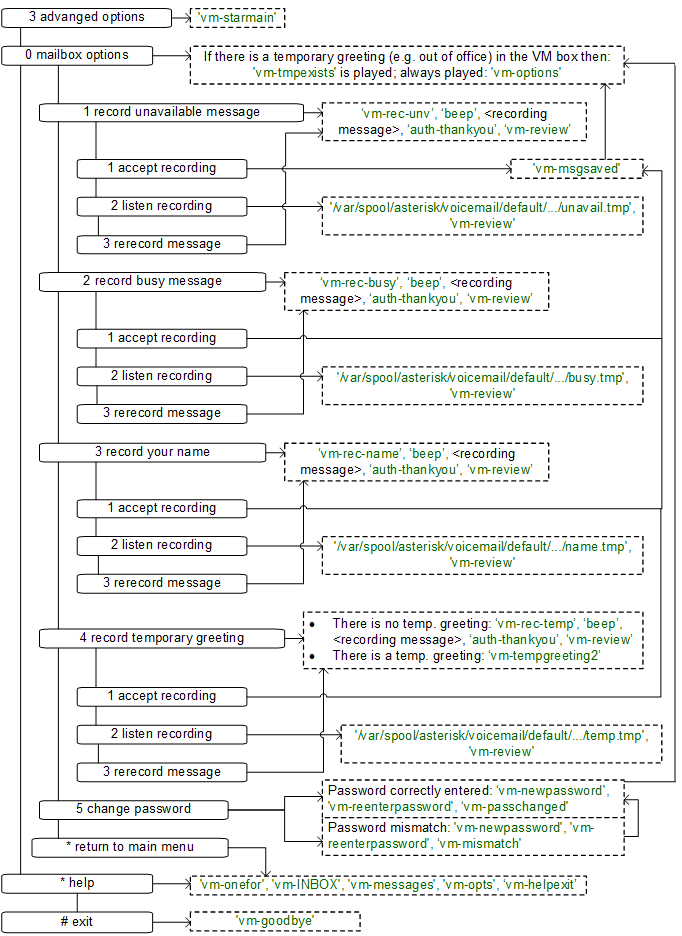
3 Advanced Options
- * To return to the main menu
0 Mailbox options
1 Record your unavailable message
- 1 accept it
- 2 Listen to it
- 3 Rerecord it
2 Record your busy message
- 1 accept it
- 2 Listen to it
- 3 Rerecord it
3 Record your name
- 1 accept it
- 2 Listen to it
- 3 Rerecord it
4 Record your temporary greetings
- 1 accept it / or re-record if one already exist
- 2 Listen to it / or delete if one already exist
- 3 Rerecord it
- 5 Change your password
- * To return to the main menu
- * Help
- # Exit
A message/greeting is a short message that plays before the caller is allowed to record a message. The message is intended to let the caller know that you are not able to answer their call. It can also be used to convey other information like when you will be available, other methods to contact you, or other options that the caller can use to receive assistance.
The IVR menu has three types of greetings.
The standard voice mail greeting is the "unavailable" greeting. This is used if you don’t answer the phone and so the call is directed to your voice mailbox.
- You can record a custom unavailable greeting.
-
If you have not recorded your unavailable greeting but have recorded your name, the system will play a generic message like: "
Recorded nameis unavailable." -
If you have not recorded your unavailable greeting, the phone system will play a generic message like: "
Digits-of-number-dialedis unavailable".
If you wish, you can record a custom greeting used when someone calls you and you are currently on the phone. This is called your "Busy" greeting.
- You can record a custom busy greeting.
-
If you have not recorded your busy greeting but have recorded your name, the phone system will play a generic message: "
Recorded nameis busy." -
If you have not recorded your busy greeting and have not recorded your name (see below), the phone system will play a generic message: "
Digits-of-number-dialedis busy."
You can also record a temporary greeting. If it exists, a temporary greeting will always be played instead of your "busy" or "unavailable" greetings. This could be used, for example, if you are going on vacation or will be out of the office for a while and want to inform people not to expect a return call anytime soon. Using a temporary greeting avoids having to change your normal unavailable greeting when you leave and when you come back.
The Voicemail system allows you to save and organize your messages into folders. There can be up to ten folders.
- 0 - New Messages
- 1 - Old Messages
- 2 - Work Messages
- 3 - Family Messages
- 4 - Friends Messages
When a caller leaves a message for you,the system will put the message into the "New Messages" folder. If you listen to the message, but do not delete the message or save the message to a different folder, it will automatically move the message to the "Old Messages" folder. When you first log into your mailbox, the Voicemail System will make the "New Messages" folder the current folder if you have any new messages. If you do not have any new messages the it will make the "Old Messages" folder the current folder.
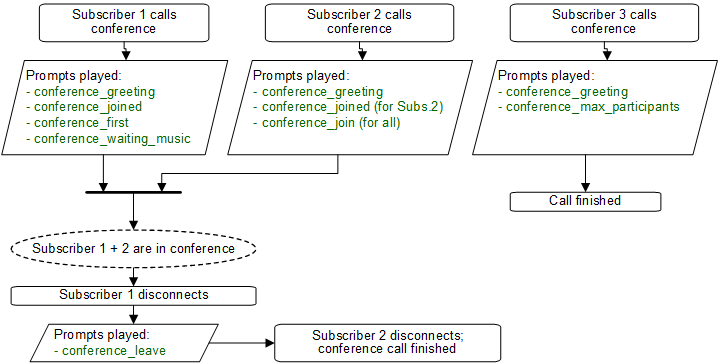
This section shows flowcharts of calls to the voicemail system. Flowcharts contain the name of prompts as they are identified among Asterisk voice prompts.
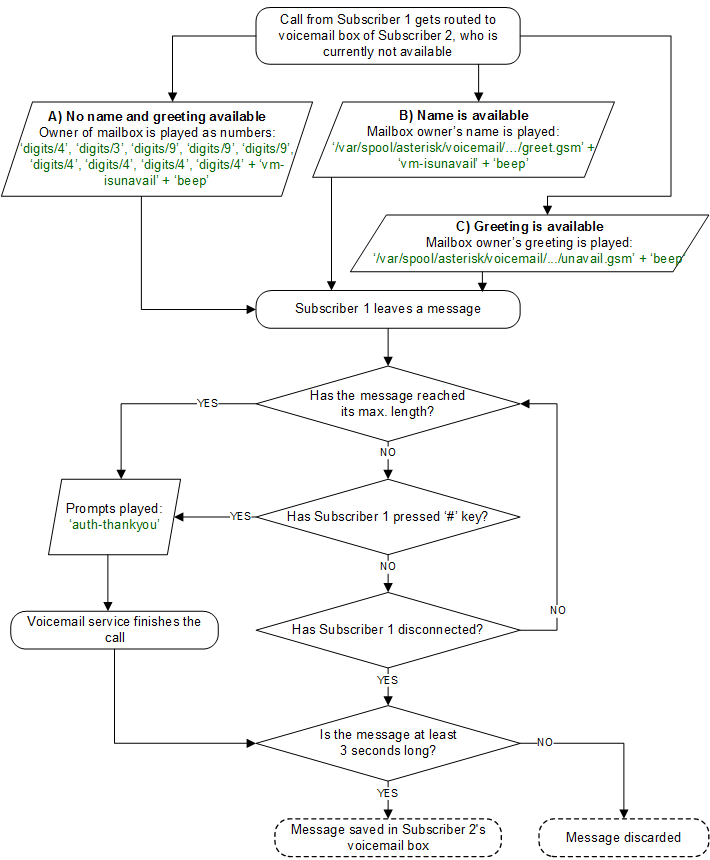
The language for the Voicemail system IVR or Vertical Service Codes (VSC) IVRs may be set using the subscriber or domain preference language.
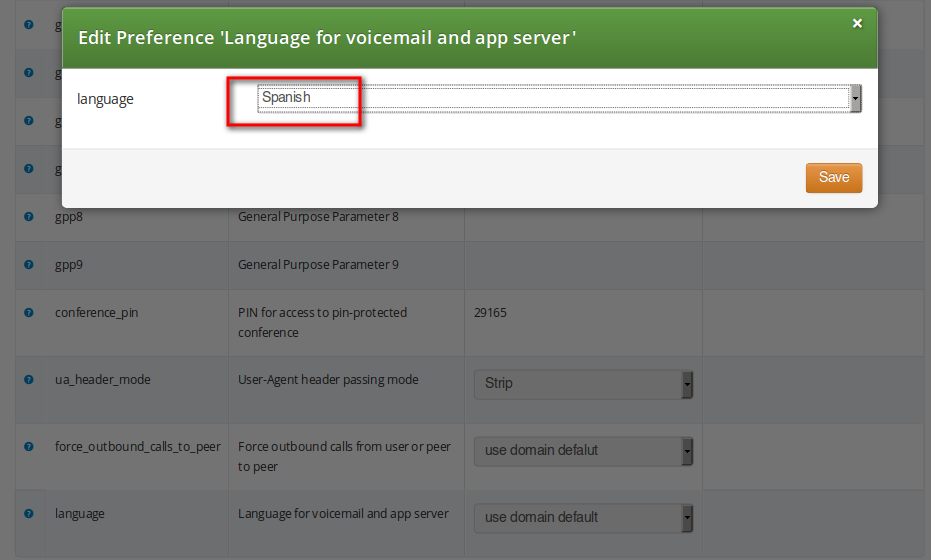
The sip:provider CE provides the pre-installed prompts for the Voicemail in the English, Spanish, French and Italian languages and the pre-installed prompts for the Vertical Service Codes IVRs in English only.
The other IVRs such as the Conference system and the error announcements use the Sound Sets configured in NGCP Panel and uploaded by the administrator in his language of choice.
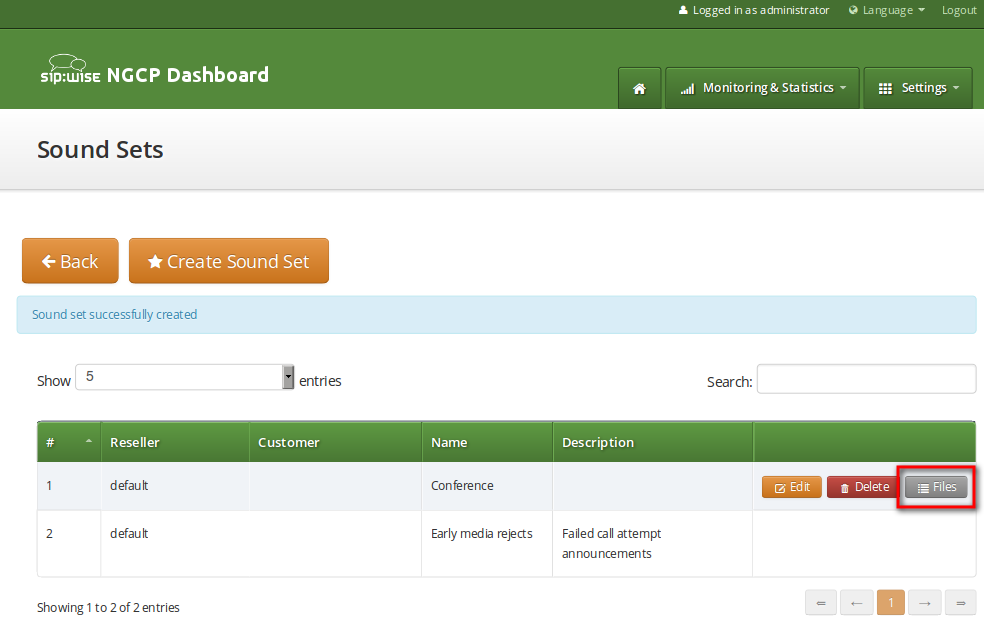
The sip:provider CE provides the administrator with ability to upload the voice prompts such as conference prompts or call error announcements on the Sound Sets page. There is a preference sound_set in the NAT and Media Flow Control section on Domain and Subscriber levels to link subscribers to the sound set that they should hear (as usual the subscriber preference overrides the domain one). Sound Sets can be defined in Settings→Sound Sets. To create a new Sound Set, click Create Sound Set. Then click the Files button.
| info | |
You may use 8 or 16 bit mono WAV audio files for all of the voice prompts. |
The call error announcements are grouped under Early Rejects section. Unfold the section and click Upload next to the sound handles (Names) that you want to use. Choose a WAV file from your file system, and click the Loopplay setting if you want to play the file in a loop instead of just once. Click Save to upload the file.
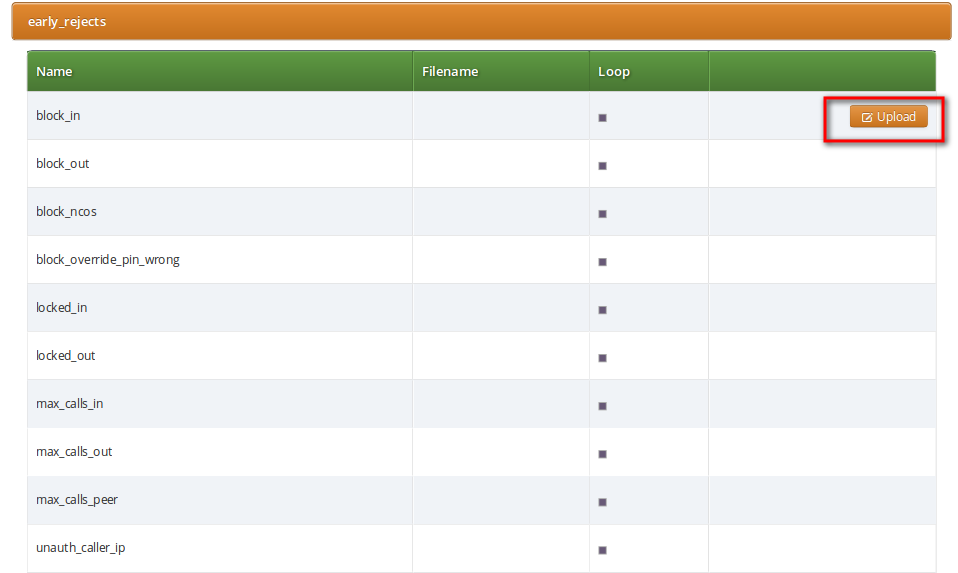
The call error announcements are played to the user in early media hence the name "Early Reject". If you don’t provide the sound files for any handles they will not be used and the sip:provider CE will fallback to sending the error response code back to the user.
Table 4. Early Reject Sound Sets
| Handle | Description | Message played |
|---|---|---|
block_in | This is what the calling party hears when a call is made from a number that is blocked by the incoming block list (adm_block_in_list, block_in_list subscriber preferences) | Your call is blocked by the number you are trying to reach. |
block_out | This is what the calling party hears when a call is made to a number that is blocked by the outgoing block list (adm_block_out_list, block_out_list subscriber preferences) | Your call to the number you are trying to reach is blocked. |
block_ncos | This is what the calling party hears when a call is made to a number that is blocked by the NCOS level assigned to the subscriber or domain (the NCOS level chosen in ncos and adm_ncos preferences) | Your call to the number you are trying to reach is not permitted. |
block_override_pin_wrong | Announcement played to calling party if it used wrong PIN code to override the outgoing user block list or the NCOS level for this call (the PIN set by block_out_override_pin and adm_block_out_override_pin preferences) | The PIN code you have entered is not correct. |
locked_in | Announcement played on incoming call to a subscriber that is locked for incoming calls | The number you are trying to reach is currently not permitted to receive calls. |
locked_out | Announcement played on outgoing call to subscriber that is locked for outgoing calls | You are currently not allowed to place outbound calls. |
max_calls_in | Announcement played on incoming call to a subscriber who has exceeded the concurrent_max limit by sum of incoming and outgoing calls or whose customer has exceeded the concurrent_max_per_account limit by sum of incoming and outgoing calls | The number you are trying to reach is currently busy. Please try again later. |
max_calls_out | Announcement played on outgoing call to a subscriber who has exceeded the concurrent_max (total limit) or concurrent_max_out (limit on number of outbound calls) or whose customer has exceeded the concurrent_max_per_account or concurrent_max_out_per_account limit | All outgoing lines are currently in use. Please try again later. |
max_calls_peer | Announcement played on calls from the peering if that peer has reached the maximum number of concurrent calls (configured by admin in concurrent_max preference of peering server) | The network you are trying to reach is currently busy. Please try again later. |
unauth_caller_ip | This is what the calling party hears when it tries to make a call from unauthorized IP address or network (allowed_ips, man_allowed_ips preferences) | You are not allowed to place calls from your current network location. |
relaying_denied | Announcement played on inbound call from trusted IP (e.g. external PBX) with non-local Request-URI domain | The network you are trying to reach is not available. |
invalid_speeddial | This is what the calling party hears when it calls an empty speed-dial slot | The speed dial slot you are trying to use is not available. |
cf_loop | Announcement played when the called subscriber has the call forwarding configured to itself | The number you are trying to reach is forwarded to an invalid destination. |
callee_offline | Announcement played on incoming call to the subscriber which is currently not registered | The number you are trying to reach is currently not available. Please try again later. |
callee_busy | Announcement played on incoming call to the subscriber which is currently busy (486 response from the UAS) | The number you are trying to reach is currently busy. Please try again later. |
callee_unknown | Announcement that is played on call to unknown or invalid number (not associated with any of our subscribers/hunt groups) | The number you are trying to reach is not in use. |
callee_tmp_unavailable | Announcement played on incoming call to the subscriber which is currently unavailable (408, other 4xx or no response code or 30x with malformed contact) | The number you are trying to reach is currently not available. Please try again later. |
peering_unavailable | Announcement played in case of outgoing off-net call when there is no peering rule matching this destination and/or source | The network you are trying to reach is not available. |
voicebox_unavailable | Announcement played on call to voicebox if the voicemail server is not configured (system operation is impaired) | The voicemail of the number you are trying to reach is currently not available. Please try again later. |
emergency_unsupported | Announcement played when emergency destination is dialed but the emergency calls are administratively prohibited for this user or domain (reject_emergency preference is enabled) | You are not allowed to place emergency calls from this line. Please use a different phone. |
emergency_geo_unavailable | Announcement played when emergency destination is dialed but the destination is not provisioned for the location of the user. | The emergency number you have dialed is not available in your region. |
no_credit | Announcement played when prepaid account has insufficient balance to make a call to this destination | You don’t have sufficient credit balance for the number you are trying to reach. |
The sip:provider CE provides the simple pin-protected conferencing service built using the SEMS DSM scripting language. Hence it is open for all kinds of modifications and extensions.
Template files for the sems conference scripts stored in /etc/ngcp-config/templates/etc/ngcp-sems/:
- IVR script: /etc/ngcp-config/templates/etc/ngcp-sems/dsm/confpin.dsm.tt2
- Config: /etc/ngcp-config/templates/etc/ngcp-sems/dsm/confpin.conf.tt2
Go to your Subscriber Preferences and click Edit on the Call Forward Type you want to set (e.g. Call Forward Unconditional).
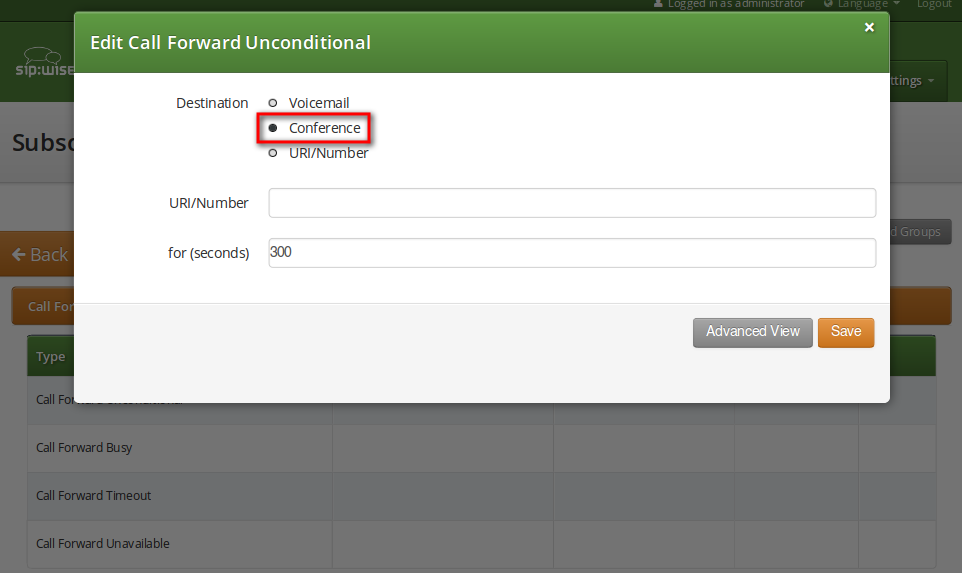
You should select Conference option in the Destination field and leave the URI/Number empty. The timeout defines for how long this destination should be tried to ring.
Sound Sets can be defined in Settings→Sound Sets. To create a new Sound Set, click Create Sound Set. Then click the Files button.
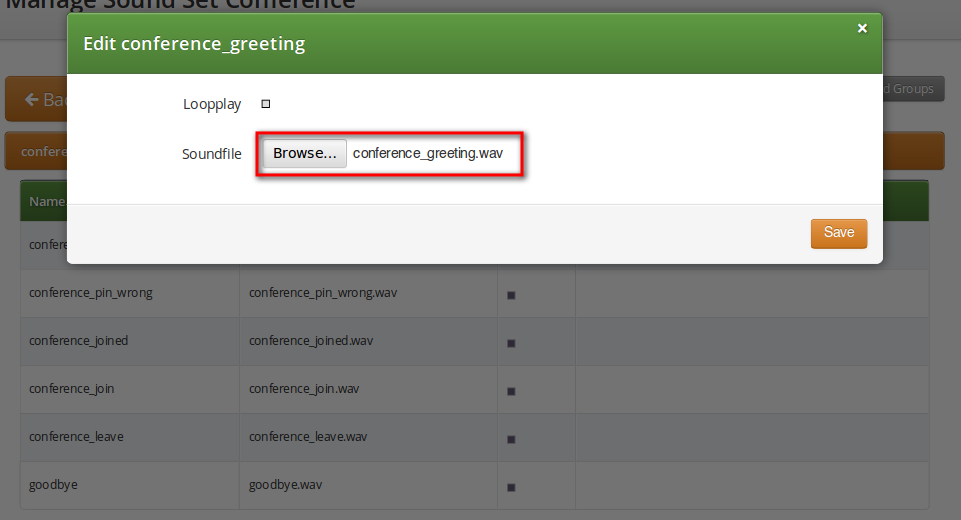
Upload the following files:
Table 5. Conference Sound Sets
| Handle | Message played |
|---|---|
conference_greeting | Welcome to the conferencing service. |
conference_pin | Please enter your PIN, followed by the pound key. |
conference_pin_wrong | You have entered an invalid PIN number. Please try again. |
conference_joined | You will be placed into the conference. |
conference_first | You are the first person in the conference. |
conference_join | A person has joined the conference. |
conference_leave | A person has left the conference. |
conference_max_participants | All conference lines are currently in use. Please try again later. |
conference_waiting_music | …waiting music… |
goodbye | Goodbye. |
| info | |
You may use 8 or 16 bit mono WAV audio files. |
Then set the preference sound_set on the Domain or Subscriber level in order to assign the Sound Set you have just created to the subscriber (as usual the subscriber preference overrides the domain one).
There are 2 ways of joining a conference: with or without PIN code. The actual way of joining the conference depends on Subscriber settings. A subscriber who has activated the conference through call forwarding may set a PIN in order to protect the conference from unauthorized access. To activate the PIN one has to enter a value in Subscriber → Details → Preferences → Internals → conference_pin field.
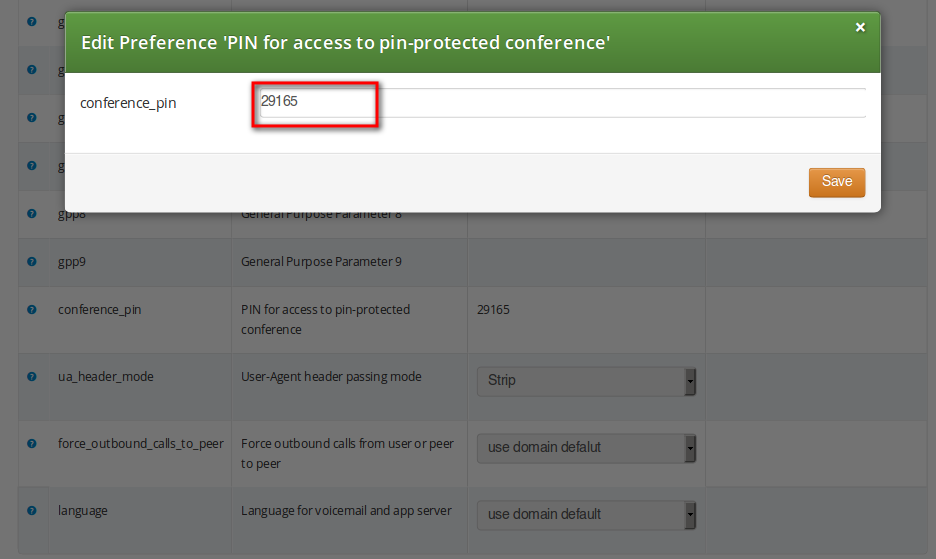
In case the PIN protection for the conference is activated, when someone calls the subscriber who has enabled the conference, the caller is prompted to enter the PIN of the conference. Upon the successful entry of the PIN the caller hears the announcement that he is going to be placed into the conference and at the same time this is announced to all participants already in the conference.
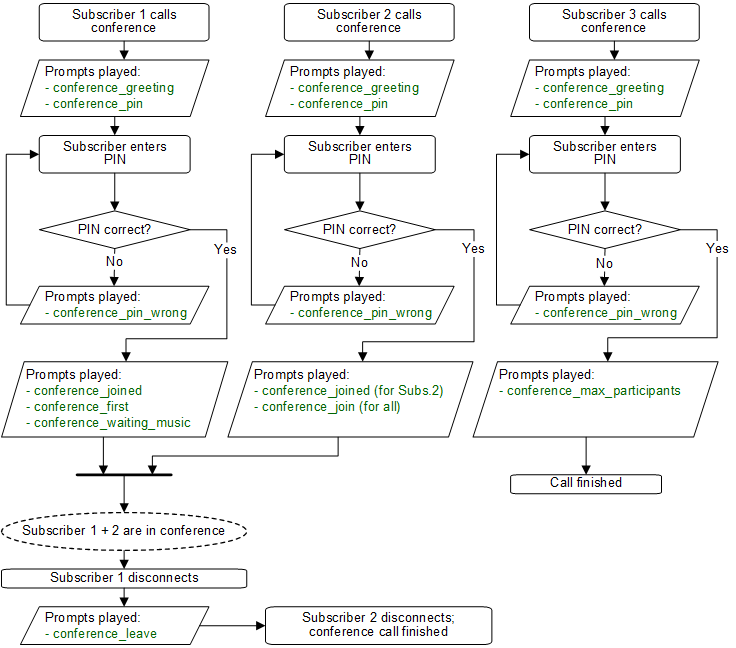
The following 2 sections show flowcharts with voice prompts that are played to a caller when he dials the conference.
MCID feature allows customers to report unwanted calls to the platform operator.
To enable the feature first edit config.yml and enable there apps: malicious_call: yes and kamailio: store_recentcalls: yes. The latter option enables kamailio to store recent calls per subscrbriber UUID in the redis DB (the amount of stored recent calls will not exceed the amount of provisionined subscribers).
Next step is to create a system sound set for the feature. In Settings→Sound Sets either use your already existing Sound Set or create a new Sound Set and then assign it to your domain or subscribers. In the Sound Set there is a fileset malicious_call_identification→mailicious_call_report for that purpose.
Once the Sound Set is created the Subscriber’s Preferences Malicious Call Identification must be enabled under Subcriber → Preferences → Applications menu. The same parameter can be set in the Customer’s preferences to enable this feature for all its subscribers.
The final step is to create a new Rewrite Rule and to route calls to, for instance *123 → MCID application. For that you create a Calee Inbound rewrite rule ^(\*123)$ → malicious_call
Finaly you run ngcpcfg apply Enabling MCID to recreate the templates and automatically restart depended services.
As a subscriber, to report a malicious call you call to either malicious_call or to your custom number assigned for that purpose. Please note that you can report only your last received call. You will hear the media reply from the Sound Set you have previosuly configured.
To check reported malicious calls as the plafrom operator open Settings→Malicious Calls tab where you will see a list of registered calls. You can selectively delete records from the list and alternatively you can manage the reported calls by using the REST API.
By default the expiration time for the most recent call per subscriber is 3600 seconds (1 hour). If you wish to prolong or shorten the expiration time open constants.yml and set there recentcalls: expire: 3600 to a new value, and issue ngcpcfg apply Enabling MCID afterwards.
The preferences a subscriber can provision by himself via the CSC can be limited via profiles within profile sets assigned to subscribers.
Profile sets define containers for profiles. The idea is to define profile sets with different profiles by the administrator (or the reseller, if he is permitted to do so). Then, a subscriber with administrative privileges can re-assign profiles within his profile sets for the subscribers of his customer account.
Profile Sets can be defined in Settings→Subscriber Profiles. To create a new Profile Set, click Create Subscriber Profile Set.
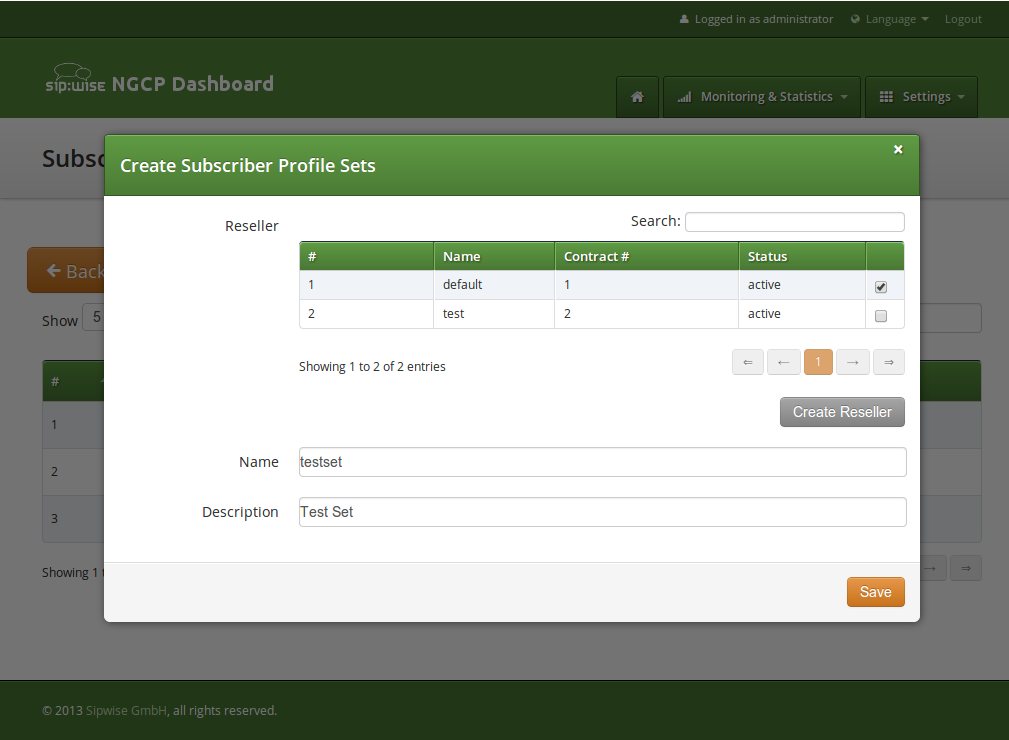
You need to provide a reseller, name and description.
To create Profiles within a Profile Set, hover over the Profile Set and click the Profiles button.
Profiles within a Profile Set can be created by clicking the Create Subscriber Profile button.
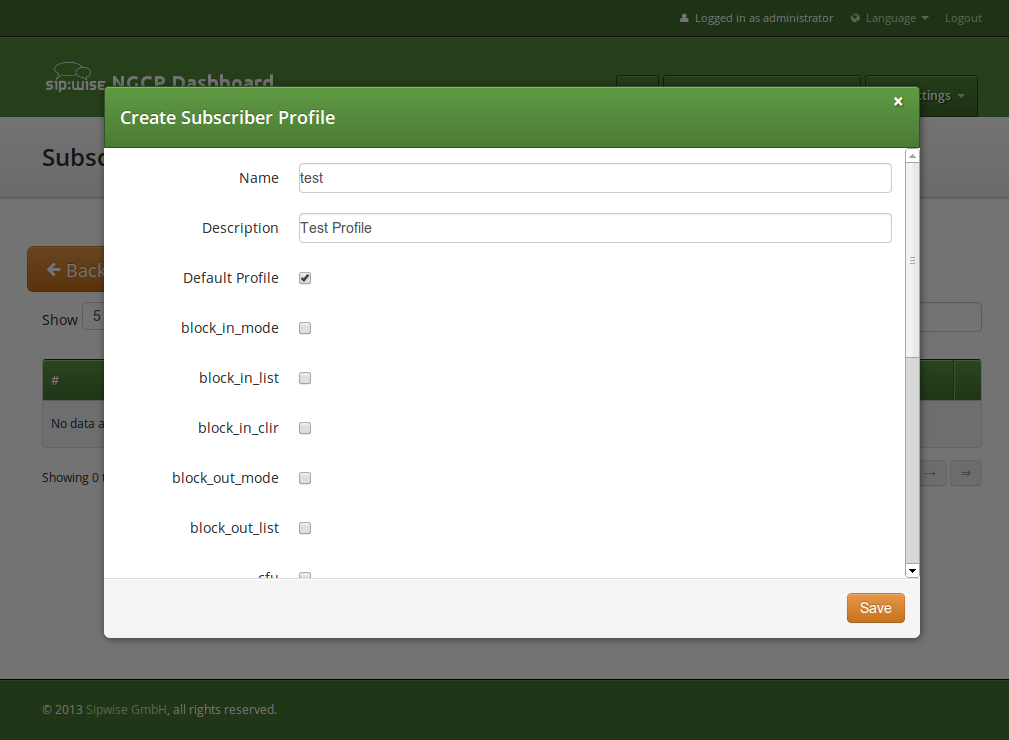
Checking the Default Profile option causes this profile to get assigned automatically to all subscribers, who have the profile set assigned. Other options define the user preferences which should be made available to the subscriber.
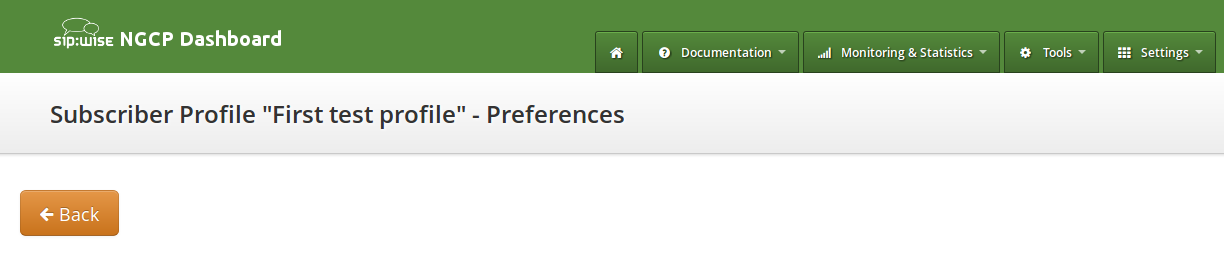
| info | |
When the platform administrator selects Preferences of the Subscriber Profile he will get an empty page like in the picture below, if none or only certain options are selected in the Subscriber Profile. |
Some of the options, like ncos (NCOS level), will enable the definition of
that preference within the Subscriber Profile Preferences. Thus all subscribers
who have this profile assigned to will have the preference activated by default.
The below picture shows the preferences linked to the sample Subscriber Profile:
In order to detect a SIP loop ( incoming call as a response for a call request ) sip:provider CE checks the combination of SIP-URI, To and From headers.
This check can be enabled in config.yml by setting kamailio.proxy.loop_detection.enable: 'yes'. The system tolerates kamailio.proxy.loop_detection.max loops within kamailio.proxy.loop_detection.expire seconds. Higher occurrence of loops will be reported with a SIP 482 "Loop Detected" error message
.
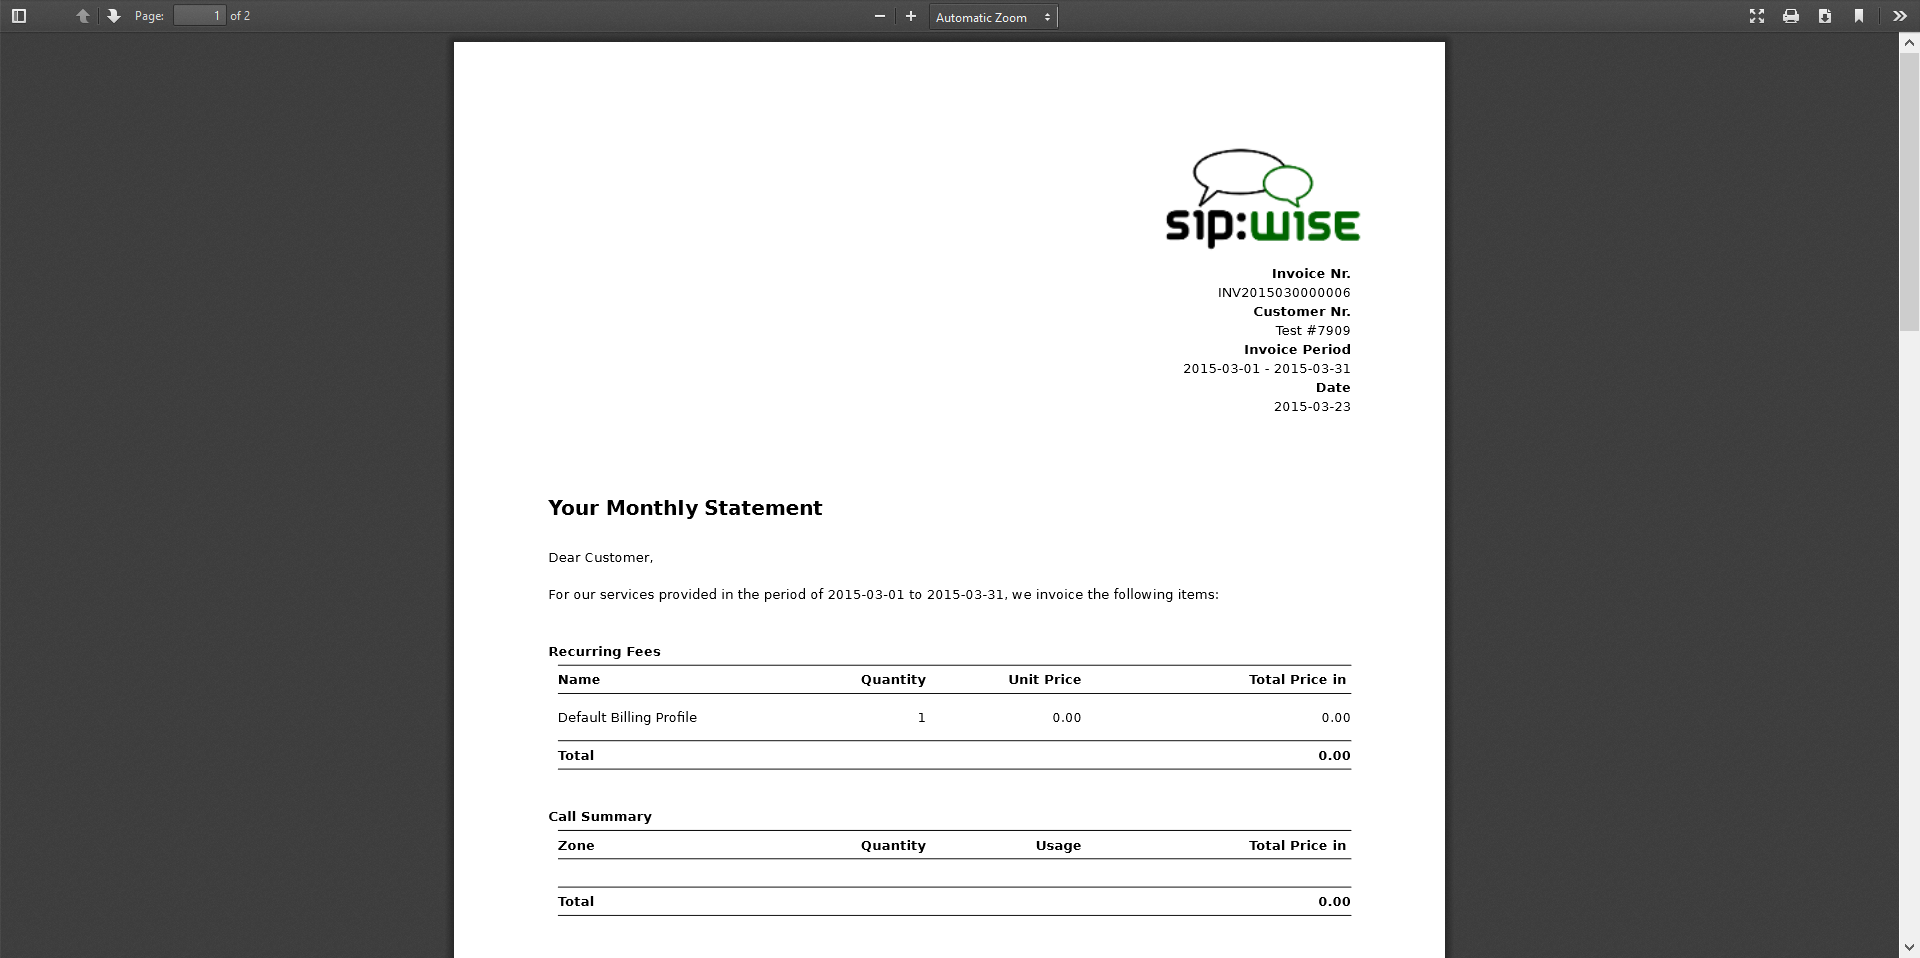
Content and vision of the invoices are customizable by invoice templates Section 6.15.2, “Invoice Templates”.
| info | |
The sip:provider CE generates invoices in pdf format. |
Invoices can be requested for generation, searched, downloaded and deleted in the invoices interface.
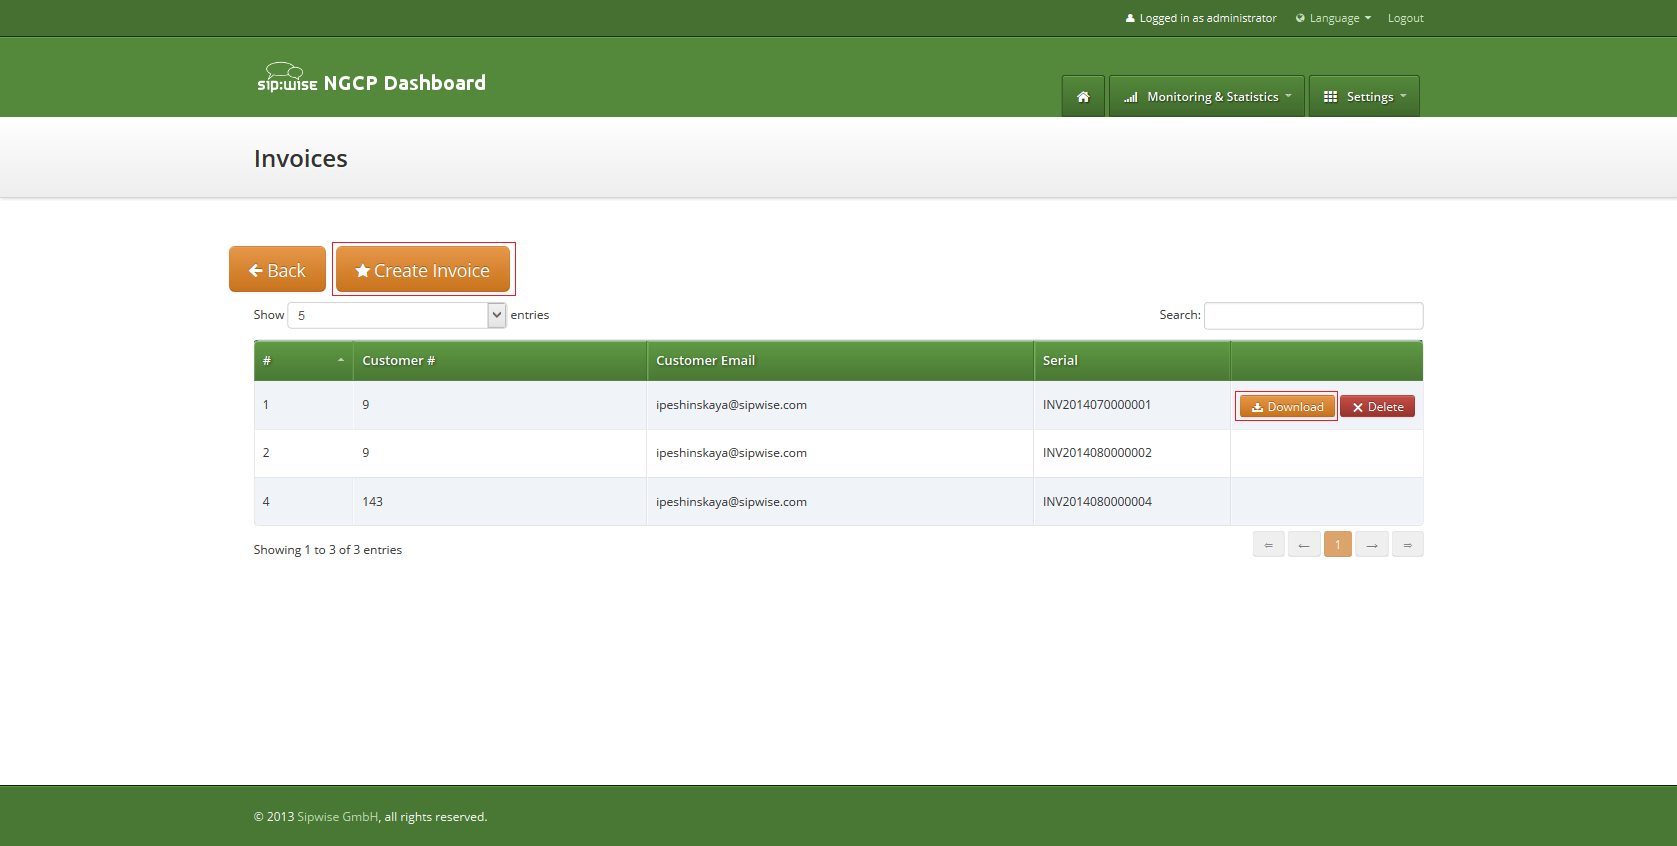
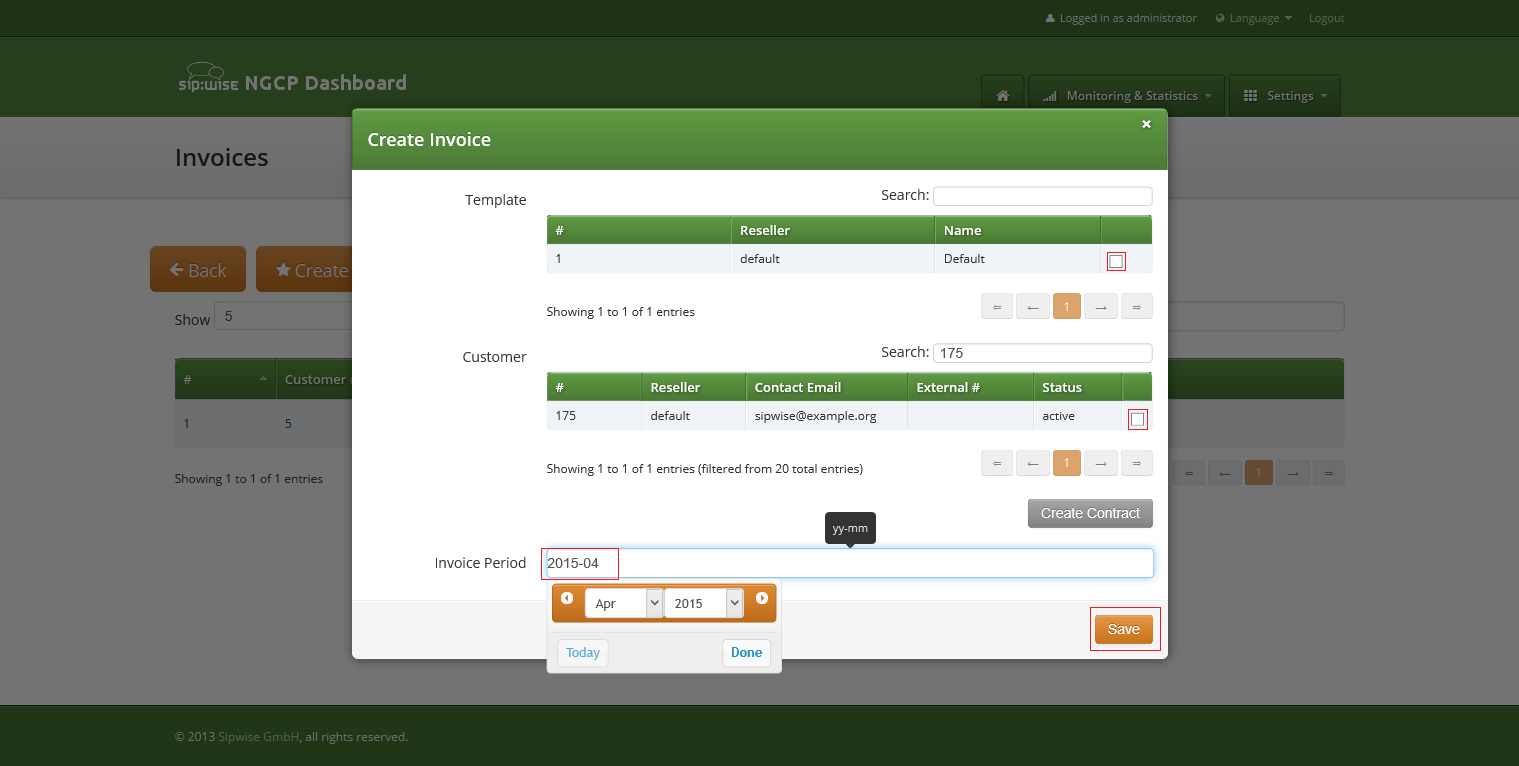
To request invoice generation for the particular customer and period press "Create invoice" button. On the invoice creation form following parameters are available for selection:
- Template: any of existent invoice template can be selected for the invoice generation.
- Customer: owner of the billing account, recipient of the invoice.
- Invoice period: billing period. Can be specified only as one calendar month. Calls with start time between first and last second of the period will be considered for the invoice
All form fields are mandatory.
Generated invoice can be downloaded as pdf file.
To do it press button "Download" against invoice in the invoice management interface.
Respectively press on the button "Delete" to delete invoice.
Invoice template defines structure and look of the generated invoices. The sip:provider CE makes it possible to create some invoice templates. Multiple invoice templates can be used to send invoices to the different customers using different languages.
| important | |
At least one invoice template should be created to enable invoice generation. Each customer has to be associated to one of the existent invoice template, otherwise invoices will be not generated for this customer. |
Customer can be linked to the invoice template in the customer interface.
Invoice templates can be searched, created, edited and deleted in the invoice templates management interface.

Invoice template creation is separated on two steps:
- Register new invoice template meta information.
- Edit content (template itself) of the invoice template.
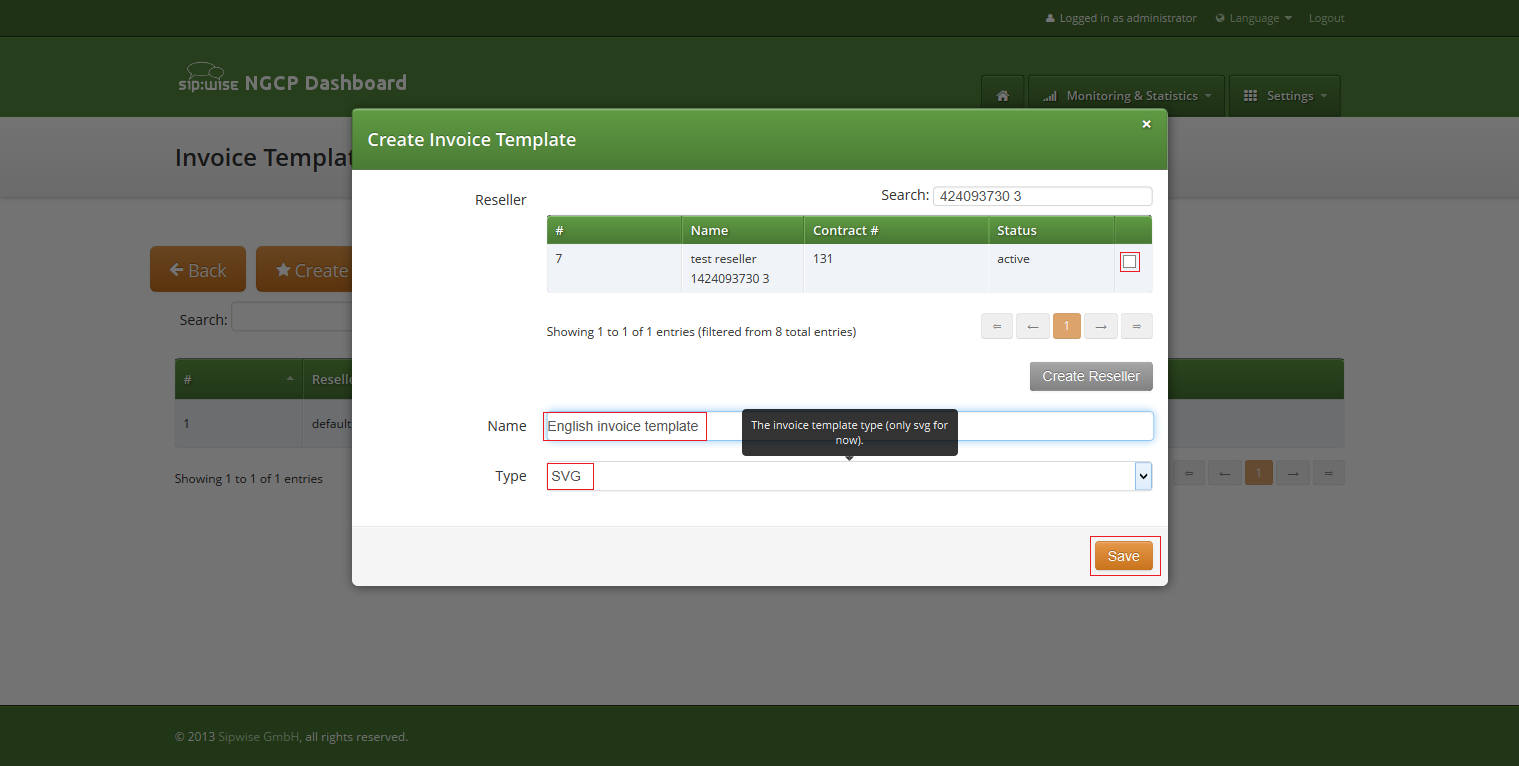
To register new invoice template press "Create Invoice Template" button.
On the invoice template meta information form following parameters can be specified:
- Reseller: reseller who owns this invoice template. Please note, that it doesn’t mean that the template will be used for the reseller customers by default. After creation, invoice template still need to be linked to the reseller customers.
- Name: unique invoice template name to differentiate invoice templates if there are some.
- Type: currently sip:provider CE supports only svg format of the invoice templates.
All form fields are mandatory.
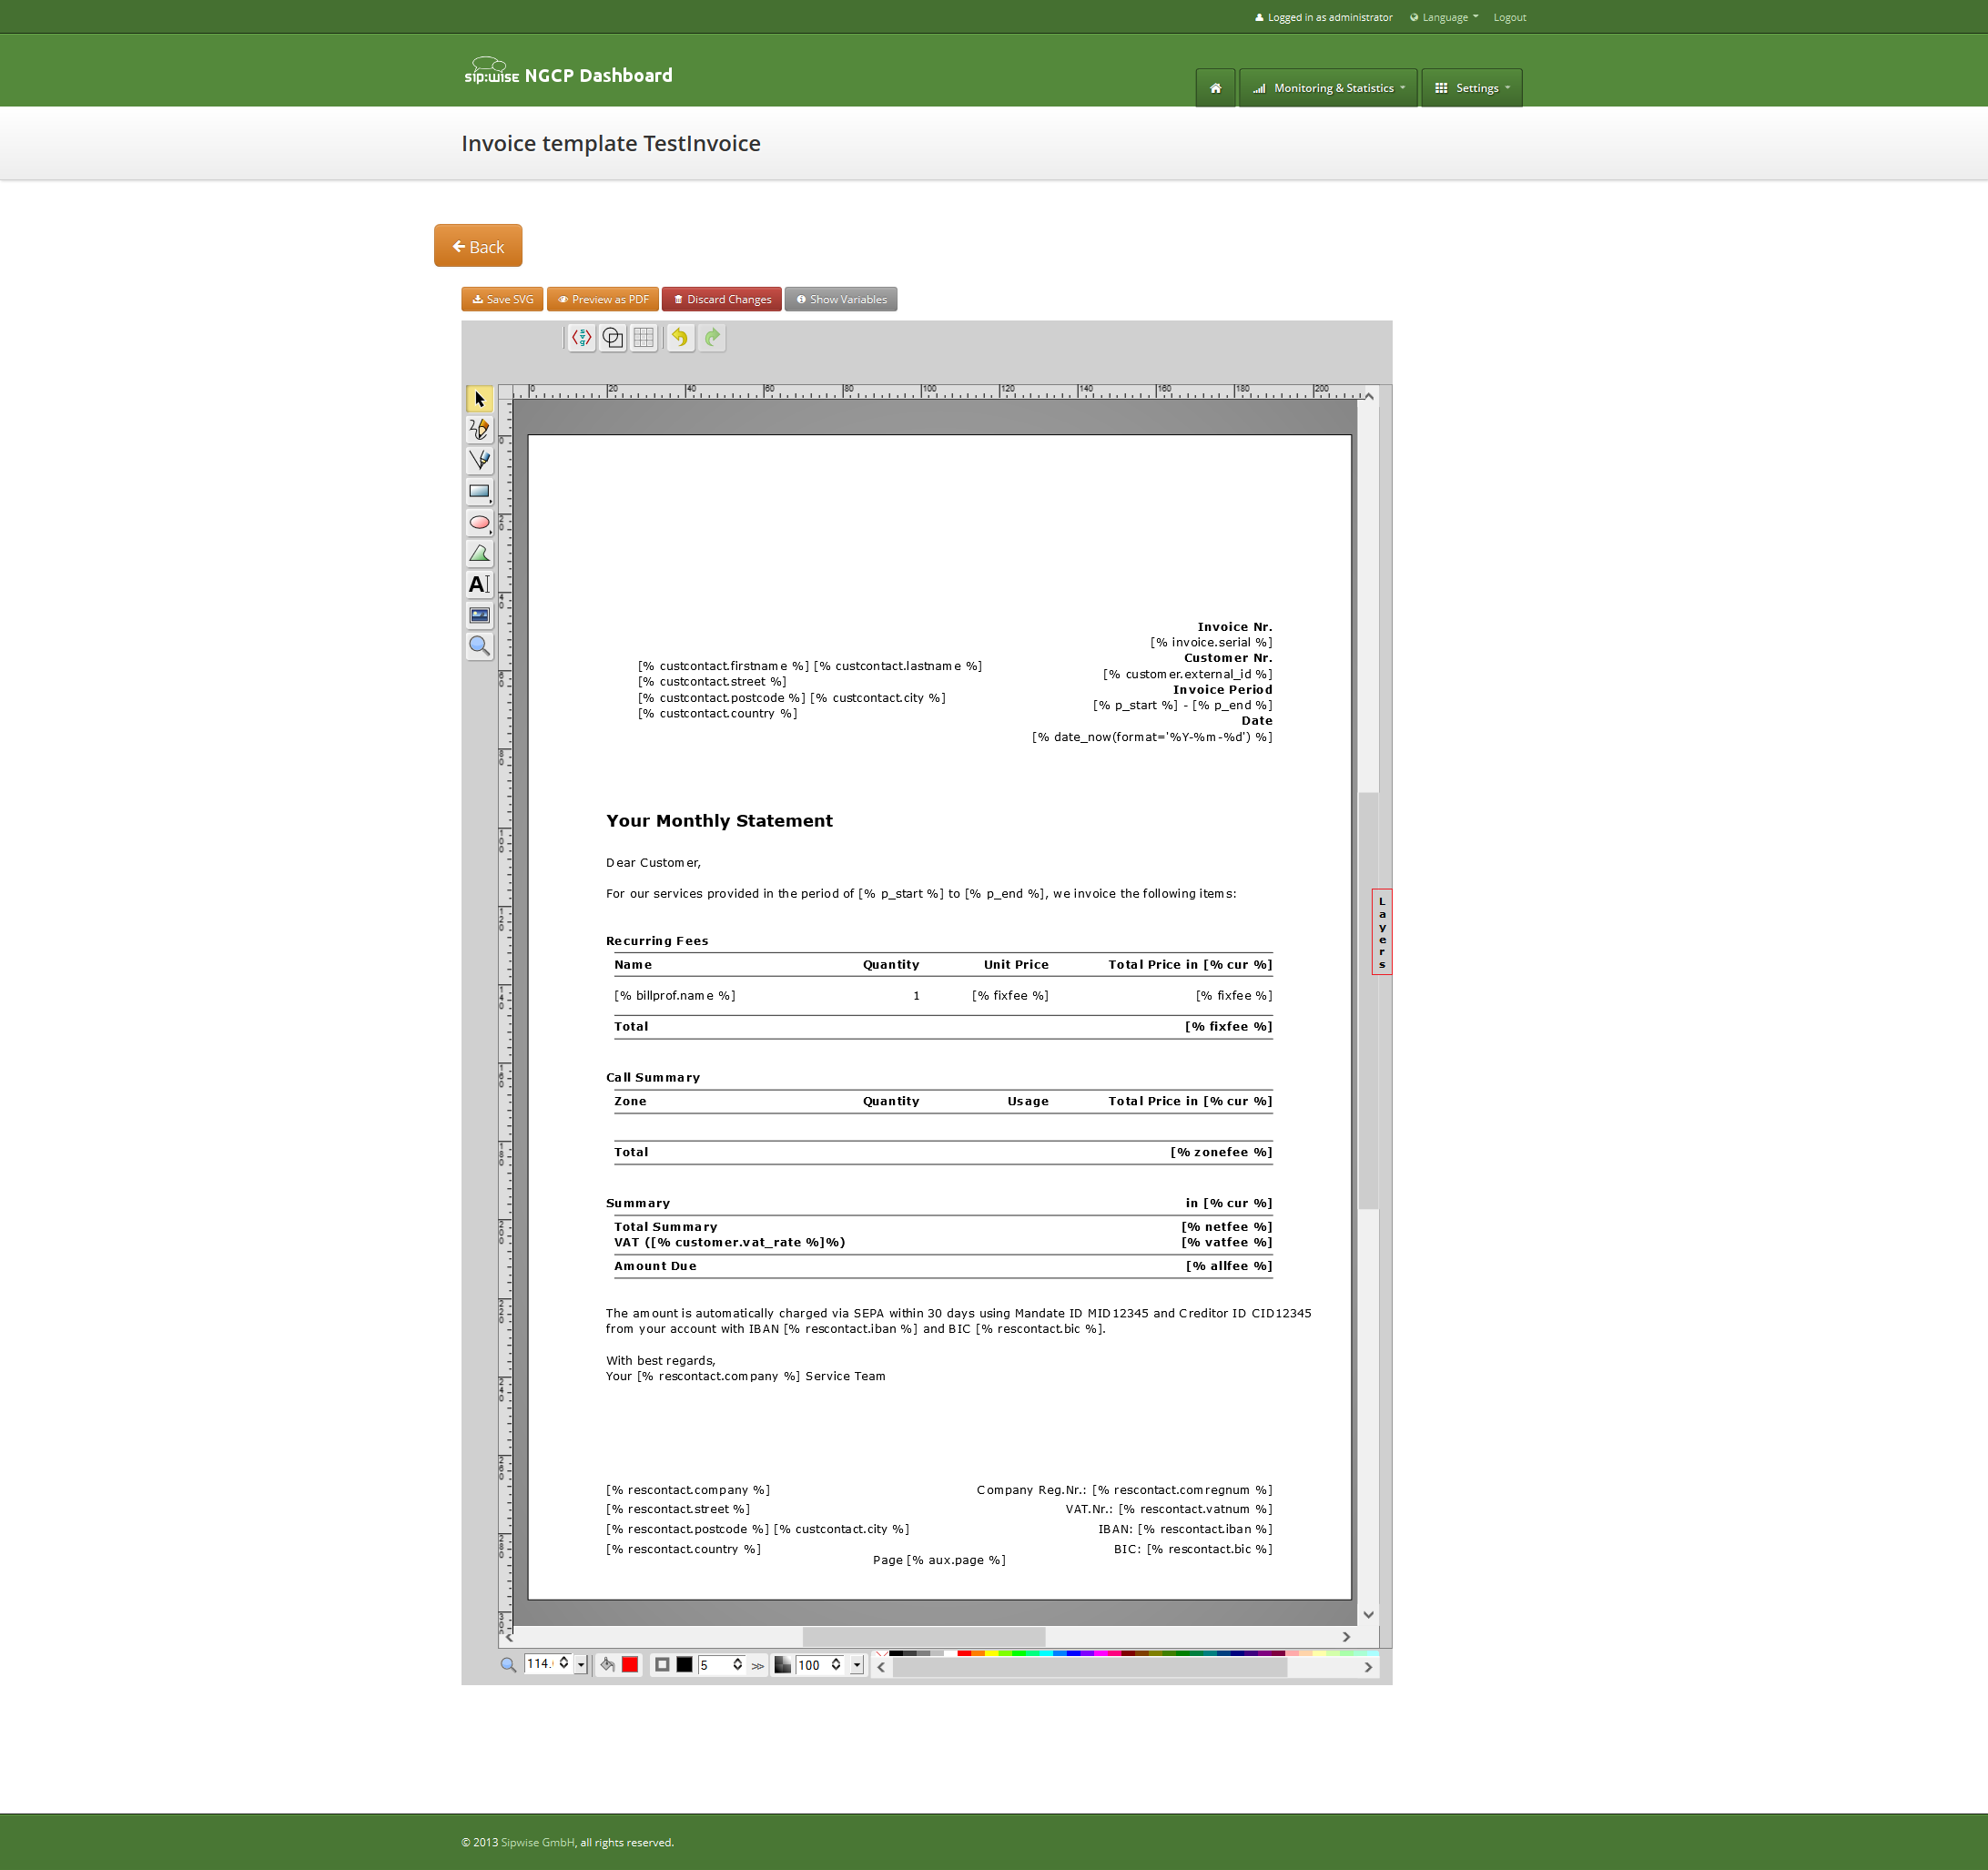
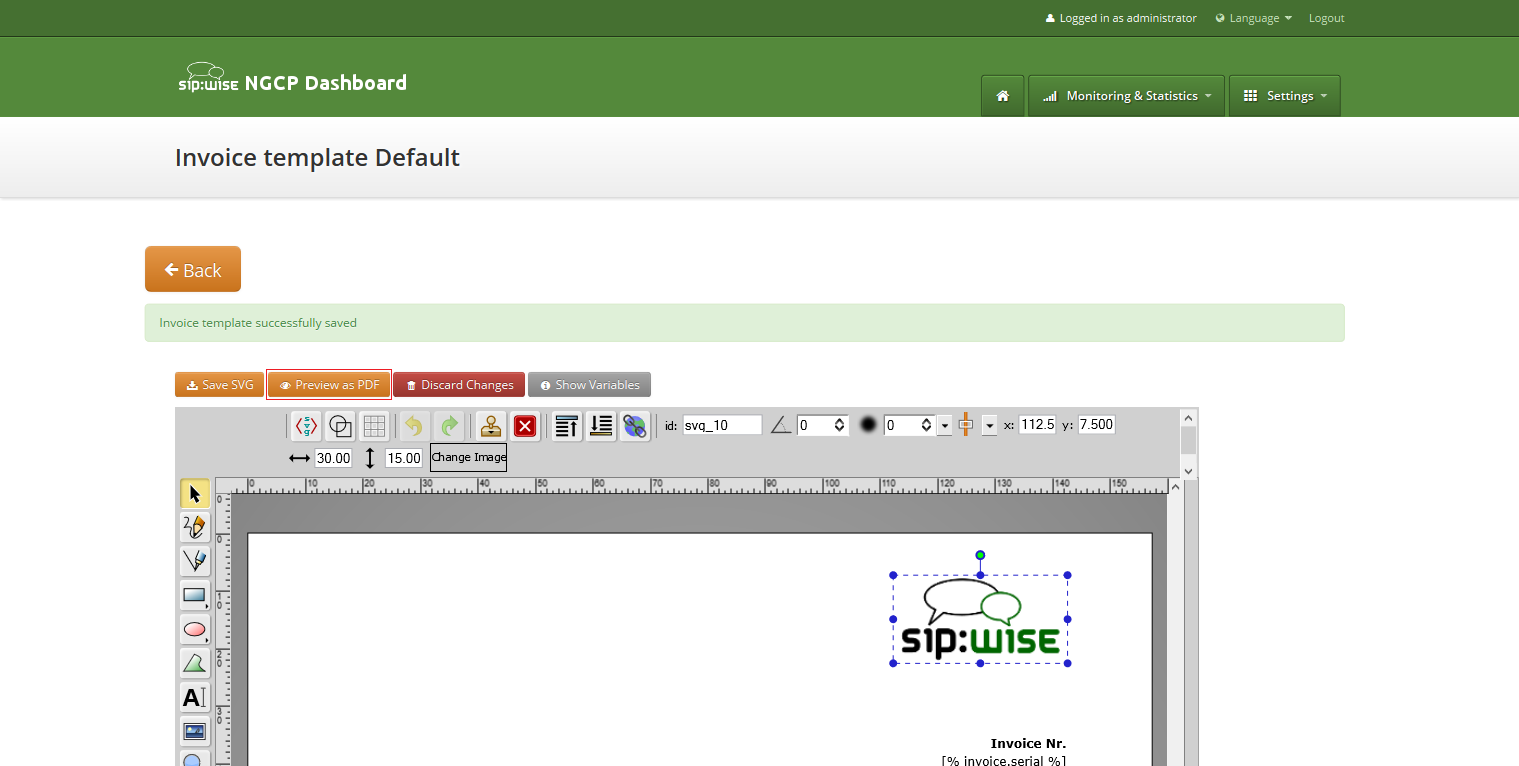
After registering new invoice template you can change invoice template structure in WYSIWYG SVG editor and preview result of the invoice generation based on the template.
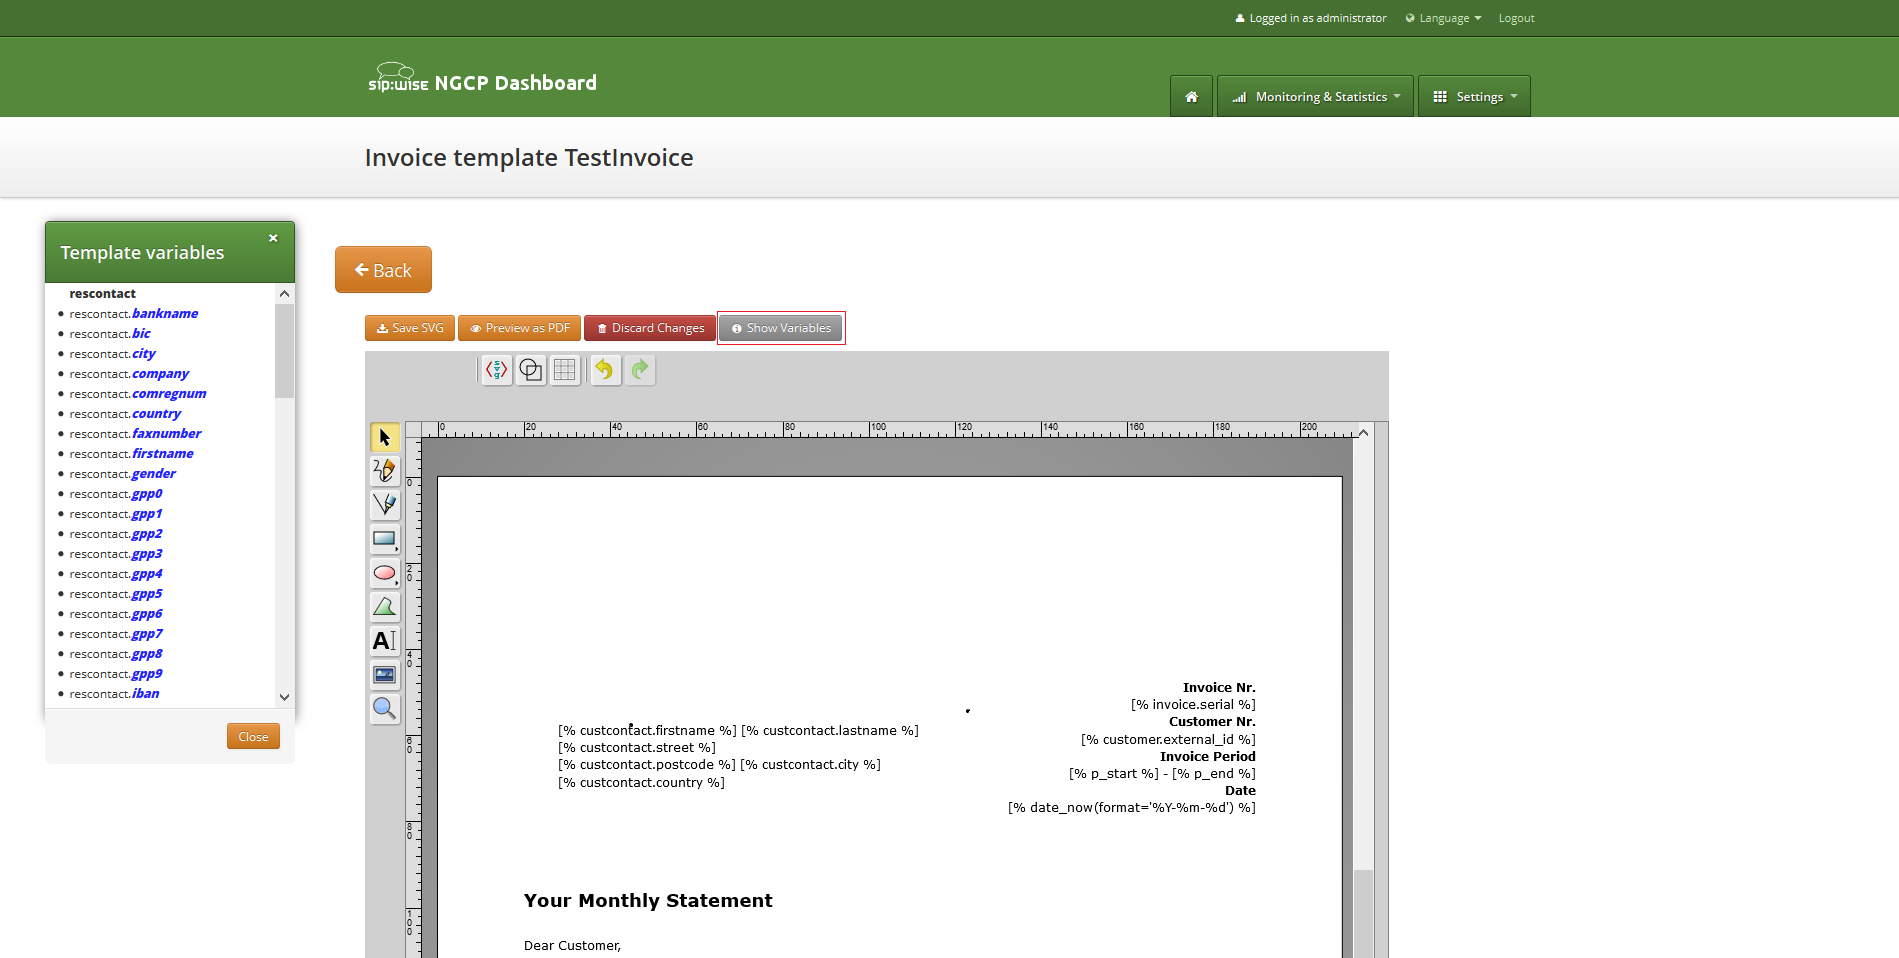
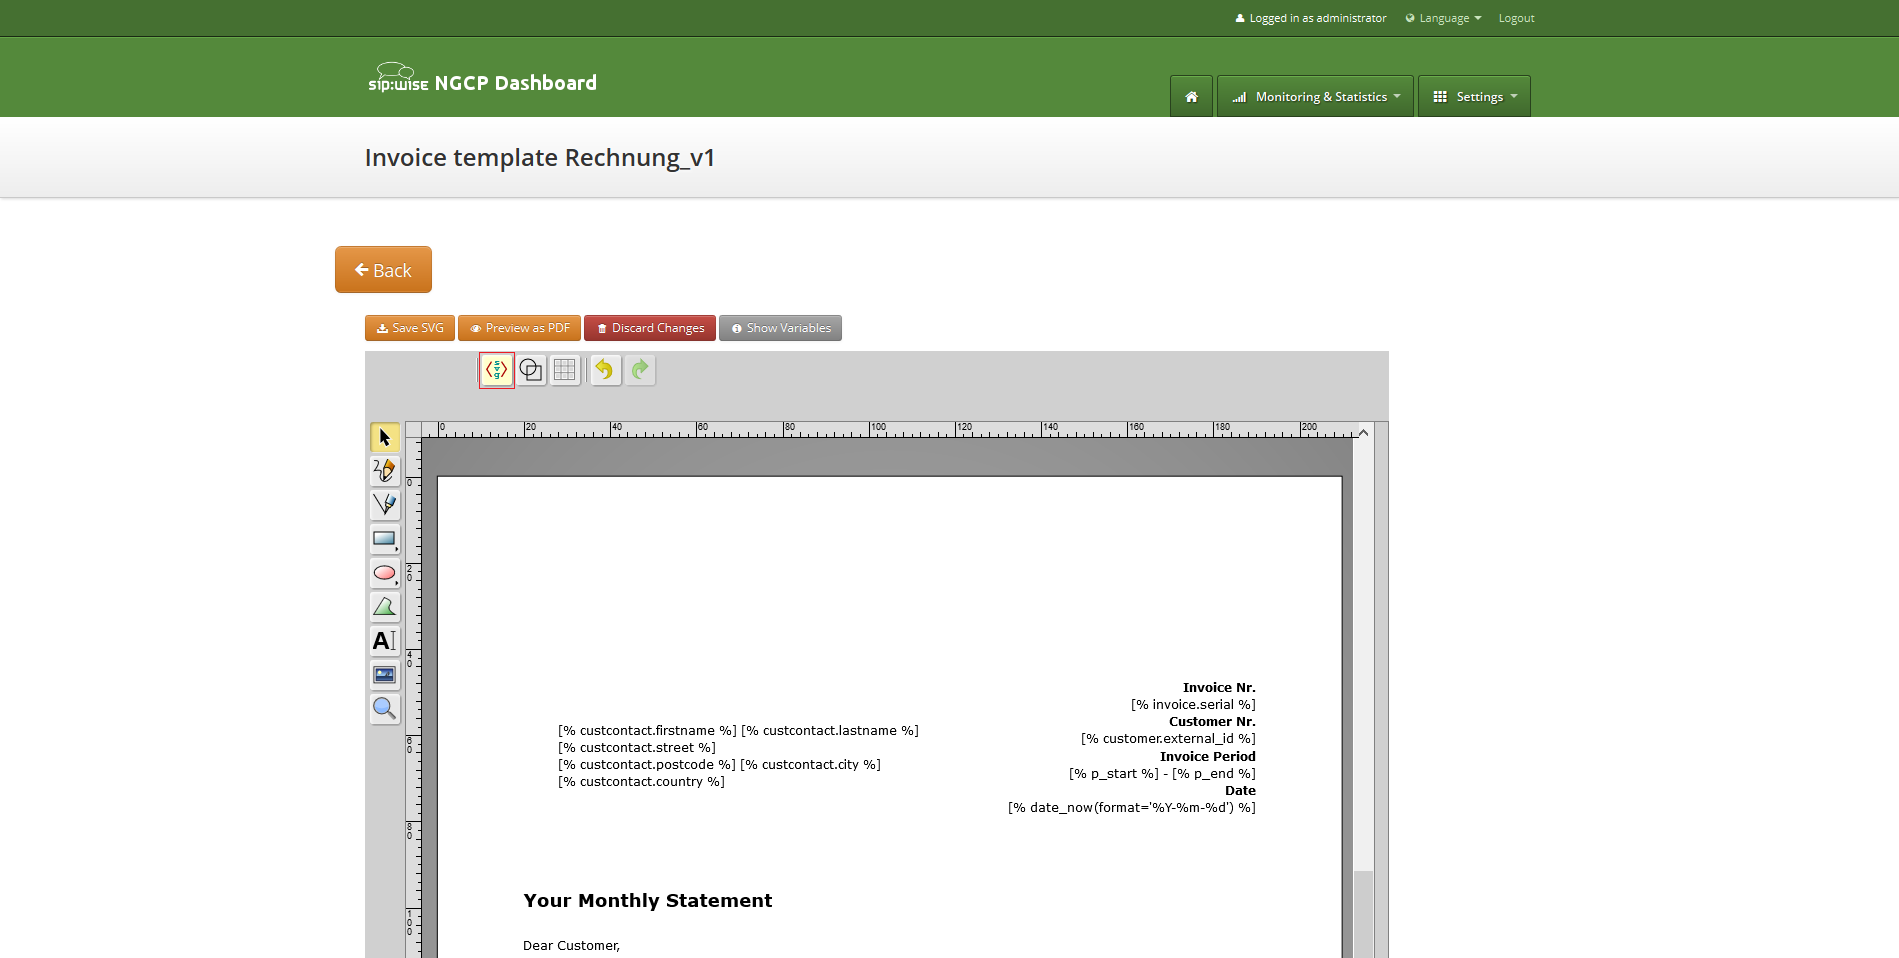
Invoice template is a XML SVG source, which describes content, look and position of the text lines, images or other invoice template elements. The sip:provider CE provides embedded WYSIWYG SVG editor svg-edit 2.6 to customize default template. The sip:provider CE svg-edit has some changes in layers management, image edit, user interface, but this basic introduction still may be useful.
Template refers to the owner reseller contact ("rescontact"), customer contract ("customer"), customer contact ("custcontact"), billing profile ("billprof"), invoice ("invoice") data as variables in the "[%%]" mark-up with detailed information accessed as field name after point e.g. [%invoice.serial%]. During invoice generation all variables or other special tokens in the "[% %]" mark-ups will be replaced by their database values.
Press on "Show variables" button on invoice template content page to see full list of variables with the fields:
You can add/change/remove embedded variables references directly in main svg-edit window. To edit text line in svg-edit main window double click on the text and place cursor on desired position in the text.
After implementation of the desired template changes, invoice template should be saved Section 6.15.2.3, “Save and preview invoice template content”.
To return to the sip:provider CE invoice template default content you can press on the "Discard changes" button.
| important | |
"Discard changes" operation can’t be undone. |
Layers
Default template contains three groups elements (<g/>), which can be thinked of as pages, or in terms of svg-edit - layers. Layers are:
- Background: special layer, which will be repeated as background for every other page of the invoice.
- Summary: page with a invoice summary.
- CallList: page with calls made in a invoice period. Is invisible by default.
To see all invoice template layers, press on "Layers" vertical sign on right side of the svg-edit interface:
Side panel with layers list will be shown.
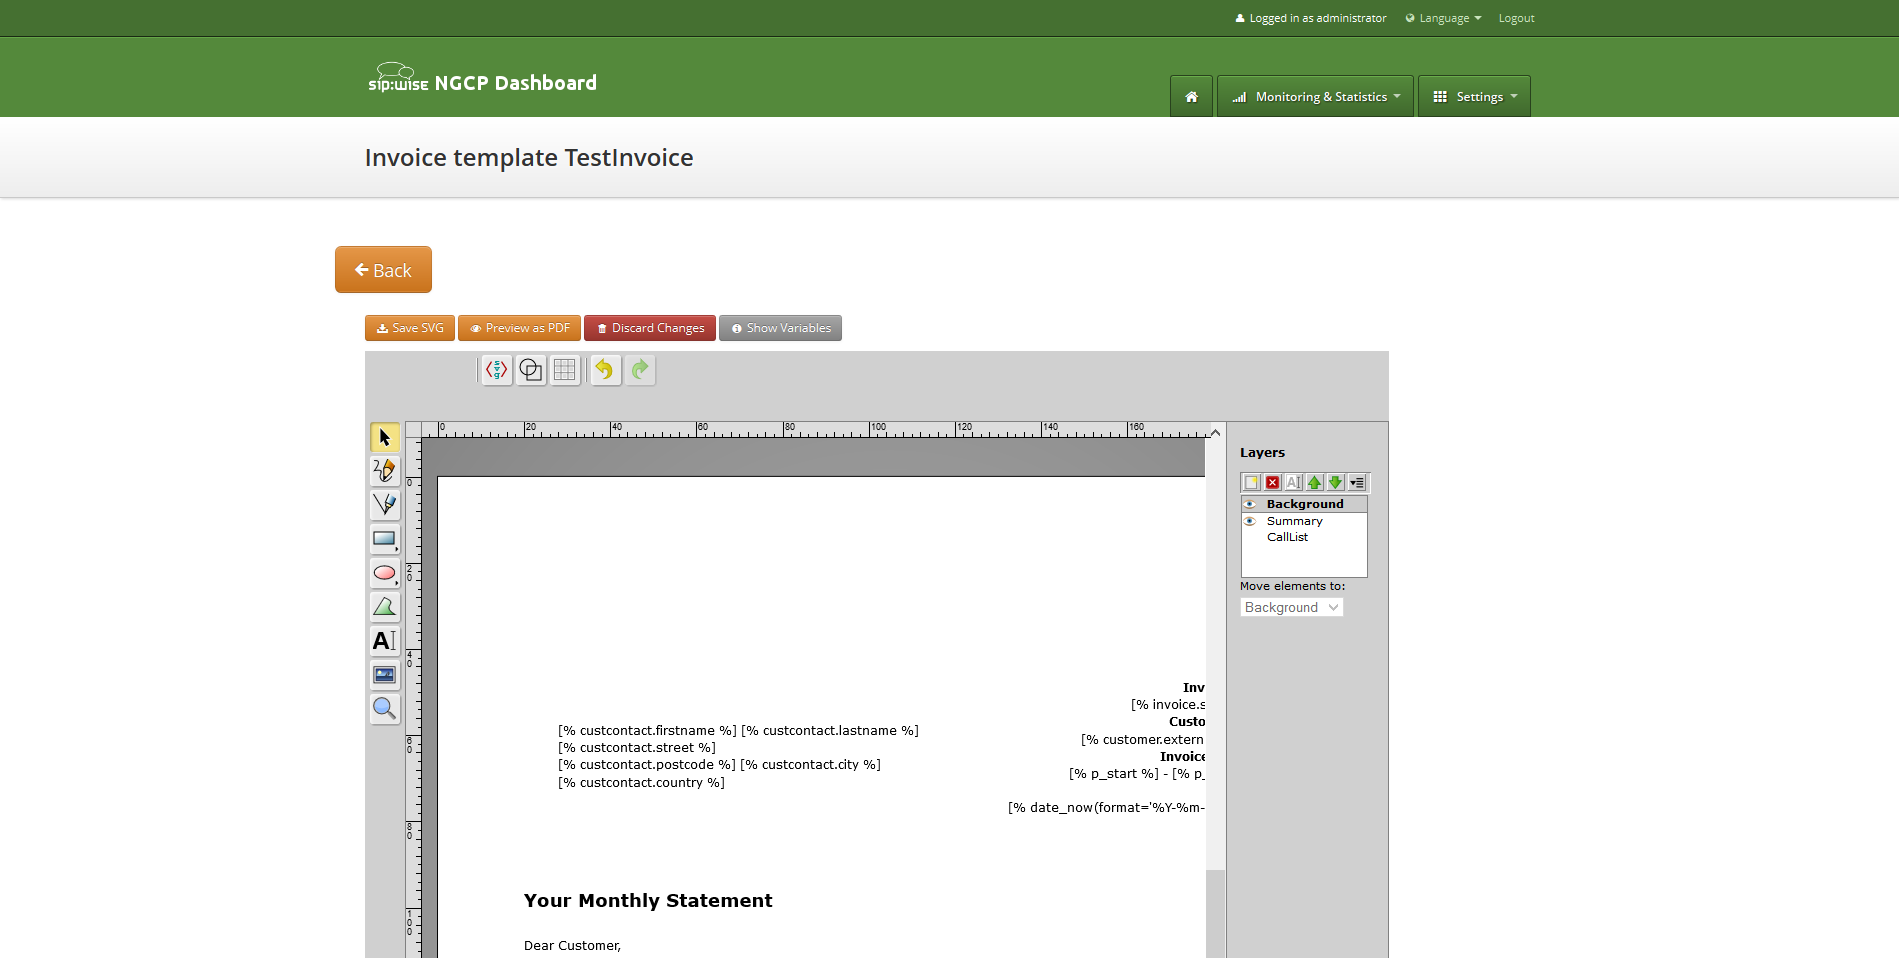
One of the layers is active, and its element can be edited in the main svg-edit window. Currently active layer’s name is bold in the layers list. The layers may be visible or invisible. Visible layers have "eye" icon left of their names in the layers list.
To make a layer active, click on its name in the layers list. If the layer was invisible, its elements became visible on activation. Thus you can see mixed elements of some layers, then you can switch off visibility of other layers by click on their "eye" icons. It is good idea to keep visibility of the "Background" layer on, so look of the generated page will be seen.
Sometimes it may be convenient to edit svg source directly and svg-edit makes it possible to do it. After press on the <svg> icon in the top left corner of the svg-edit interface:
SVG XML source of the invoice template will be shown.
SVG source can be edited in place or just copy-pasted as usual text.
| info | |
Template keeps sizes and distances in pixels. |
| important | |
When edit svg xml source, please change very carefully and thinkfully things inside special comment mark-up "<!--{ }-→". Otherwise invoice generation may be broken. Please be sure that document structure repeats default invoice template: has the same groups (<g/>) elements on the top level, text inside special comments mark-up "<!--{ }-→" preserved or changed appropriately, svg xml structure is correct. |
To save your changes in the svg xml source, first press "OK" button on the top left corner of the source page:
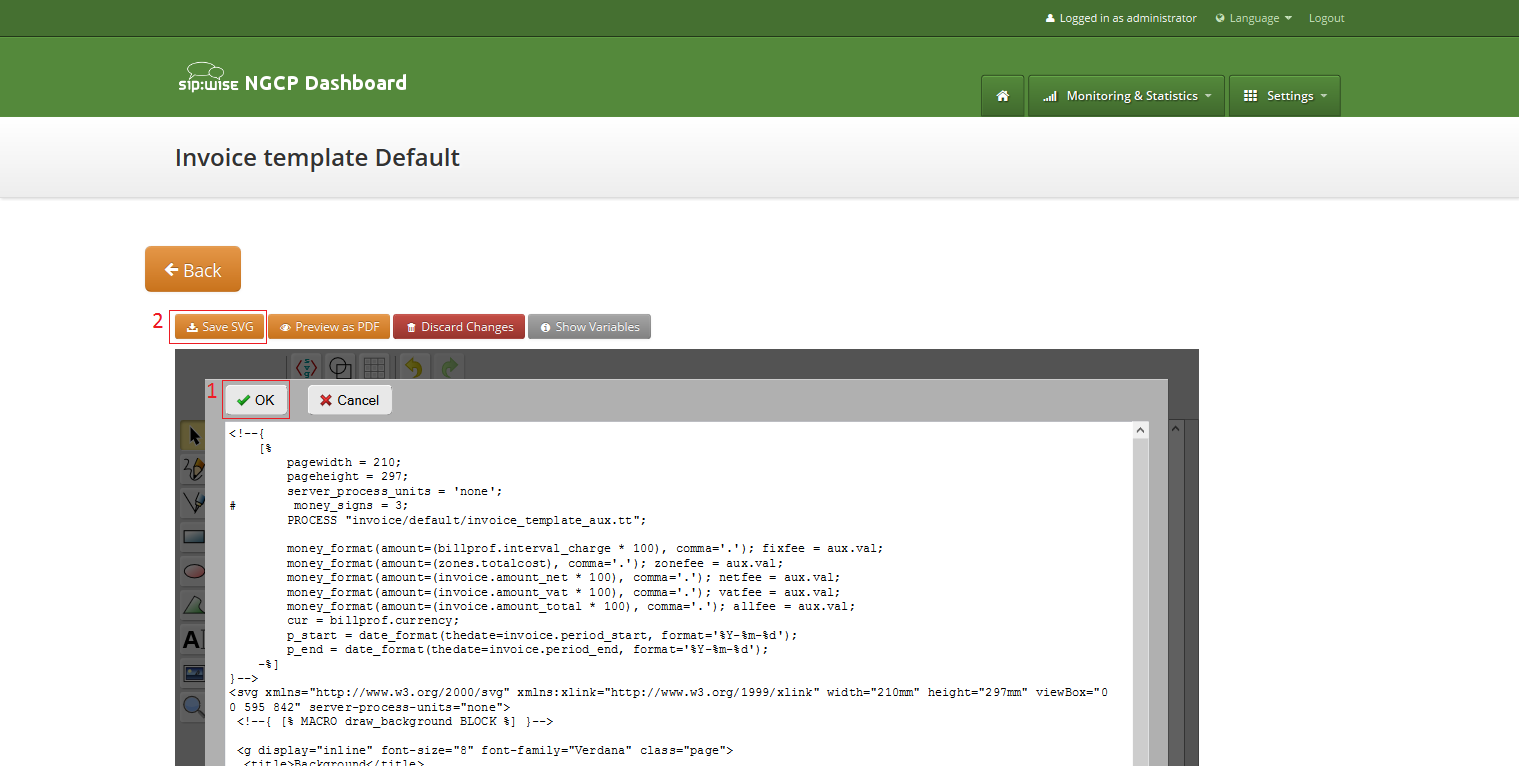
And then save invoice template changes Section 6.15.2.3, “Save and preview invoice template content”.
| info | |
You can copy and keep the svg source of your template as a file on the disk before start experimenting with the template. Later you will be able to return to this version replacing svg source. |
Change logo image
- Make sure that "Select tool" is active.
- Select default logo, clicking on the logo image.
- Press "Change image" button, which should appear on the top toolbar.
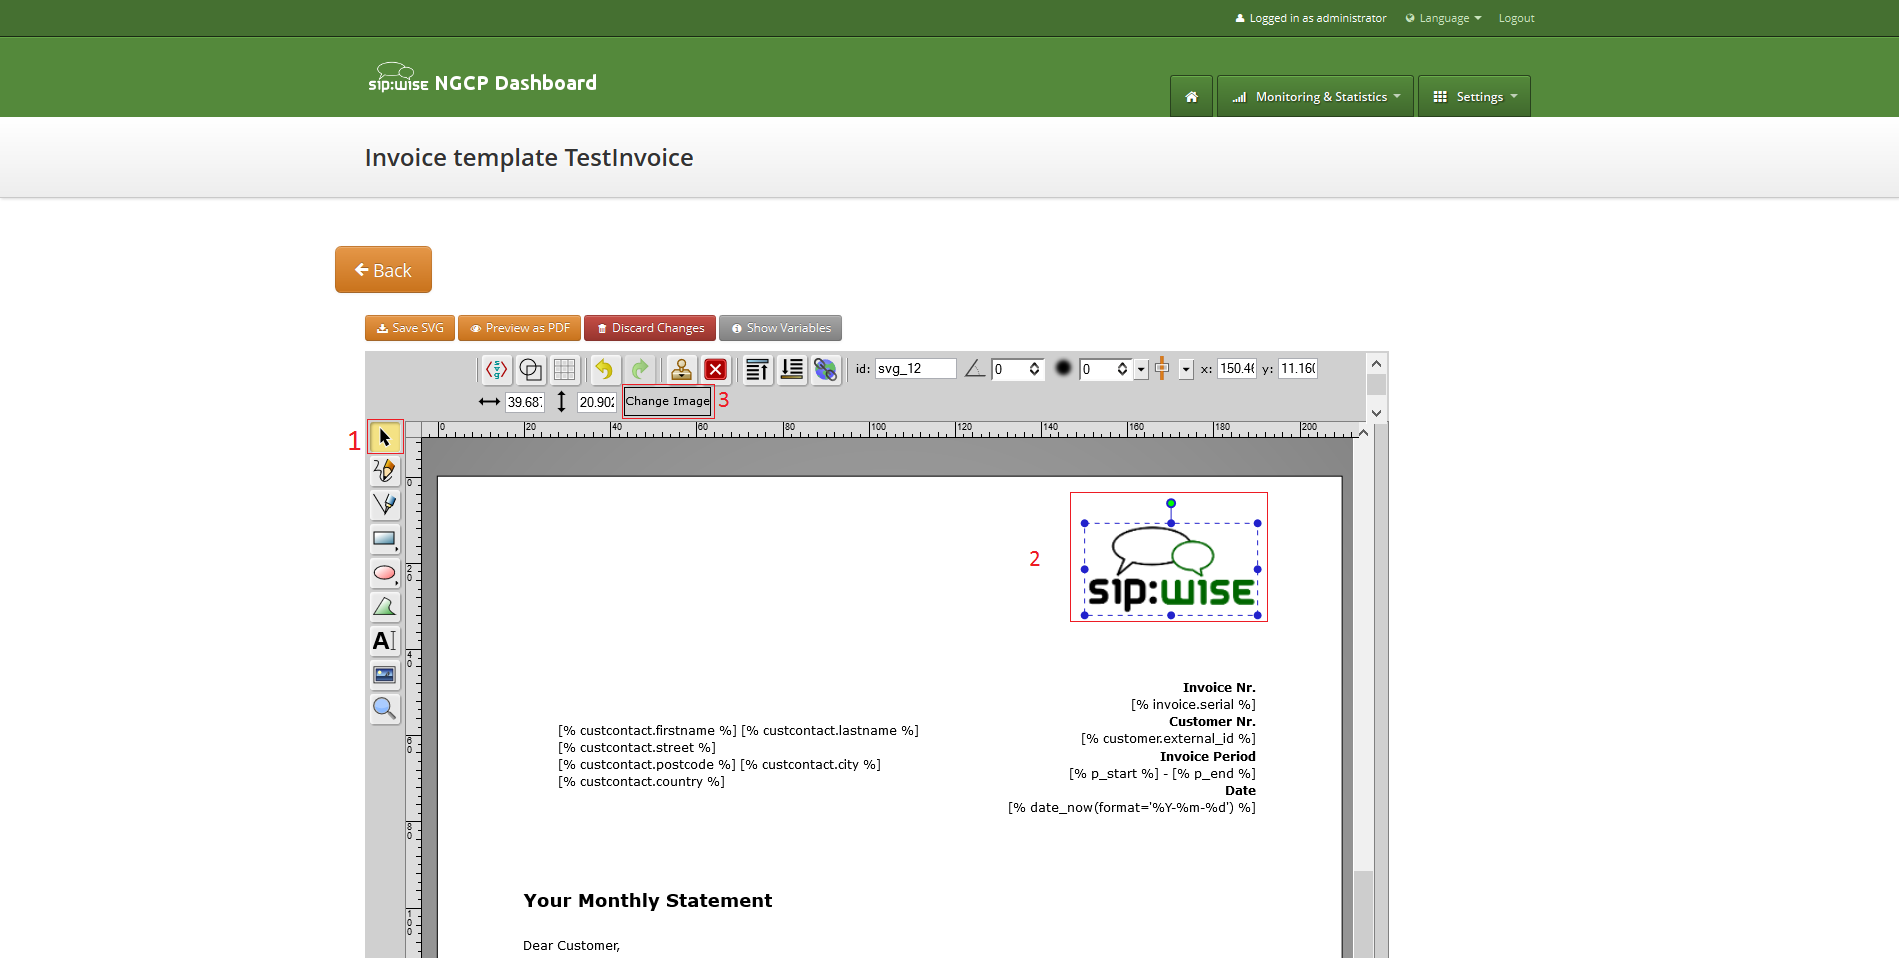
After image uploaded save invoice template changes Section 6.15.2.3, “Save and preview invoice template content”.
To save invoice template content changes press button "Save SVG".
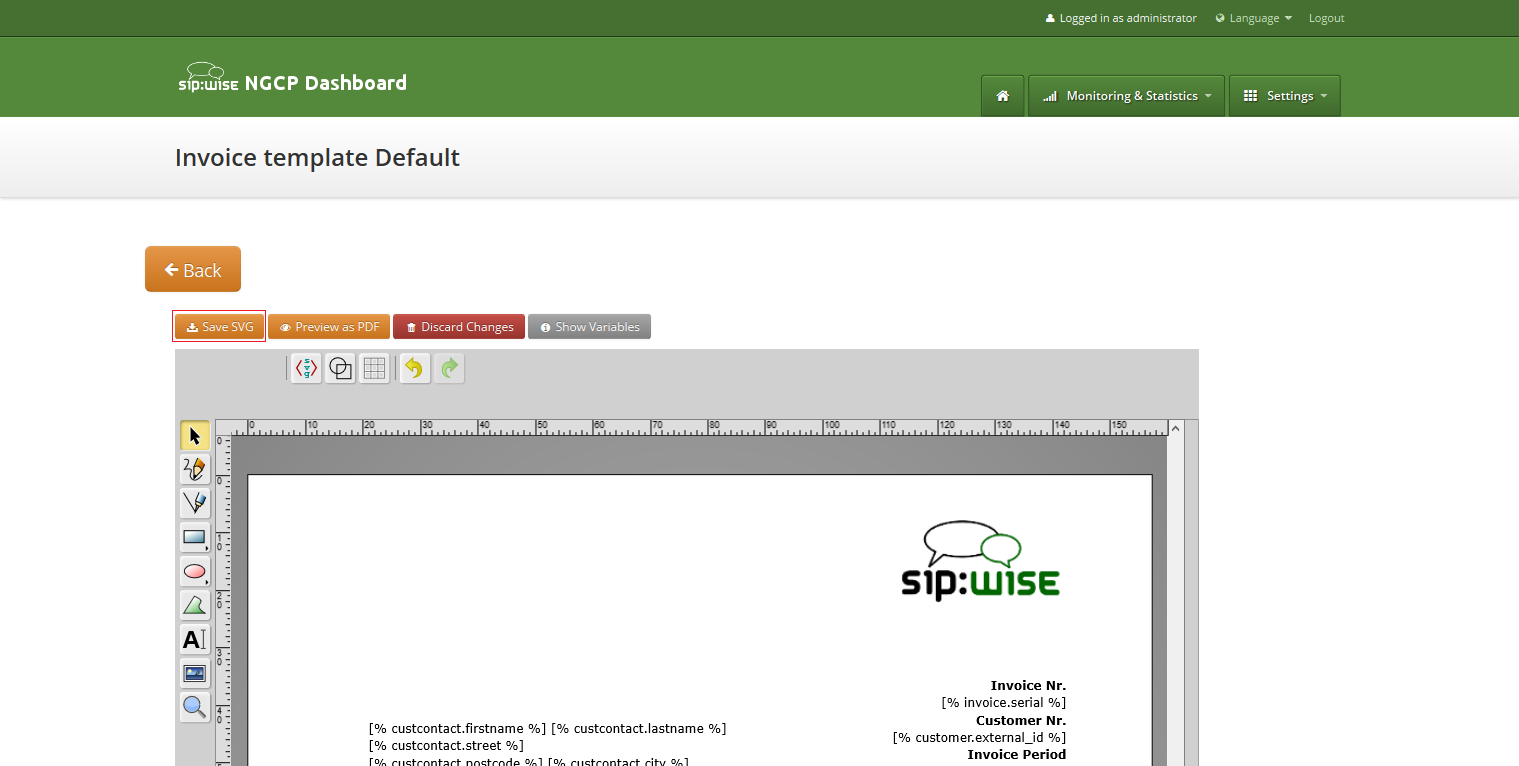
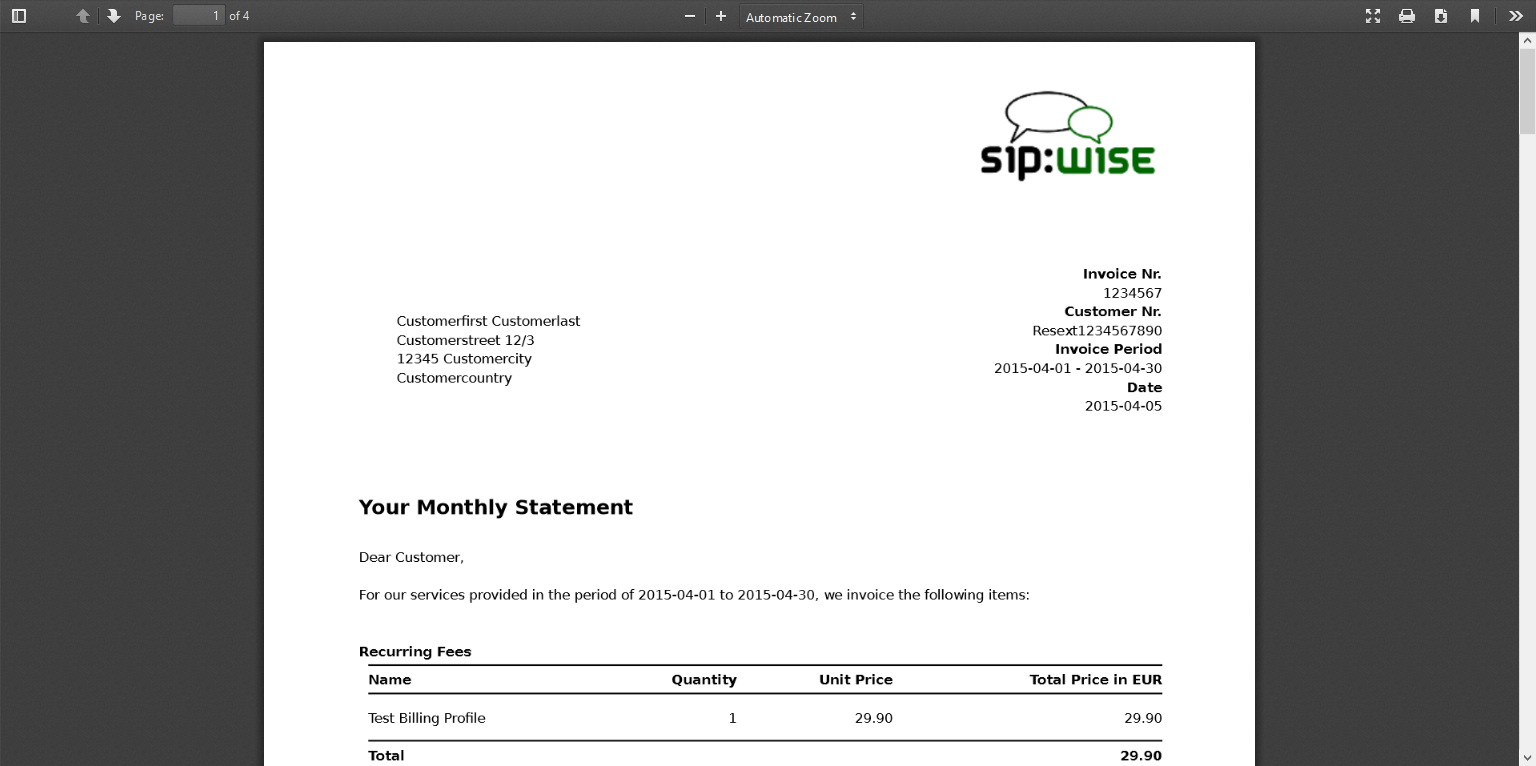
You will see message about successfully saved template. You can preview your invoice look in PDF format. Press on "Preview as PDF" button.
Invoice preview will be opened in the new window.
| info | |
Example fake data will be used for preview generation. |
Besides generating invoices on demand using web interface, Sipwise NGCP contains an invoice generator script that allows for producing invoices automatically, at regular intervals, for all customers, using the cron system tool.
| warning | |
Automated invoice generation is deprecated since mr4.0 release of NGCP. The invoice generator script will damage billing records in the database. The rest of the description in "Invoices Generation" section is kept in the handbook for reference purposes only. |
Script is located at: /usr/share/ngcp-panel/tools/generate_invoices.pl
In short:
- To generate and immediately send invoices for the previous month:
perl /usr/share/ngcp-panel/tools/generate_invoices.pl --send --prevmonth
- To generate invoices for the previous month without sending:
perl /usr/share/ngcp-panel/tools/generate_invoices.pl --prevmonth
- To send already generated invoices for the previous month:
perl /usr/share/ngcp-panel/tools/generate_invoices.pl --sendonly --prevmonth
- Regenerate invoices for the specified period:
perl /usr/share/ngcp-panel/tools/generate_invoices.pl --stime="2015-01-01 00:00:00" --etime="2015-01-31 00:00:00" --regenerate
Some not obvious options:
- *--allow_terminated* Generates invoices for the terminated contracts too.
- *--force_unrated* Generate invoices despite unrated calls existence in the specified generation period.
- *--no_empty* Skip invoices for the contracts without calls in the specified period and with null permanent fee for the billing profile.
To see all possible script options use --help or --man:
/usr/share/ngcp-panel/tools/generate_invoices.pl --man
Script will be run periodically as configured by the cron files. Cron files templates can be found at:
- /etc/ngcp-config/templates/etc/cron.d/ngcp-invoice-gen.tt2
- /etc/ngcp-config/templates/etc/cron.d/ngcp-invoice-gen.services
After applying your configuration cron file will be located at:
- /etc/cron.d/ngcp-invoice-gen
Script uses configuration file located at: /etc/ngcp-invoice-gen/invoice-gen.conf
Except common DB connection configuration following specific options can be defined in the config file:
- RESELLER_ID 1,2,3,…N
Comma separated resellers id. Invoice generation will be performed only for the specified resellers.
- CLIENT_CONTRACT_ID 1,2,3,…N
Comma separated customers id. Invoice generation will be performed only for the specified customers.
- STIME YYYY-mm-DD HH:MM:SS
Usually is not necessary. Script option --prevmonth will define correct start and end time for the previous month billing period. Generated invoices will include all calls with call start time more then STIME value and less the ETIME value.
- ETIME YYYY-mm-DD HH:MM:SS
Usually is not necessary. Script option --prevmonth will define correct start and end time for the previous month billing period. Generated invoices will include all calls with call start time more then STIME value and less the ETIME value.
- SEND [0|1]
Generated invoices will be immediately sent to the customers.
- RESEND [0|1]
Invoices, already sent to the customers, will be sent again.
- REGENERATE [0|1]
Already presented invoices files will be generated again. Otherwise they will stay intouched.
- ALLOW_TERMINATED [0|1]
Generate invoices for the already terminated customers too.
- ADMIN_EMAIL your@email.com
Purposed for notifications about invoices generation fails. Not in use now.
All generated invoices can be seen in the invoice management interface Section 6.15.1, “Invoices Management”.
On request each invoice will be sent to the proper customer as e-mail with the invoice PDF in the attachment. Letter content is defined by the invoice email template.
The sip:provider CE makes it possible to customize content of the emails sent on the following actions:
- Web password reset requested. Email will be sent to the subscriber, whom password was requested for resetting. If the subscriber doesn’t have own email, letter will be sent to the customer, who owns the subscriber.
- New subscriber created. Email will be sent to the newly created subscriber or to the customer, who owns new subscriber.
- Letter with the invoice. Letter will be sent to the customer.
Default email templates for each of the email events are inserted on the initial sip:provider CE database creation. Content of the default template is described in the corresponding sections. Default email templates aren’t linked to any reseller and can’t be changed through sip:provider CE Panel. They will be used to initialize default templates for the newly created reseller.
Each email template refers to the values from the database using special mark-ups "[%" and "%]". Each email template has fixed set of the variables. Variables can’t be added or changed without changes in the sip:provider CE Panel code.
Email will be sent after subscriber or subscriber administrator requested password reset for the subscriber account. Letter will be sent to the subscriber. If subscriber doesn’t have own email, letter will be sent to the customer owning the subscriber.
Default content of the password reset email template is:
Template name | passreset_default_email |
From | |
Subject | Password reset email |
Body | Dear Customer, Please go to [%url%] to set your password and log into your self-care interface. Your faithful Sipwise system -- This is an automatically generated message. Do not reply. |
Following variables will be provided to the email template:
- [%url%]: specially generated url where subscriber can define his new password.
- [%subscriber%]: username@domain of the subscriber, which password was requested for reset.
Email will be sent on the new subscriber creation. Letter will be sent to the newly created subscriber if it has an email. Otherwise, letter will be sent to the customer who owns the subscriber.
| info | |
By default email content template is addressed to the customer. Please consider this when create the subscriber with an email. |
Template name | subscriber_default_email |
From | |
Subject | Subscriber created |
Body | Dear Customer, A new subscriber [%subscriber%] has been created for you. Your faithful Sipwise system -- This is an automatically generated message. Do not reply. |
Following variables will be provided to the email template:
- [%url%]: specially generated url where subscriber can define his new password.
- [%subscriber%]: username@domain of the subscriber, which password was requested for reset.
Template name | invoice_default_email |
From | |
Subject | Invoice #[%invoice.serial%] from [%invoice.period_start_obj.ymd%] to [%invoice.period_end_obj.ymd%] |
Body | Dear Customer, Please find your invoice #[%invoice.serial%] for [%invoice.period_start_obj.month_name%], [%invoice.period_start_obj.year%] in attachment of this letter. Your faithful Sipwise system -- This is an automatically generated message. Do not reply. |
Variables passed to the email template:
- [%invoice%]: container variable for the invoice information.
| info | Invoice fields |
|---|---|
The fields [%invoice.period_start_obj%] and [%invoice.period_end_obj%] provide methods of the perl package DateTime for the invoice start date and end date. Further information about DateTime can be obtained from the package documentation: man DateTime |
- [%provider%]: container variable for the reseller contact. All database contact values will be available.
- [%client%]: container variable for the customer contact.
| info | Contact fields example for the "provider". Replace "provider" to client to access proper "customer" contact fields. |
|---|---|
|
Email templates linked to the resellers can be customized in the email templates management interface. For the administrative account email templates of all the resellers will be shown. Respectively for the reseller account only owned email templates will be shown.
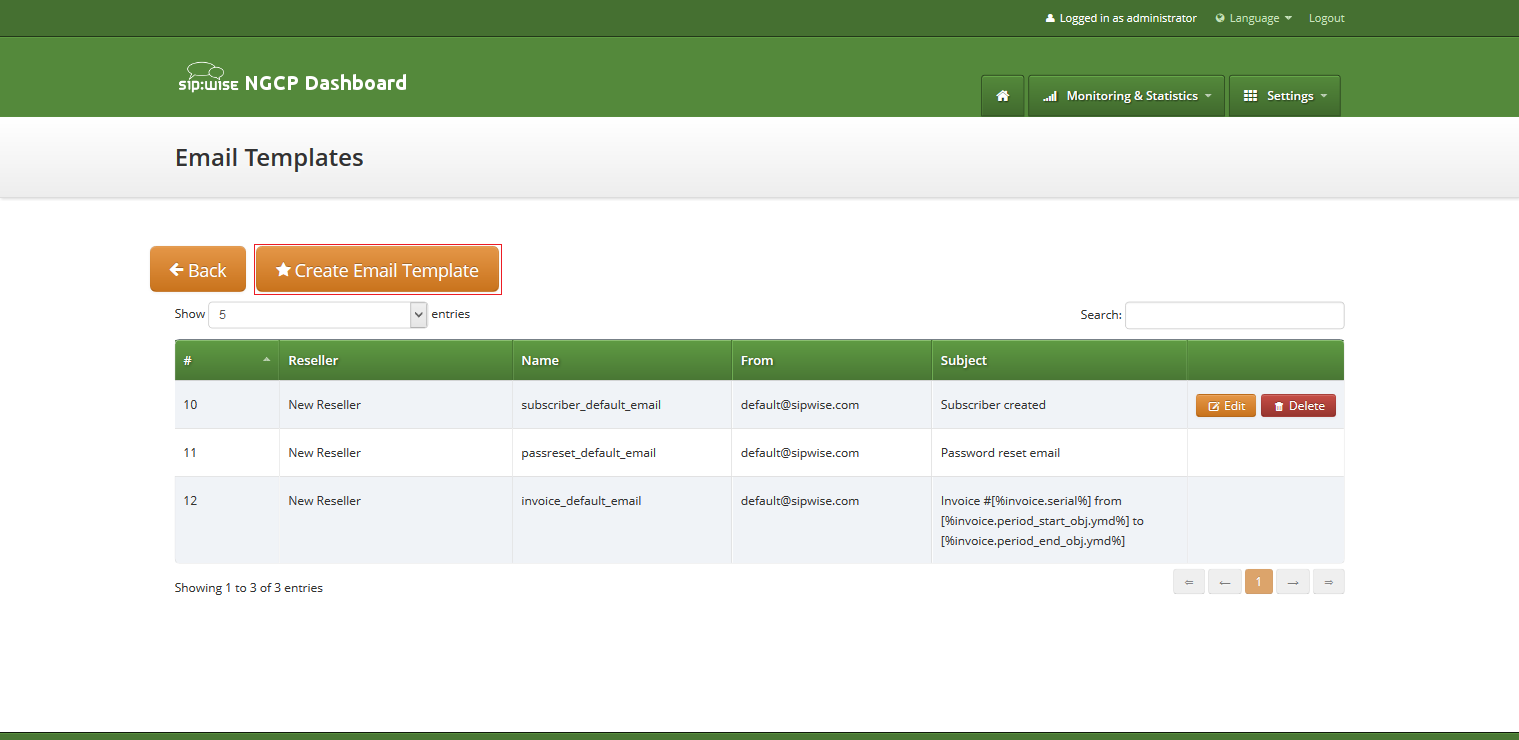
To create create new email template press button "Create Email Template".
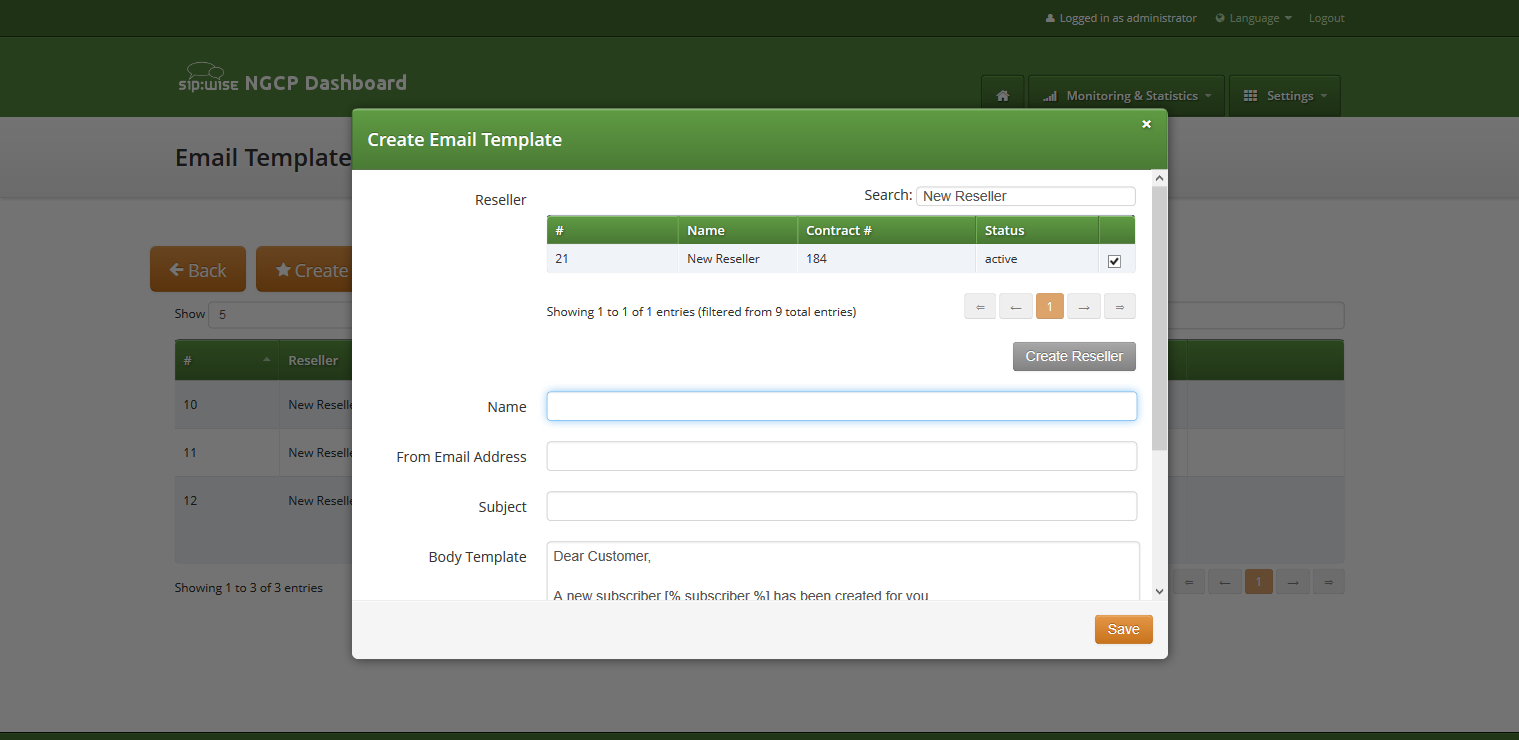
On the email template form all fields are mandatory:
- Reseller: reseller who owns this email template.
Name: currently only email template with the following names will be considered by the sip:provider CE on the appropriate event Section 6.16.1, “Email events” :
- passreset_default_email;
- subscriber_default_email;
- invoice_default_email;
- From Email Address: email address which will be used in the From field in the letter sent by the sip:provider CE.
- Subject: Template of the email subject. Subject will be processed with the same template variables as the email body.
- Body: Email text template. Will be processed with appropriate template variables.
Vertical Service Codes (VSC) are codes a user can dial on his phone to provision specific features for his subscriber account. The format is *<code>*<value> to activate a specific feature, and #<code> or #<code># to deactivate it. The code parameter is a two-digit code, e.g. 72. The value parameter is the value being set for the corresponding feature.
| important | |
The value user input is normalized using the Rewrite Rules Sets assigned to domain as described in Section 5.6, “Configuring Rewrite Rule Sets”. |
By default, the following codes are configured for setting features. The examples below assume that there is a domain rewrite rule normalizing the number format 0<ac><sn> to <cc><ac><sn> using 43 as country code.
-
72 - enable Call Forward Unconditional e.g. to 431000 by dialing
*72*01000, and disable it by dialing#72. -
90 - enable Call Forward on Busy e.g. to 431000 by dialing
*90*01000, and disable it by dialing#90. -
92 - enable Call Forward on Timeout e.g. after 30 seconds of ringing to 431000 by dialing
*92*30*01000, and disable it by dialing#92. -
93 - enable Call Forward on Not Available e.g. to 431000 by dialing
*93*01000, and disable it by dialing#93. -
50 - set Speed Dial Slot, e.g. set slot 1 to 431000 by dialing
*50*101000, which then can be used by dialing*1. -
55 - set One-Shot Reminder Call e.g. to 08:30 by dialing
*55*0830. -
31 - set Calling Line Identification Restriction for one call, e.g. to call 431000 anonymously dial
*31*01000. -
32 - enable Block Incoming Anonymous Calls by dialing
*32*, and disable it by dialing#32. -
80 - call using Call Block Override PIN, number should be prefixed with a block override PIN configured in admin panel to disable the outgoing user/admin block list and NCOS level for a call. For example, when override PIN is set to 7890, dial
*80*789001000to call 431000 bypassing block lists.
You can change any of the codes (but not the format) in /etc/ngcp-config/config.yml in the section sems→vsc. After the changes, execute ngcpcfg apply 'changed VSC codes'.
| caution | |
If you have the EMTAs under your control, make sure that the specified VSCs don’t overlap with EMTA-internal VSCs, because the VSC calls must be sent to the NGCP via SIP like normal telephone calls. |
Table 6. VSC Voice Prompts
| Prompt Handle | Related VSC | Message |
|---|---|---|
vsc_error | any | An error has occurred. Please try again later. |
vsc_invalid | wrong code | Invalid feature code. |
reject_vsc | any | Vertical service codes are disabled for this line. |
vsc_cfu_on | 72 (Call Forward Unconditional) | Your unconditional call forward has successfully been activated. |
vsc_cfu_off | 72 (Call Forward Unconditional) | Your unconditional call forward has successfully been deactivated. |
vsc_cfb_on | 90 (Call Forward Busy) | Your call forward on busy has successfully been activated. |
vsc_cfb_off | 90 (Call Forward Busy) | Your call forward on busy has successfully been deactivated. |
vsc_cft_on | 92 (Call Forward on Timeout) | Your call forward on ring timeout has successfully been activated. |
vsc_cft_off | 92 (Call Forward on Timeout) | Your call forward on ring timeout has successfully been deactivated. |
vsc_cfna_on | 93 (Call Forward on Not Available) | Your call forward while not reachable has successfully been activated. |
vsc_cfna_off | 93 (Call Forward on Not Available) | Your call forward while not reachable has successfully been deactivated. |
vsc_speeddial | 50 (Speed Dial Slot) | Your speed dial slot has successfully been stored. |
vsc_reminder_on | 55 (One-Shot Reminder Call) | Your reminder has successfully been activated. |
vsc_reminder_off | 55 (One-Shot Reminder Call) | Your reminder has successfully been deactivated. |
vsc_blockinclir_on | 32 (Block Incoming Anonymous Calls) | Your rejection of anonymous calls has successfully been activated. |
vsc_blockinclir_off | 32 (Block Incoming Anonymous Calls) | Your rejection of anonymous calls has successfully been deactivated. |
WebRTC is an open project providing browsers and mobile applications with Real-Time Communications (RTC) capabilities. Configuring your platform to offer WebRTC is quite easy and straightforward. This allows you to have a SIP-WebRTC bridge in place and make audio/video call towards normal SIP users from WebRTC clients and vice versa.
Sip Provider listens, by default, on the following WebSockets and WebSocket Secure: ws://your-ip:5060/ws, wss://your-ip:5061/ws and wss://your-ip:1443/wss/sip/.
The WebRTC subscriber is just a normal subscriber which has just a different configuration in his Preferences. You need to change the following preferences under Subscribers→Details→Preferences→NAT and Media Flow Control:
- use_rtpproxy: Always with rtpproxy as additional ICE candidate
- transport_protocol: RTP/SAVPF (encrypted SRTP with RTCP feedback)
The transport_protocol setting may change, depending on your WebRTC client/browser configuration. Supported protocols are the following:
- Transparent (Pass through using the client’s transport protocol)
- RTP/AVP (Plain RTP)
- RTP/SAVP (encrypted SRTP)
- RTP/AVPF (RTP with RTCP feedback)
- RTP/SAVPF (encrypted SRTP with RTCP feedback)
- UDP/TLS/RTP/SAVP (Encrypted SRTP using DTLS)
- UDP/TLS/RTP/SAVPF (Encrypted SRTP using DTLS with RTCP feedback)
| warning | |
The below configuration is enough to handle a WebRTC client/browser. As mentioned, you may need to tune a little bit your |
In order to have a bridge between normal SIP clients (using plain RTP for example) and WebRTC client, the normal SIP clients' preferences have to have the following configuration:
transport_protocol: RTP/AVP (Plain RTP)
This will teach Sip Provider to translate between Plain RTP and RTP/SAVPF when you have calls between normal SIP clients and WebRTC clients.
Instant Messaging (IM) based on XMPP comes with sip:provider CE out of the box. sip:provider CE uses prosody as internal XMPP server.
Each subscriber created on the platform have assigned a XMPP user, reachable already - out of the box - by using the same SIP credentials. You can easily open an XMPP client (e.g. Pidgin) and login with your SIP username@domain and your SIP password. Then, using the XMPP client options, you can create your buddy list by adding your buddies in the format user@domain.