| |
| |
This chapter describes the steps necessary to rate calls and export rated CDRs (call detail records) to external systems.
Service billing on the NGCP is based on billing profiles, which may be assigned to customers and SIP peerings. The design focuses on a simple, yet flexible approach, to support arbitrary dial-plans without introducing administrative overhead for the system administrators. The billing profiles may define a base fee and free time or free money per billing interval. Unused free time or money automatically expires at the end of the billing interval.
Each profile may have call destinations (usually based on E.164 number prefix matching) with configurable fees attached. Call destination fees each support individual intervals and rates, with a different duration and/or rate for the first interval. (e.g.: charge the first minute when the call is opened, then every 30 seconds, or make it independent of the duration at all) It is also possible to specify different durations and/or rates for peak and off-peak hours. Peak time may be specified based on weekdays, with additional support for manually managed dates based on calendar days. The call destinations can finally be grouped for an overview on user’s invoices by specifying a zone in two detail levels. (E.g.: national landline, national mobile, foreign 1, foreign 2, etc.)
The first step when setting up billing data is to create a billing profile, which will be the container for all other billing related data. Go to Settings→Billing and click on Create Billing Profile.
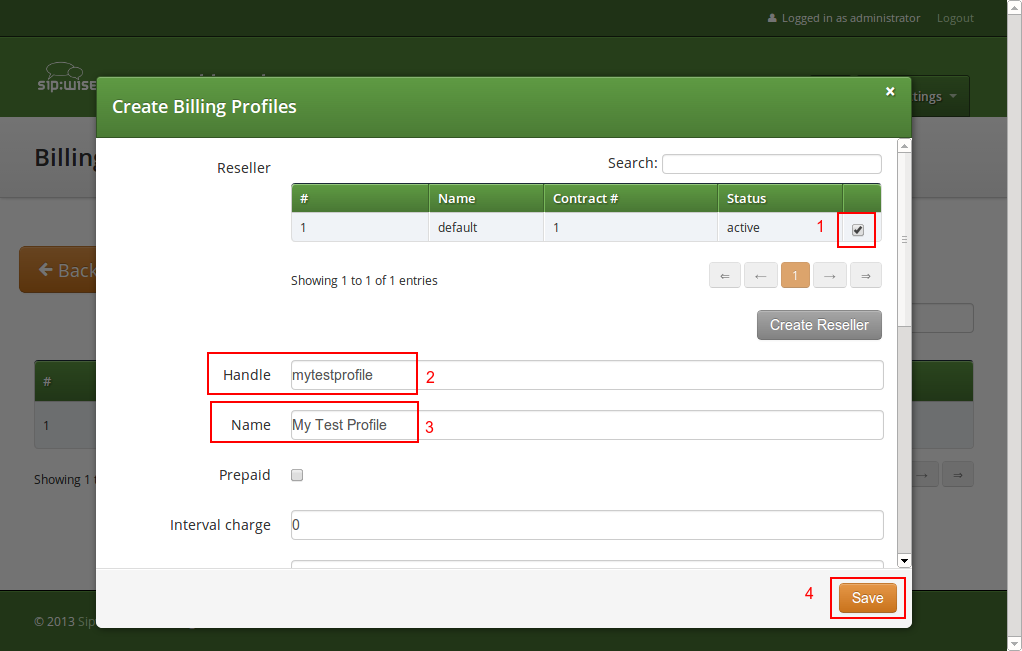
The fields Reseller, Handle and Name are mandatory.
Each Billing Profile holds multiple Billing Fees.
To set up billing fees, click on the Fees button of the billing profile you want to configure. Billing fees may be uploaded using a configurable CSV file format, or entered directly via the web interface by clicking Create Fee Entry. To configure the CSV field order for the file upload, rearrange the entries in the www_admin→fees_csv→element_order array in /etc/ngcp-config/config.yml and execute the command ngcpcfg apply changed fees element order. The following is an example of working CSV file to upload (pay attention to double quotes):
".","^1",out,"EU","ZONE EU",5.37,60,5.37,60,5.37,60,5.37,60,0,0
"^01.+$","^02145.+$",out,"AT","ZONE Test",0.06250,1,0.06250,1,0.01755,1,0.01733,1,0
For input via the web interface, just fill in the text fields accordingly.
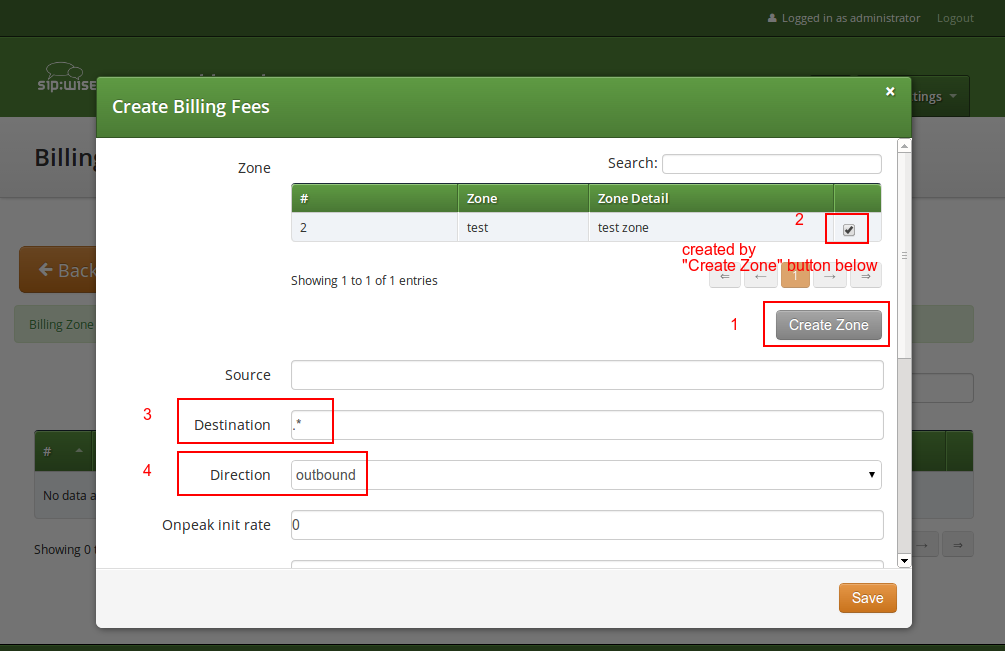
In both cases, the following information may be specified independently for every destination:
foreign zone 1)
^.*@sip\.example\.org$ or ^someone@sip\.sipwise\.com$ or just . to match everything). If you leave this field empty, the default pattern . matching everything will be set implicitly. Internally, this pattern will be matched against the <source_cli>@<source_domain> fields of the CDR.
someone@sip\.example\.org or ^43). This field must be set.
Outbound for standard origination fees (applies to callers placing a call and getting billed for that) or Inbound for termination fees (applies to callees if you want to charge them for receiving various calls, e.g. for 800-numbers). If in doubt, use Outbound. If you upload fees via CSV files, use out or in, respectively.
The {source, destination, direction} combination needs to be unique for a billing profile. The system will return an error if such a set is specified twice, both for the file upload and the input via the web interface. |
There are several internal services (vsc, conference, voicebox, fax2mail) which will need a specific destination entry with a domain-based destination. If you don’t want to charge the same (or nothing) for those services, add a fee for destination |
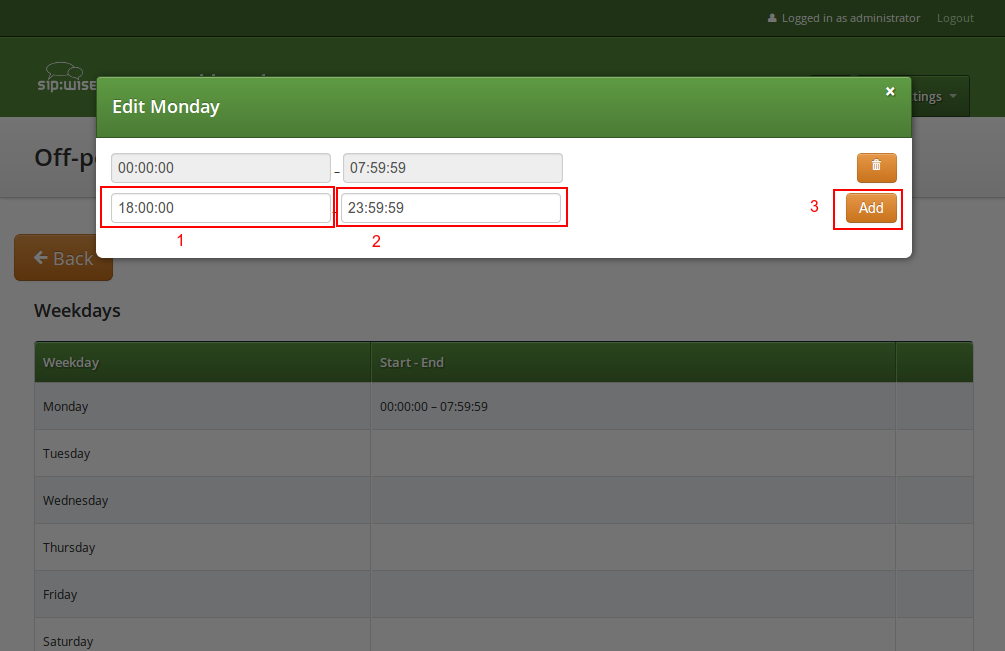
To be able to differentiate between on-peak and off-peak calls, the platform stores off-peak times for every billing profile based on weekdays and/or calendar days. To edit the settings for a billing profile, go to Settings→Billing and press the Off-Peaktimes button on the billing profile you want to configure.
To set off-peak times for a weekday, click on Edit next to the according weekday. You will be presented with two input fields which both receive a timestamp in the form of hh:mm:ss specifying a time of day for the start and end of the off-peak period. If any of the fields is left empty, the system will automatically insert 00:00:00 (start field) or 23:59:59 (end field). Click on Add to store the setting in the database. You may create more than one off-peak period per weekday. To delete a range, just click Delete next to the entry. Click the close icon when done.
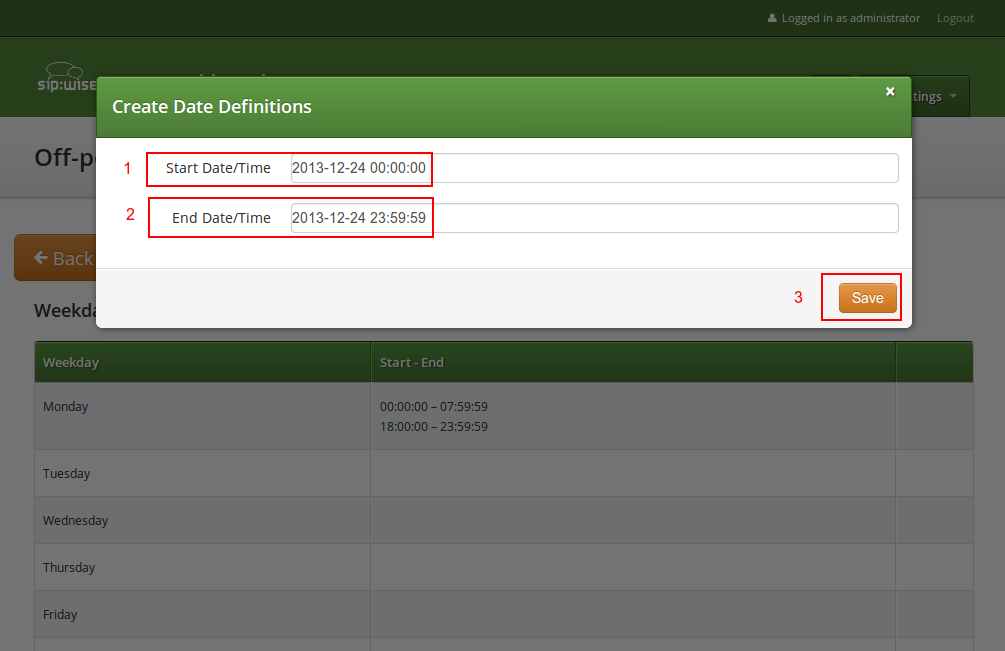
To specify off-peak ranges based on calendar dates, click on Create Special Off-Peak Date. Enter a date in the form of YYYY-MM-DD hh:mm:ss into the Start Date/Time input field and End Date/Time input field to define a range for the off-peak period.
In a normal post-paid accounting scenario, each customer accumulates debt in their billing account, which at the end of the billing interval is then billed to the customer. A prepaid billing profile reverses this sequence: the customer first has to provide credit to their account balance, and the costs for all calls are then deducted from that account balance. Once the balance reaches zero, no further calls from this customer are accepted, with the exception of free calls. Additionally, if the balance drops to zero while any calls are currently active, NGCP will disconnect those calls as soon as that happens.
With prepaid billing enabled, all details of the billing profile and all details of the billing fees behave as they normally do, including interval free time. If any interval free time is given, the free time will be used before the account’s credit is.
For technical reasons, the system can make the distinction between on-peak and off-peak times only at call establishment time. In other words, if the currently active call fee at the moment when the call is established is an off-peak fee, then the same off-peak fee will remain active for the whole length of this call, even if the call actually transitions into an on-peak fee (and vice versa). |
For technical reasons, prepaid billing can’t charge local endpoint calls to Voicebox, VSC calls or calls to a Conference Room. |
The Sipwise NGCP platform offers advanced billing features which are especially designed for pre-paid billing scenarios. For details please visit Billing Customizations Section 7.4, “Billing Customizations” section of the handbook.
The NGCP supports a fraud detection feature, which is designed to detect accounts causing unusually high customer costs, and then to perform one of several actions upon those accounts. This feature can be enabled and configured through two sets of billing profile options described in Section 7.1.1, “Creating Billing Profiles”, namely the monthly (fraud monthly limit, fraud monthly lock and fraud monthly notify) and daily limits (fraud daily limit, fraud daily lock and fraud daily notify). Either monthly/daily limits or both of them can be active at the same time.
Monthly fraud limit check runs once a day, shortly after midnight local time and daily fraud limit check runs every 30min. A background script (managed by cron daemon) automatically checks all accounts which are linked to a billing profile enabled for fraud detection, and selects those which have caused a higher cost than the fraud monthly limit configured in the billing profile, within the currently active billing interval (e.g. in the current month), or a higher cost than the fraud daily limit configured in the billing profile, within the calendar day. It then proceeds to perform at least one of the following actions on those accounts:
Fraud lock levels are various protection (and notification) settings that are applied to subscribers of a Customer, if fraud detection is enabled in the currently active billing profile and the Customer’s daily or monthly fraud limit has been exceeded.
The following lock levels are available:
none: no account locking will happen
foreign calls: only calls within the subscriber’s own domain, and emergency
calls, are allowed
all outgoing calls: subscribers of the customer cannot place any calls, except
calls to free and emergency destinations
incoming and outgoing: subscribers of the customer cannot place and receive
any calls, except calls to free and emergency destinations
global: same restrictions as at incoming and outgoing level, additionally
subscribers are not allowed to access the Customer Self Care (CSC) interface
ported: only automatic call forwarding, due to number porting, is allowed
You can override fraud detection and locking settings of a billing profile on a per-account basis via REST API or the Admin interface. |
Accounts that were automatically locked by the fraud detection feature will not be automatically unlocked when the next billing interval starts. This has to be done manually through the administration panel or through the provisioning interface. |
If fraud detection is configured to only send an email and not lock the affected accounts, it will continue to do so for over-limit accounts every day. The accounts must either be locked in order to stop the emails (only currently active accounts are considered when the script looks for over-limit accounts) or some other action to resolve the conflict must be taken, such as disabling fraud detection for those accounts. |
It is possible to fetch the list of fraud events and thus get fraud status
of Customers by using the REST API and referring to the resource: |
Apart from the daily fraud detection check service, NGCP also provides instant, "hard" locking for prepaid use cases, by means of billing profile packages. See Billing Profile Packages Section 7.4.3, “Profile Packages” for reference. |
The standard way of doing the billing — i.e. having fixed billing intervals of a calendar month, starting on the 1st day of month — may not fit all billing profiles and intervals that sip:provider PRO platform operators would like to use.
The sip:provider PRO supports — starting from its mr4.2.1 version — alternate ways of defining billing profiles and intervals which are especially worthy for pre-paid scenarios. New functionality is covered by the following titles:
Subsequent sections will provide an introduction and configuration instructions to these advanced features of sip:provider PRO.
The idea is to dynamically select billing profiles (including fees) depending on the IP network the caller‘s SIP client is using to connect. The caller‘s IP is populated in a call‘s CDR, and effectively processed by:
The billing profile for rating a call is identified by matching the source IP against network ranges linked to the customer contract‘s billing mappings records. This feature is sometimes also referred to as roaming.
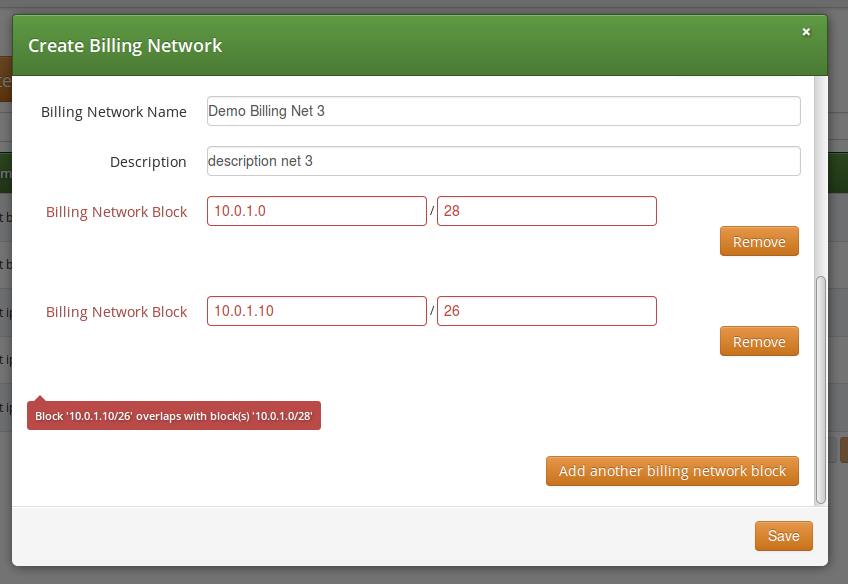
A Billing Network is defined as a series of network blocks where each network block consists of a single IP address or an IP subnet. Blocks of a particular billing network can be defined by either IPv4, or IPv6 addresses but not mixed.
The new /api/billingnetworks/ REST API resource allows to manage billing networks.
The example billing network that is shown in the figure above may be defined through
the API with this JSON structure:
{ "blocks" : [ { "ip" : "10.0.1.0", // subnet: 10.0.1.0 .. 10.0.1.255
                 "mask" : 24
               },
               { "ip" : "10.0.2.2" // single ip
               }
             ],
  "description" : "Some text",
  "name" : "Demo Billing Net 1", //unique per reseller
  "reseller_id" : 1
}
Input validation of the network blocks is automatically performed by sip:provider PRO during their definition in a way that it prevents specifying overlapping blocks by means of Interval Trees; billing networks themselves may overlap though.
Using the default settings related to billing when creating a new Reseller or Customer on the administrative web panel results in applying the standard billing profile mapping schedule: the same billing profile is always used.
The idea of billing profile mapping schedule is to extend the billing mappings logic to utilize it as a schedule for billing profiles (and associated fees) for the Customer or Reseller contract. So far, billing mapping records provided only a history showing which profile was in effect at a given time in the past, which is for example required for delayed rating of calls.
Now it is also possible to define in advance, when specific billing profiles should become active in the future, e.g. to plan campaigns or special offers.
Billing profile mappings represent a schedule of overlapping time intervals with Billing Profiles and Billing Networks, which are assigned to (customer) contracts when creating or editing them.
Mapping intervals can be of type:
half-open:
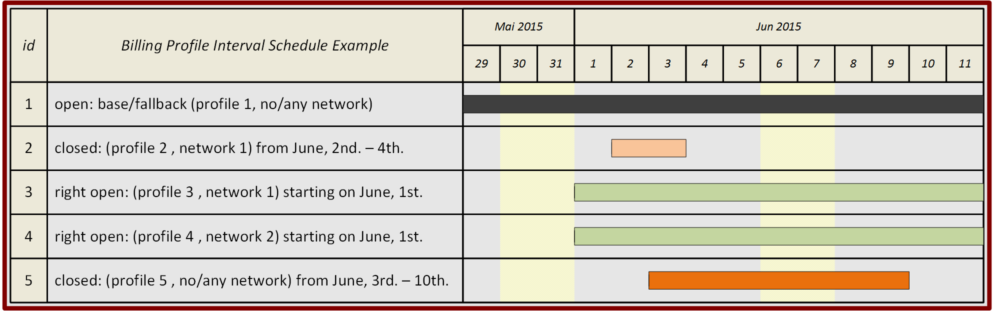
Applying the profile mapping schedule shown in the above figure will result in billing profiles being active as provided in the table below.
Table 10. Active Billing Profiles
Time | Web Panel shows | Rating | ||
Caller IP in Network 1 | Caller IP in Network 2 | Caller IP in other network | ||
May 30 | Profile 1 | Profile 1 | Profile 1 | Profile 1 |
June 1 | Profile 4 | Profile 3 | Profile 4 | Profile 1 |
June 2 | Profile 2 | Profile 2 | Profile 4 | Profile 1 |
June 5 | Profile 5 | Profile 3 | Profile 4 | Profile 5 |
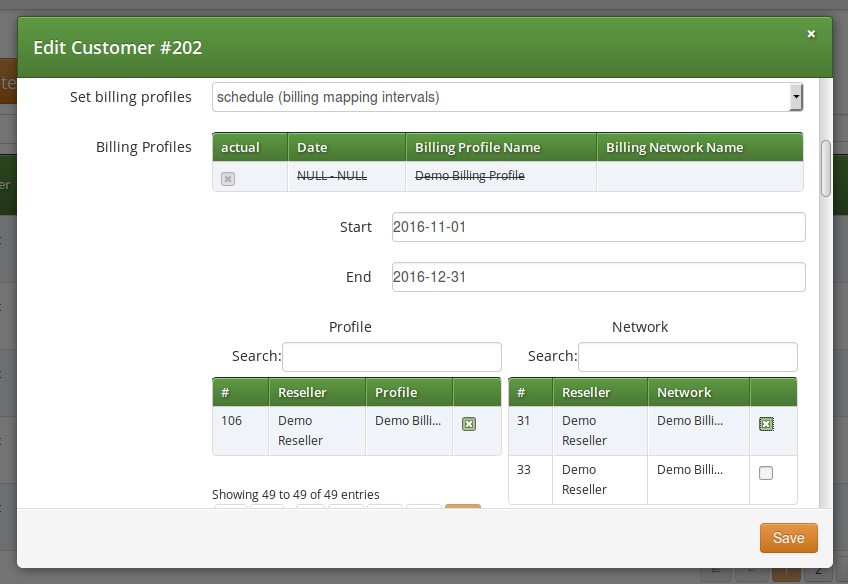
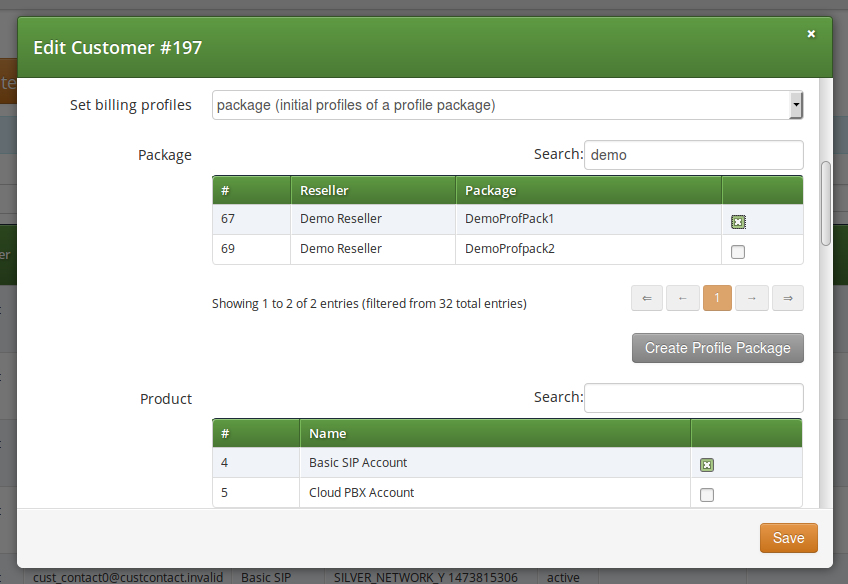
A Customer’s default billing profile mapping can be changed to scheduled mappings
when editing its properties, at the parameter "Set billing profiles", selecting:
schedule (billing mapping intervals)
Assigning a Billing Network to a billing profile mapping is optional. Without selecting the network, the Billing Profile will be applied to all calls. |
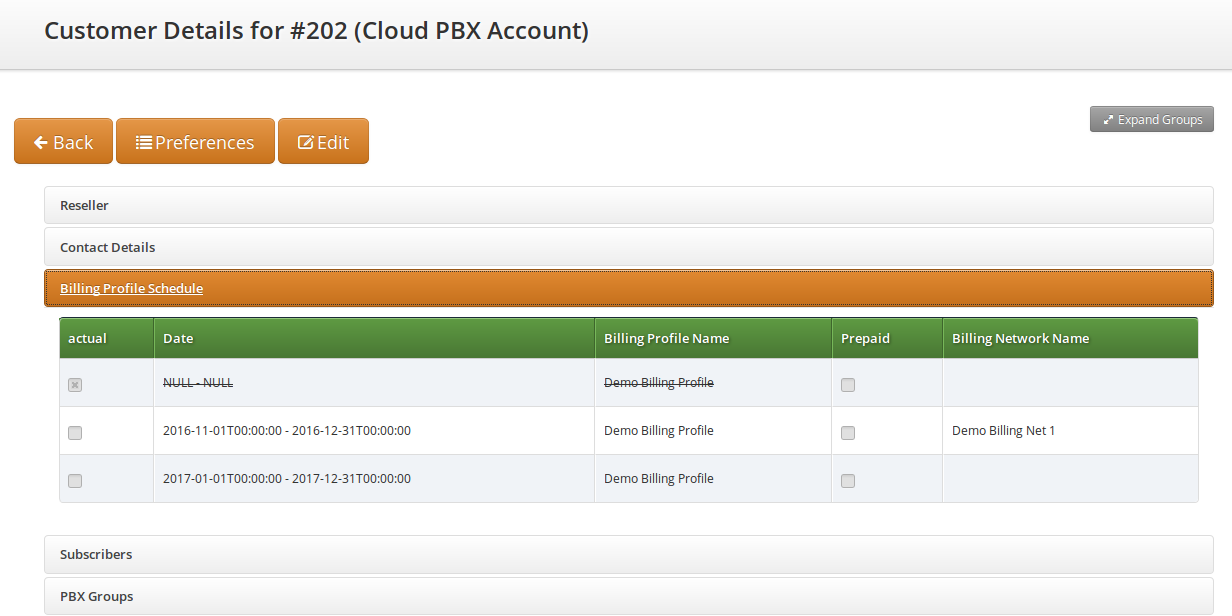
The profile mapping schedule assigned to a Customer is also listed among Customer’s properties. See Settings → Customers → Details → Billing Profile Schedule.
Profile mappings that started in the past, like the default one, are displayed with a strike-through font in order to indicate that those can not be modified. |
The currently active mapping is depicted by a checked box.
The /api/customers/ API resource was extended to provide three different modes of
defining profile mappings:
billing_profiles field: explicitly declare profile mappings in form of (billing
profile, billing network, start time, stop time) tuples
billing_profile_id field (legacy API spec): a single profile mapping interval
is appended (billing profile, no network / any caller IP respectively, starting now)
profile_package_id field: profile mappings starting now are appended by using
lists of (billing profile, billing network) tuples from the given profile package
With regards to Resellers, the /api/contracts/ API resource was enhanced as well,
but supports method 1. and 2. only, and without billing networks.
Mapping Intervals
Intervals can be of open, half-open (left-open, right-open) or closed type. When specifying profile mappings discretely, allowed interval types are restricted, depending on create/update situation:
Table 11. Allowed Mapping Intervals
| Interval Type | Start | Stop | POST (create) | PUT / PATCH (update) |
|---|---|---|---|---|
| undefined | undefined |
|
|
| undefined | defined |
|
|
| > now() | undefined |
|
|
| > now() | > start |
|
|
Example Profile Mapping
An example JSON structure for definition of profile mapping schedules shown in Billing Profile Schedule List Figure 35, “Profile Mapping Schedule List” :
{ ...,
  "billing_profile_definition" : "profiles", // i.e. use 'billing_profiles' field
  "billing_profiles" : [ { "network_id" : "236",
                           "profile_id" : "236",
                           "start" : "2016-11-01 00:00:00",
                           "stop" : "2016-12-31 00:00:00"
                         }, // closed future interval, with network
                         { "network_id" : null,
                           "profile_id" : "237",
                           "start" : "2017-01-01 00:00:00",
                           "stop" : "2017-12-31 00:00:00"
                         } ], // closed future interval, without network
  "contact_id" : 141,
  ...
}By introducing billing profile packages, general billing parameters can be defined for a customer contract:
Subscriber lock levels and profile sets to get applied upon:
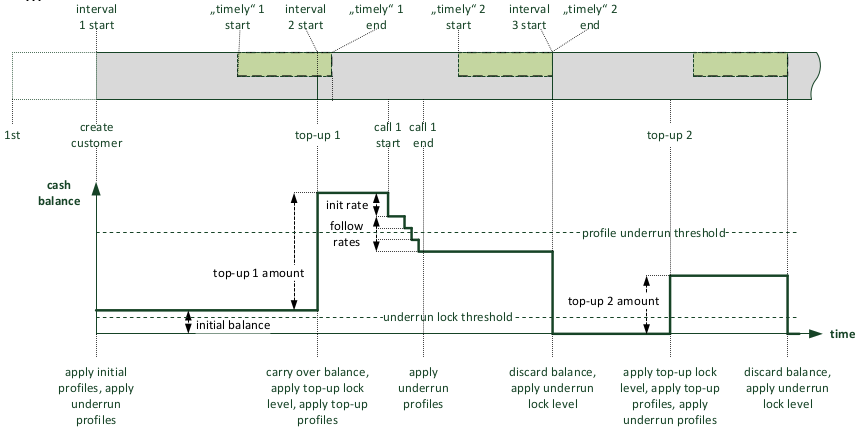
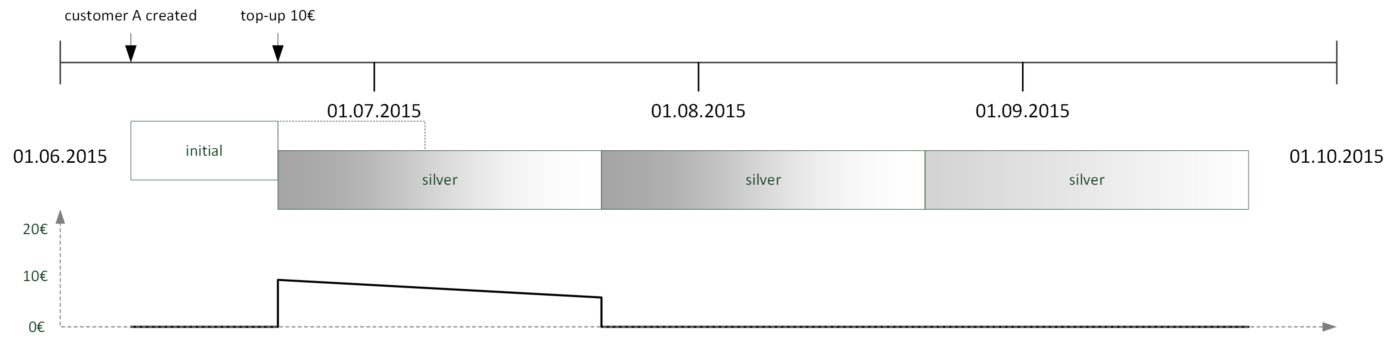
Profile Packages are fundamental for pre-paid billing scenarios, since in such a billing scheme the traditional, fixed monthly periods prove to be insufficient to cover the business needs of the NGCP platform operator. As an example: pre-paid subscribers typically have their "billing periods" between account balance top-ups.
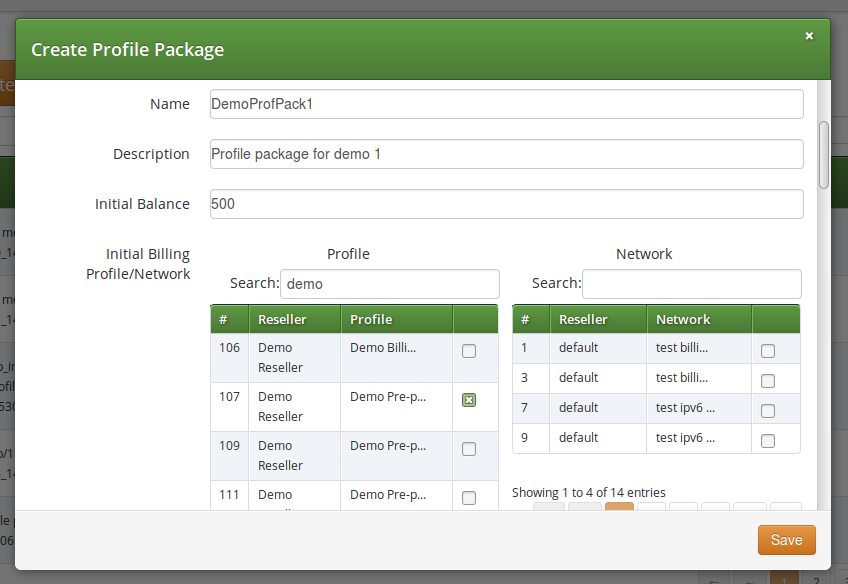
A Profile Package consists of various elements that will be discussed in subsequent sections of the sip:provider PRO handbook. In order to set the parameters of a profile package one must navigate to: Settings → Profile Packages → Create Profile Package, or alternatively, in order to update an existing profile package: select the package and press Edit button.
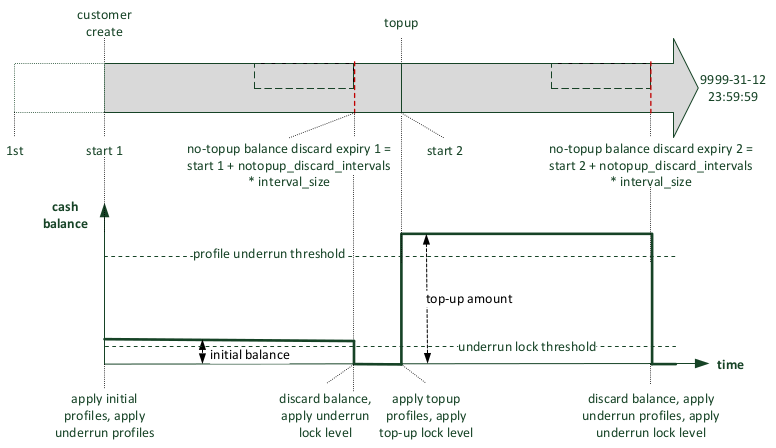
Basic Balance Intervals Setup
Interval start mode:
1st of month (1st): billing interval is 1 calendar month; this is the default for each Customer created on Sipwise NGCP platform
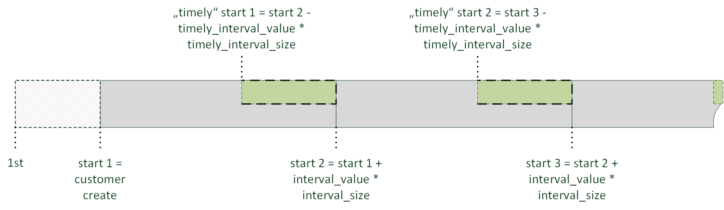
upon customer creation (create): (the initial) billing interval starts when the Customer is created
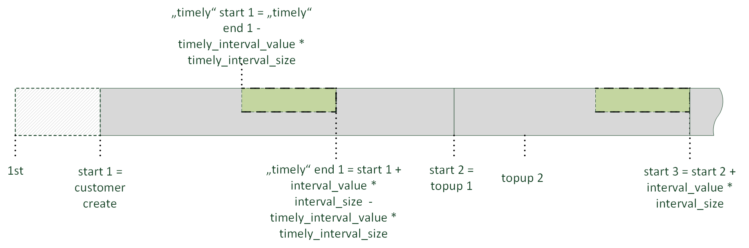
upon topup (topup_interval): interval starts at first topup event and its
length is defined by interval duration parameter of the profile package
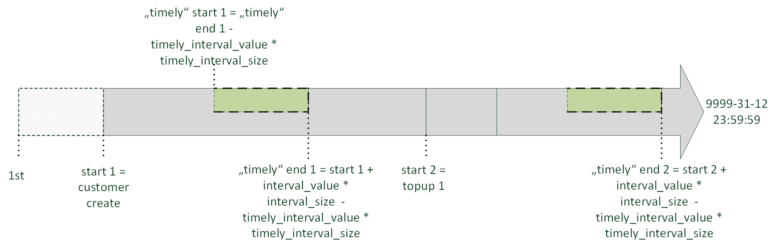
intervals from topup to topup (topup): interval starts at any topup event
and its length is defined by interval duration parameter of the profile package;
intervals can overlap in this case
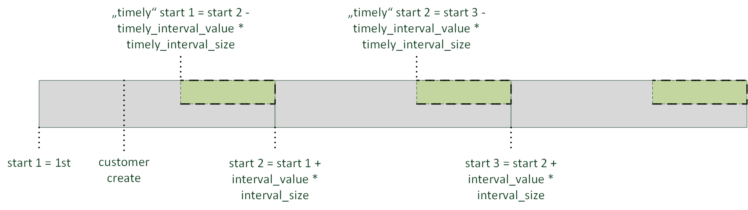
Balance Carry Over
Carry Over: balance carry over behaviour upon interval transitions:
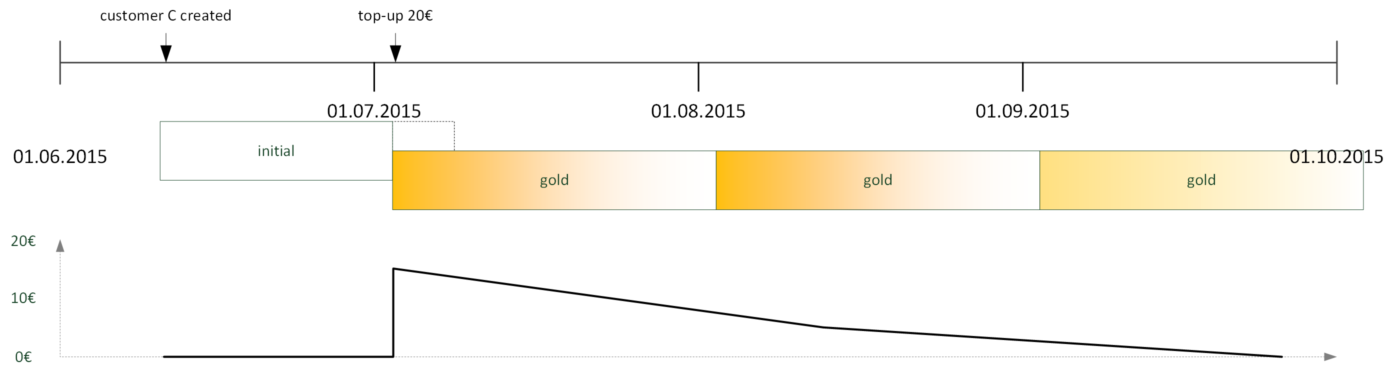
carry-over: always keep balance
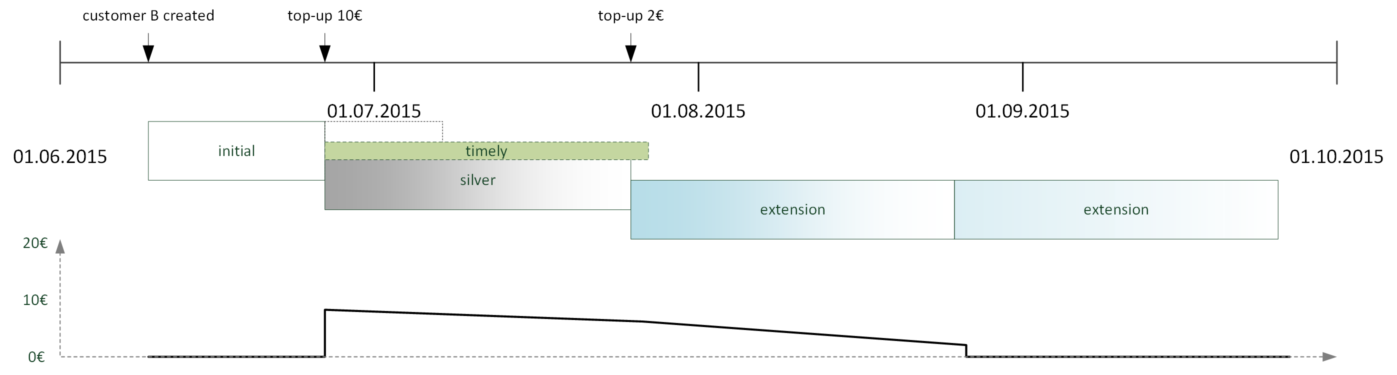
carry-over only if topped-up timely: keep balance in case of a timely top-up
only; where timely means the topup happens within a pre-defined time span before
the end of the balance interval
discard: discard balance at the end of each interval
Underrun Settings
Underrun lock level: this level of services will apply when an account balance underruns
don’t change: no change in the available set of services
no lock: all services are available
foreign: only calls within subscriber’s own domain are allowed
outgoing: all outgoing calls are prohibited
all calls: all calls (incoming + outgoing) are prohibited
global: all calls + access to Customer Self Care web interface are prohibited
ported: only automatic call forwarding, due to number porting, is allowed
Basic Top-up Settings
Profile mappings
A lists of (billing profile, billing network) tuples for appending profile mappings:
Profile Package Configuration
Definition of basic profile package parameters
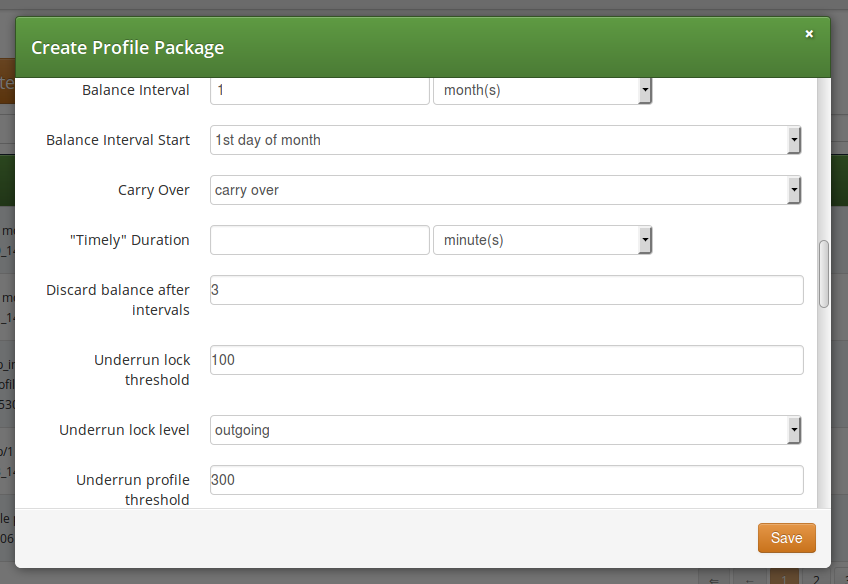
Definition of balance interval and carry-over behaviour
Definition of balance underrun parameters
Definition of top-up settings
Assigning a profile package to a customer
Interval start mode: top-up interval; carry-over: timely
Profile package setup:
Interval start mode: top-up to top-up; carry-over: always
The new /api/profilepackages/ REST API resource allows to manage billing profile
package container entities, that aggregate settings of profile packages.
A sample JSON structure follows:
{
  "reseller_id" : 1,
  "status" : "active",
  "name" : "demo profile package",
  "description" : "package for 10€ ...",
  "balance_interval_start_mode" : "1st",
  "balance_interval_value" : 1,
  "balance_interval_unit" : "month",
  "carry_over_mode" : "carry_over",
  "timely_duration_unit" : null,
  "timely_duration_value" : null,
  "initial_balance" : 0,
  "initial_profiles" : [...], // required default, e.g. same as „topup_profiles“
  "notopup_discard_intervals" : null,
  "underrun_lock_threshold" : 0,
  "underrun_lock_level" : 4,
  "underrun_profile_threshold" : 5,
  "underrun_profiles" : [...],
  "service_charge" : 10,
  "topup_lock_level" : null,
  "topup_profiles" : [ {
                         "network_id" : null, // any network
                         "profile_id" : 29
                       },
                       {
                         "network_id" : 2, // a specific billing network
                         "profile_id" : 30
                       },
                     ],
  ...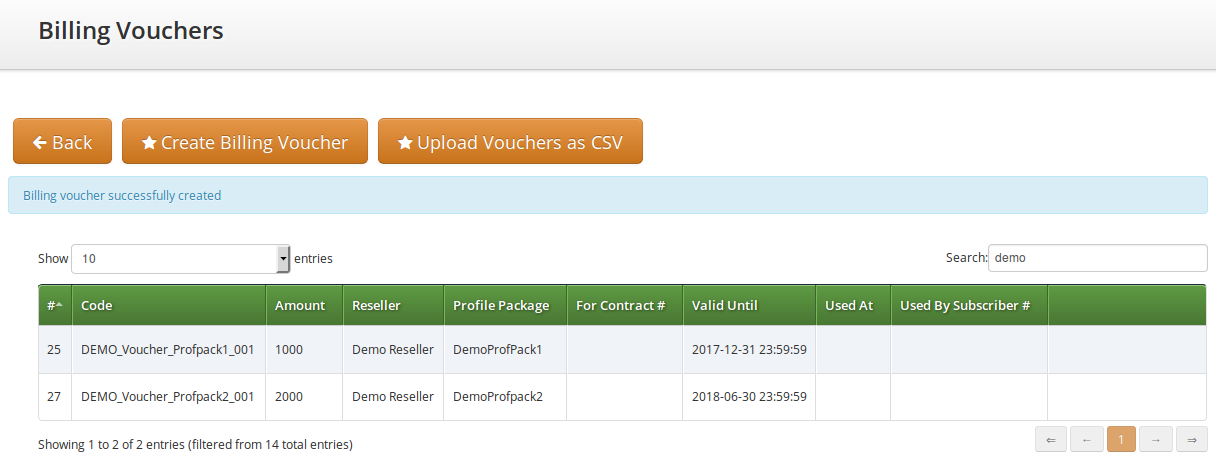
}Vouchers are a typical mean of topping-up an account balance in pre-paid billing scenarios.
The definition of a voucher in the database may succeed via:
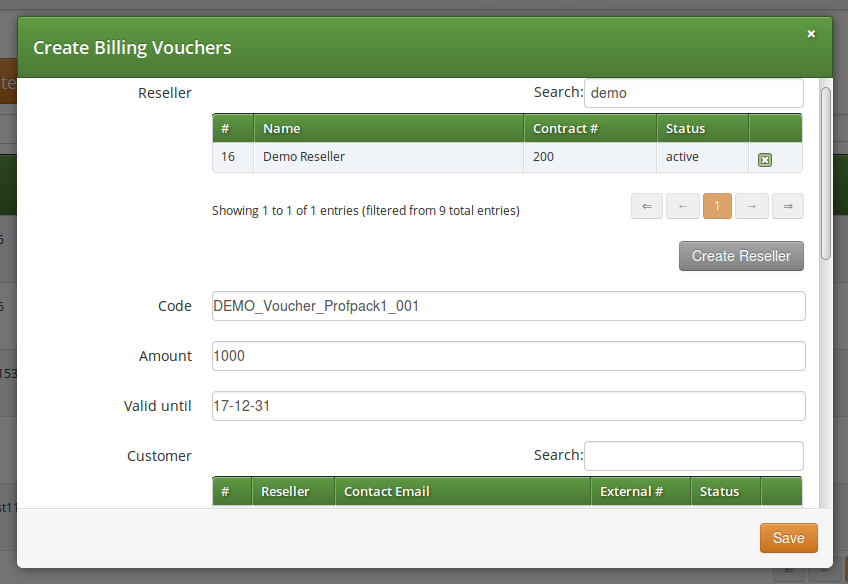
In order to manage vouchers the administrator has to navigate to: Settings → Vouchers → Create Billing Voucher or select an existing one and press Edit button.
Setting following properties of a voucher is optional:
Package: vouchers may be associated with profile packages; if done so, some changes will be applied to the Customer for whom the voucher is redeemed with the top-up event:
Vouchers can be created and managed using the /api/vouchers/ REST API resource.
This resource restricts invasive operations (POST, PUT, PATCH, DELETE) to authorized users.
{
  "amount" : 1000,
  "customer_id" : null, //do not restrict to a specific customer
  "valid_until" : "2017-06-05 23:59:59",
  "package_id" : "571", //switch to profile package
  "reseller_id" : 1,
  "code" : "SILVER_1_1437974823"
}A customer’s administrator or subscriber can perform a top-up to increase the contract‘s cash balance. The NGCP platform supports two means of topping-up the balance:
The NGCP platform provides 2 interfaces to perform top-ups:
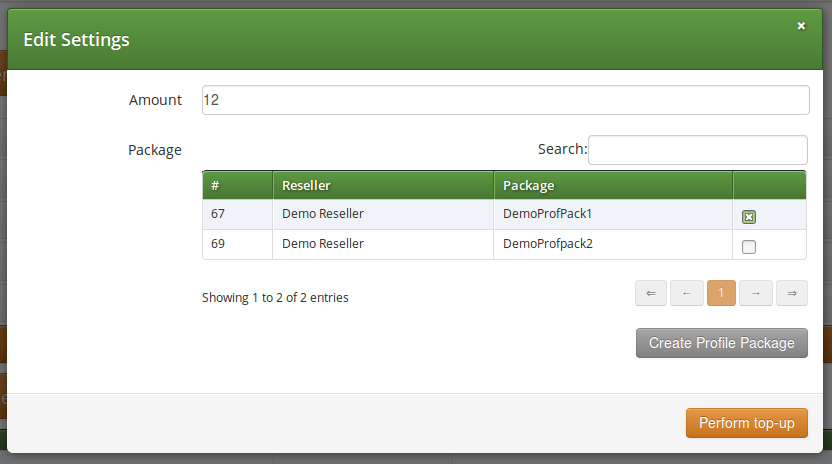
through the administrative web interface:
One has to select the Customer, then Details → Contract Balance and finally press Top-up Cash or Top-up Voucher.
When doing top-up with cash one needs to supply the amount of top-up in the currency of the customer contract. Optionally one can assign a Profile Package to the top-up event which will activate that profile package for the customer.
It is also possible to perform top-up through the REST API: POST /api/topupcash
{
  "subscriber_id" : "73",
  "amount" : 100,
  "package_id" : null,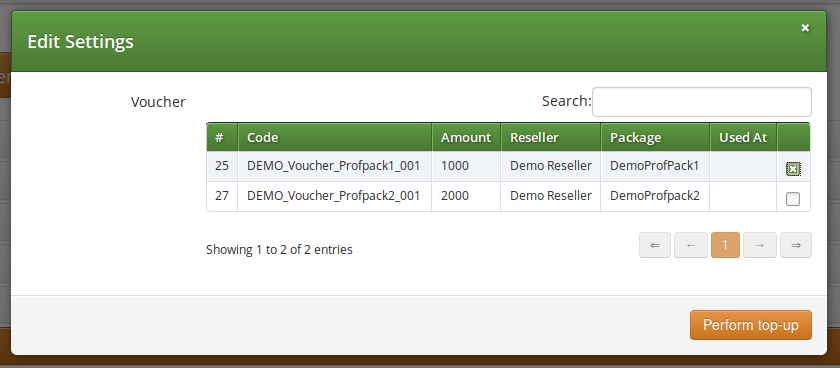
}Selecting Top-up Voucher option will provide a simple list of available vouchers from which the administrator can choose the voucher. If a Profile Package is assigned to the voucher, that package will be activated for the customer on the top-up event.
It is also possible to perform top-up through the REST API: POST /api/topupvouchers
{
  "subscriber_id" : "73",
  "code" : "SILVER_1_1437974390“
  "request_token" : "uuid_from_3rdparty_relay" // optional request identifier
                                               // for lookups in the top-up log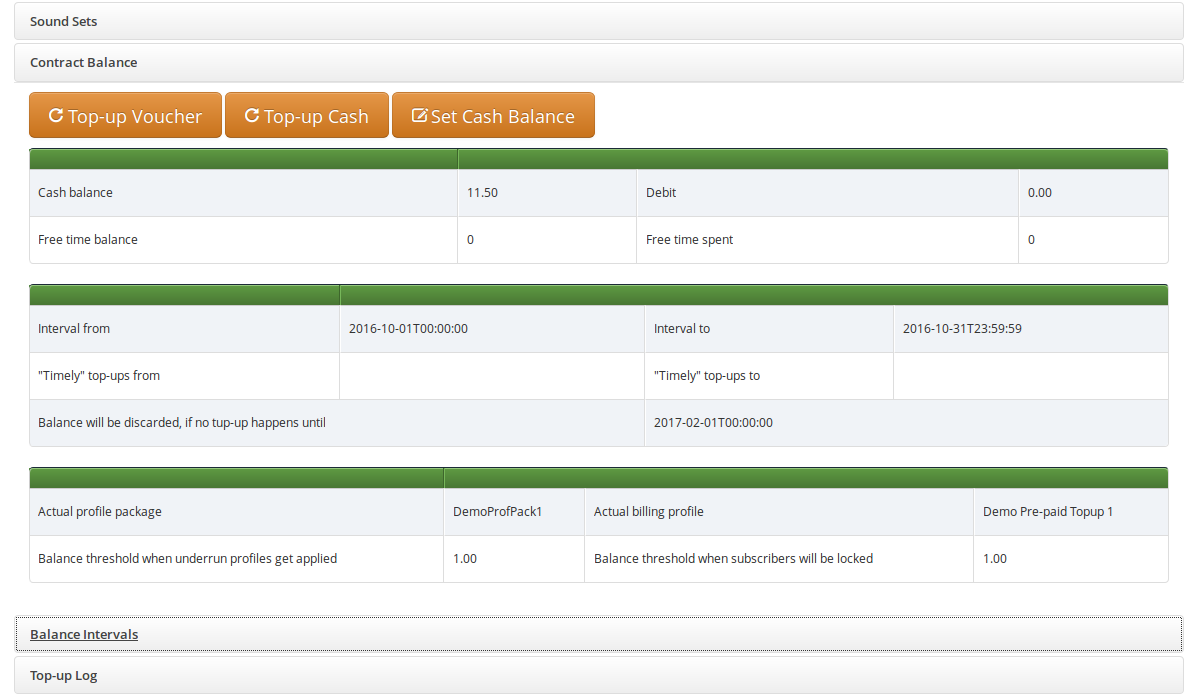
}The actual contract balance and logs of top-up or balance interval change events are a kind of financially important information and that’s why those are provided on the administrative web interface for each customer. One should navigate to: Settings → Customers → select the customer → Details.
The various information details available on the web interface are discussed in subsequent sections of the handbook.
This part of the overviews shows the actual financial state of the customer’s balance and the current profile package and balance interval.
Another functionality assigned to Contract Balance section is the manual top-up. Both top-up with cash and top-up with voucher can be performed from here.
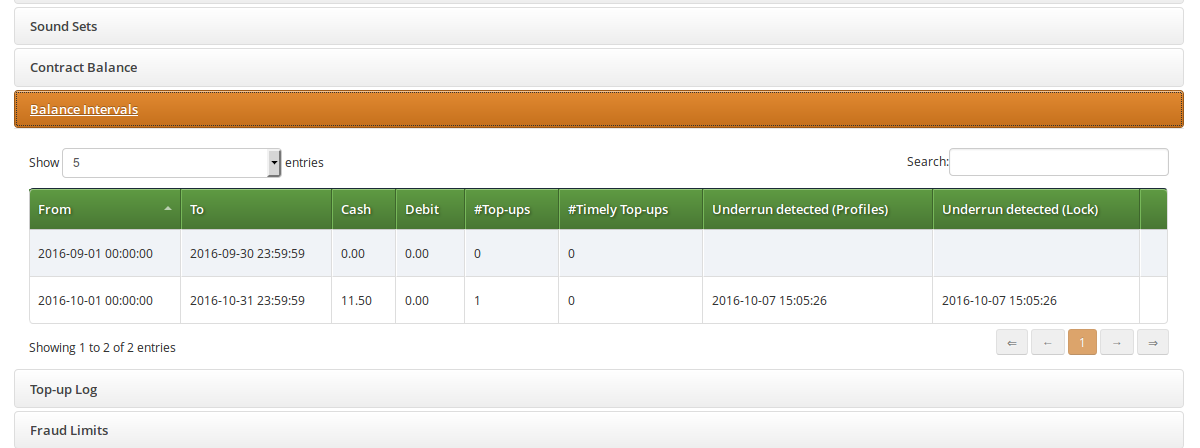
This table shows the balance intervals that have been in use, including the current interval.
Content of the balance intervals table is:
Debit: the total spent amount of money in the actual interval
While "Cash" shows the remaining amount, "Debit" shows the spent amount. With a post-paid billing scenario only "Debit" field would be populated, with pre-paid both fields will display an amount. |
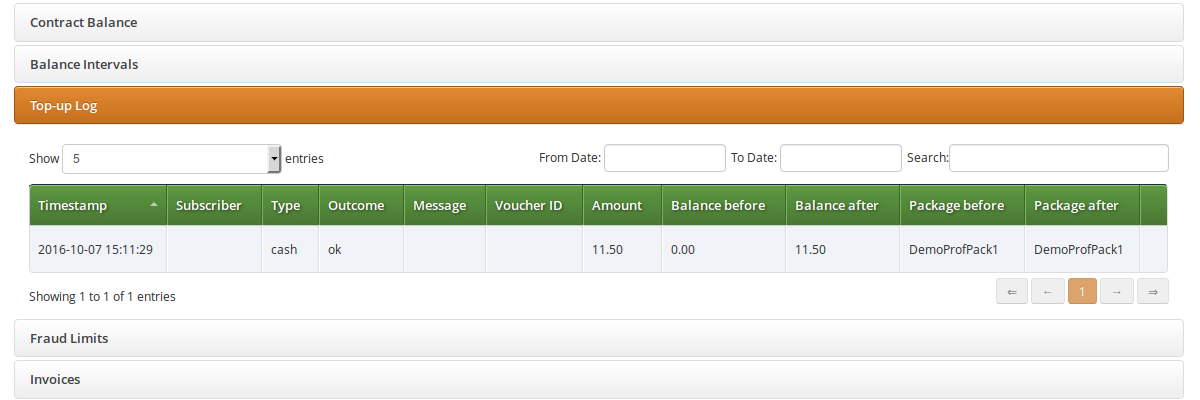
Each successful or failing top-up request has to be logged. The log records represent an audit trail and reflect any data changes in the course of the top-up request.
In case of an error during the top-up operation the error message and any parseable fields of failed top-up attempts is recorded.
Content of the top-up log table is:
cash or voucher
ok or failed
The top-up log table can also be queried using the readonly /api/topuplogs
REST API resource.
An example of the response:
{
  "_embedded" : {
    "ngcp:topuplogs" : [{
      "_links" : {...},
      "amount" : null,
      "cash_balance_after" : null,
      "cash_balance_before" : null,
      "contract_balance_after_id" : null,
      "contract_balance_before_id" : null,
      "contract_id" : 2565,
      "id" : 373,
      "lock_level_after" : null,
      "lock_level_before" : null,
      "message" : ..., //error reason
      "outcome" : "failed",
      "package_after_id" : null,
      "package_before_id" : null,
      "profile_after_id" : null,
      "profile_before_id" : null,
      "request_token" : "1444956281_6", // = “panel“ for panel UI requests
      "subscriber_id" : 1804,
      "timestamp" : "2015-10-16 02:45:19",
      "type" : "voucher", // "cash" or "voucher"
      "username" : "administrator",
      "voucher_id" : null }]
  },
  "_links" : { ... },
  "total_count" : 1
}After getting to know the concepts of customized billing solution on sip:provider PRO platform, it’s worth seeing some practical examples for the usage of those advanced features.
The starting point is the setup of Profile Packages for our fictive customers: A, B and C. There are 4 different packages defined, with corresponding vouchers:
Initial:
Silver:
Gold:
Extension:
Regular billing data export is done using CSV (comma separated values) files which may be downloaded from the platform using the cdrexport user which has been created during the installation.
There are two types of exports. One is CDR (Call Detail Records) used to charge for calls made by subscribers, and the other is EDR (Event Detail Records) used to charge for provisioning events like enabling certain features.
In order to be able to easily identify billing files, the file names are constructed by the following fixed-length fields:
<prefix><separator><version><separator><timestamp><separator><sequence number><suffix>
The definition of the specific fields is as follows:
Table 12. CDR/EDR export file name format
| File name element | Length | Description |
|---|---|---|
| 7 | A fixed string. Always |
| 1 | A fixed character. Always |
| 3 | The format version, a three digit number. Currently |
| 14 | The file creation timestamp in the format |
| 10 | A unique 10-digit zero-padded sequence number for quick identification. |
| 4 | A fixed string. Always |
A valid example filename for a CDR billing file created at 2012-03-10 14:30:00 and being the 42nd file exported by the system, is:
sipwise_007_20130310143000_0000000042.cdr
Each billing file consists of three parts: one header line, zero to 5000 body lines and one trailer line.
The billing file header is one single line, which is constructed by the following fields:
<version>,<number of records>
The definition of the specific fields is as follows:
Table 13. CDR/EDR export file header line format
| Body Element | Length | Type | Description |
|---|---|---|---|
| 3 | zero-padded uint | The format version. Currently |
| 4 | zero-padded uint | The number of body lines contained in the file. |
A valid example for a Header is:
007,0738
The body of a CDR consists of a minimum of zero and a maximum of 5000 lines. Each line holds one call detail record in CSV format and is constructed by the following fields, all of them enclosed in single quotes:
Table 14. CDR export file body line format
| Body Element | Length | Type | Description |
|---|---|---|---|
| 1-10 | uint | Internal CDR id. |
| 19 | timestamp | Timestamp of last modification. |
| 36 | string | Internal UUID of calling party subscriber. |
| 1-255 | string | Internal ID of calling party provider. |
| 0-255 | string | External ID of calling party subscriber. |
| 1-10 | uint | Internal ID of calling party subscriber. |
| 0-255 | string | External ID of calling party customer. |
| 1-10 | uint | Internal ID of calling party customer. |
| 1-255 | string | SIP username of calling party. |
| 1-255 | string | SIP domain of calling party. |
| 1-64 | string | CLI of calling party in E.164 format. |
| 1 | uint |
|
| 0-64 | string | IP Address of the calling party. |
| 1 / 36 | string | Internal UUID of called party subscriber or |
| 1-255 | string | Internal ID of called party provider. |
| 0-255 | string | External ID of called party subscriber. |
| 1-10 | uint | Internal ID of called party subscriber. |
| 0-255 | string | External ID of called party customer. |
| 1-10 | uint | Internal ID of called party customer. |
| 1-255 | string | Final SIP username of called party. |
| 1-255 | string | Final SIP domain of called party. |
| 1-255 | string | Incoming SIP username of called party. |
| 1-255 | string | Incoming SIP domain of called party. |
| 1-255 | string | The user-part of the SIP Request URI as received by the soft-switch. |
| 0-255 | string | User to authenticate towards peer. |
| 0-255 | string | Realm to authenticate towards peer. |
| 3-4 | string | The type of the call - one of:
|
| 2-7 | string | The final call status - one of:
|
| 3 | uint | The final SIP status code. |
| 23 | timestamp | Timestamp of call initiation (invite received from caller). Seconds include fractional part (3 decimals). |
| 23 | timestamp | Timestamp of call establishment (final response received from callee). Seconds include fractional part (3 decimals). |
| 4-11 | fixed precision | Length of call (beginning at |
| 1-255 | string | The SIP call-id. |
| 2-7 | string | The internal rating status - one of:
Currently always |
| 0 / 19 | timestamp | Timestamp of rating or empty if not rated. |
| 4-11 | fixed precision | The originating carrier cost or empty if not rated. In cent with two decimals. |
| 4-11 | fixed precision | The originating customer cost or empty if not rated. In cent with two decimals. |
| 0-127 | string | The originating carrier billing zone or empty if not rated. |
| 0-127 | string | The originating customer billing zone or empty if not rated. |
| 0-127 | string | The originating carrier billing destination or empty if not rated. |
| 0-127 | string | The originating customer billing destination or empty if not rated. |
| 1-10 | uint | The number of originating free time seconds used on carrier side or empty if not rated. |
| 1-10 | uint | The number of originating free time seconds used from the customer’s account balance or empty if not rated. |
| 4-11 | fixed precision | The termination carrier cost or empty if not rated. In cent with two decimals. |
| 4-11 | fixed precision | The termination customer cost or empty if not rated. In cent with two decimals. |
| 0-127 | string | The termination carrier billing zone or empty if not rated. |
| 0-127 | string | The termination customer billing zone or empty if not rated. |
| 0-127 | string | The termination carrier billing destination or empty if not rated. |
| 0-127 | string | The termination customer billing destination or empty if not rated. |
| 1-10 | uint | The number of termination free time seconds used on carrier side or empty if not rated. |
| 1-10 | uint | The number of termination free time seconds used from the customer’s account balance or empty if not rated. |
| 4-11 | fixed precision | The originating reseller cost or empty if not rated. In cent with two decimals. |
| 0-127 | string | The originating reseller billing zone or empty if not rated. |
| 0-127 | string | The originating reseller billing destination or empty if not rated. |
| 1-10 | uint | The number of originating free time seconds used from the reseller’s account balance or empty if not rated. |
| 4-11 | fixed precision | The termination reseller cost or empty if not rated. In cent with two decimals. |
| 0-127 | string | The termination reseller billing zone or empty if not rated. |
| 0-127 | string | The termination reseller billing destination or empty if not rated. |
| 1-10 | uint | The number of termination free time seconds used from the reseller’s account balance or empty if not rated. |
| 1 | string | A fixed character. Always |
A valid example of one body line of a rated CDR is (line breaks added for clarity):
'15','2013-03-26 22:09:11','a84508a8-d256-4c80-a84e-820099a827b0','1','','1','',
'2','testuser1','192.168.51.133','4311001','0','192.168.51.1',
'94d85b63-8f4b-43f0-b3b0-221c9e3373f2','1','','3','','4','testuser3',
'192.168.51.133','testuser3','192.168.51.133','testuser3','','','call','ok','200',
'2013-03-25 20:24:50.890','2013-03-25 20:24:51.460','10.880','44449842',
'ok','2013-03-25 20:25:27','0.00','24.00','onnet','testzone','platform internal',
'testzone','0','0','0.00','200.00','','foo','','foo','0','0',
'0.00','','','0','0.00','','','0'
The format of the CDR export files generated for resellers (as opposed to the complete system-wide export) is identical except for a few missing fields. Reseller CDR CSV files don’t contain the fields for carrier or reseller ratings, neither in source nor destination direction. Thus, the reseller CSV files have 16 fewer fields.
These fields may be required to integrate sip:provider PRO with legacy billing systems.
Table 15. Extra fields that can be exported to CDRs
| Body Element | Description |
|---|---|
| The originating customer’s balance immediately before/after the call |
| The terminating customer’s balance immediately before/after the call |
| The originating carrier’s balance immediately before/after the call |
| The terminating carrier’s balance immediately before/after the call |
| The originating reseller’s balance immediately before/after the call |
| The terminating reseller’s balance immediately before/after the call |
| The originating customer’s free time immediately before/after the call |
| The terminating customer’s free time immediately before/after the call |
| The originating carrier’s free time immediately before/after the call |
| The terminating carrier’s free time immediately before/after the call |
| The originating reseller’s free time immediately before/after the call |
| The terminating reseller’s free time immediately before/after the call |
| The originating customer’s billing profile package ID used for the call |
| The terminating customer’s billing profile package ID used for the call |
| The originating reseller’s billing profile package ID used for the call |
| The terminating reseller’s billing profile package ID used for the call |
| The originating carrier’s billing profile package ID used for the call |
| The terminating carrier’s billing profile package ID used for the call |
| The originating customer’s balance ID used for the call |
| The terminating customer’s balance ID used for the call |
| The originating reseller’s balance ID used for the call |
| The terminating reseller’s balance ID used for the call |
| The originating carrier’s balance ID used for the call |
| The terminating carrier’s balance ID used for the call |
Note: for calls spanning multiple balance intervals, the latter one will be selected, that is the balance interval where the call ended.
The body of a EDR consists of a minimum of zero and a maximum of 5000 lines. Each line holds one call detail record in CSV format and is constructed by the following fields, all of them enclosed in single quotes:
Table 16. EDR export file body line format
| Body Element | Length | Type | Description |
|---|---|---|---|
| 1-10 | uint | Internal EDR id. |
| 1-255 | string | The type of the event - one of:
|
| 0-255 | string | The external customer ID as provisioned for the subscriber. |
| 0-255 | string | The company name of the customer’s contact. |
| 0-255 | string | The external subscriber ID as provisioned for the subscriber. |
| 0-255 | string | The voip number of the subscriber with the highest ID (DID or primary number). |
| 0-255 | string | The old status of the event. Depending on the event_type:
|
| 0-255 | string | The new status of the event. Depending on the event_type:
|
| 0-255 | string | The time when the event occured. |
| 1 | string | A fixed character. Always |
A valid example of one body line of an EDR is (line breaks added for clarity):
"1","start_profile","sipwise_ext_customer_id_4","Sipwise GmbH",
"sipwise_ext_subscriber_id_44","436667778","","1","2014-06-19 11:34:31"
The billing file trailer is one single line, which is constructed by the following fields:
<md5 sum>
The <md5 sum> is a 32 character hexadecimal MD5 hash of the Header and Body.
To validate the billing file, one must remove the Trailer before computing the MD5 sum of the file. An example bash script to validate the integrity of the file is given below:
#!/bin/sh

error() { echo $@; exit 1; }
test -n "$1" || error "Usage: $0 <cdr-file>"
test -f "$1" || error "File '$1' not found"

TMPFILE="/tmp/$(basename "$1").$$"
MD5="$(sed -rn '$ s/^([a-z0-9]{32}).*$/\1/i p' "$1")  $TMPFILE"
sed '$d' "$1" > "$TMPFILE"
echo "$MD5" | md5sum -c -
rm -f "$TMPFILE"
Given the script is located in cdr-md5.sh and the CDR-file is sipwise_001_20071110123000_0000000004.cdr, the output of the integrity check for an intact CDR file would be:
$ ./cdr-md5.sh sipwise_001_20071110123000_0000000004.cdr
/tmp/sipwise_001_20071110123000_0000000004.cdr: OK
If the file has been altered during transmission, the output of the integrity check would be:
$ ./cdr-md5.sh sipwise_001_20071110123000_0000000004.cdr
/tmp/sipwise_001_20071110123000_0000000004.cdr: FAILED
md5sum: WARNING: 1 of 1 computed checksum did NOT match
Billing files are created twice per hour at minutes 25 and 55 and are stored in the home directory of the cdrexport user. If the amount of records within the transmission interval exceeds the threshold of 5000 records per file, multiple billing files are created. If no billing records are found for an interval, a billing file without body data is constructed for easy detection of lost billing files on the 3rd party side.
CDR and EDR files are fetched by a 3rd party billing system using SFTP or SCP with either public key or password authentication using the username cdrexport.
If public key authentication is chosen, the public key file has to be stored in the file ~/.ssh/authorized_keys2 below the home directory of the cdrexport user. Otherwise, a password has to be set for the user.
The 3rd party billing system is responsible for deleting CDR files after fetching them.
The |
| | ||