| |
| |
The sip:provider CE provides a large amount of subscriber features in order to offer compelling VoIP services to end customers, and also to cover as many deployment scenarios as possible. In this chapter, we will go over the features and describe their behavior and their use cases.
There are two different methods to provide fine-grained call admission control to both subscribers and admins. One is Block Lists, where you can define which numbers or patterns can be called from a subscriber to outbound direction and which numbers or patterns are allowed to call a subscriber in inbound direction. The other is NCOS Levels, where the admin predefines rules for outbound calls, which are grouped in certain levels. The user can then just choose the level, or the admin can restrict a user to a certain level. Also sip:provider CE offers some options to restrict the IP addresses that subscriber is allowed to use the service from. The following chapters will discuss these features in detail.
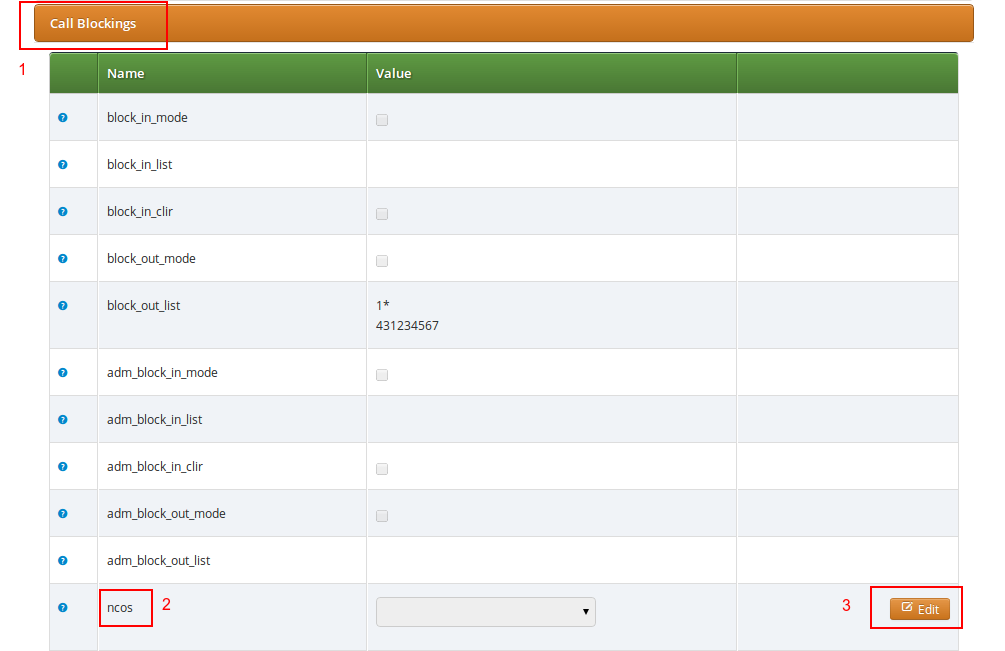
Block Lists provide a way to control which users/numbers are able to call or to be called, based on a subscriber level, and can be found in the Call Blockings section of the subscriber preferences.
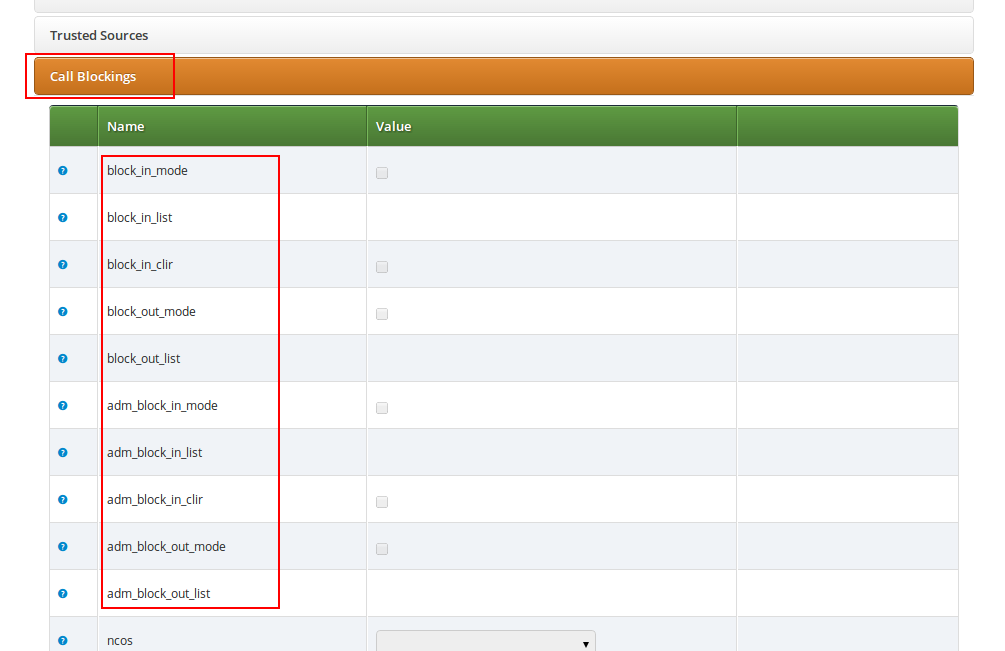
Block Lists are separated into Administrative Block Lists (adm_block_*) and Subscriber Block Lists (block_*). They both have the same behavior, but Administrative Block Lists take higher precedence. Administrative Block Lists are only accessible by the system administrator and can thus be used to override any Subscriber Block Lists, e.g. to block certain destinations. The following break-down of the various block features apply to both types of lists.
Block lists can either be whitelists or blacklists and are controlled by the User Preferences block_in_mode, block_outmode__ and their administrative counterparts.
You can change a list mode from one to the other at any time.
The list contents are controlled by the User Preferences block_in_list, block_out_list and their administrative counterparts. Click on the Edit button in the Preferences view to define the list entries.
In block list entries, you can provide shell patterns like * and []. The behavior of the list is controlled by the block_xxx_mode feature (so they are either allowed or rejected). In our example above we have block_out_mode set to blacklist, so all calls to US numbers and to the Austrian number +431234567 are going to be rejected.
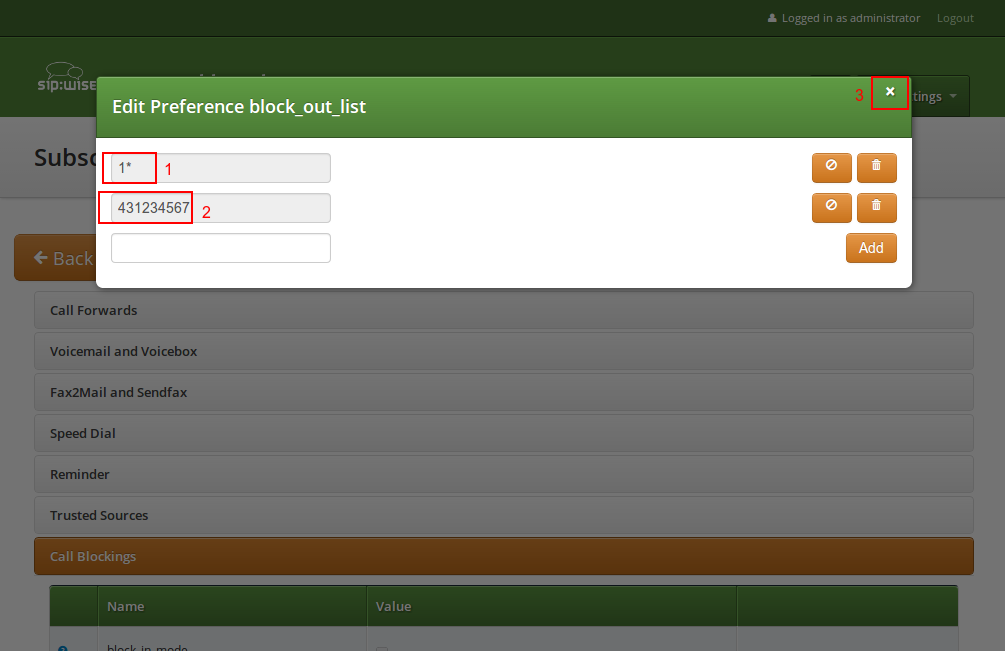
Click the Close icon once you’re done editing your list.
For incoming call, the User Preference block_in_clir and adm_block_in_clir controls whether or not to reject incoming calls with number supression (either "[Aa]nonymous" in the display- or user-part of the From-URI or a header Privacy: id is set). This flag is independent from the Block Mode.
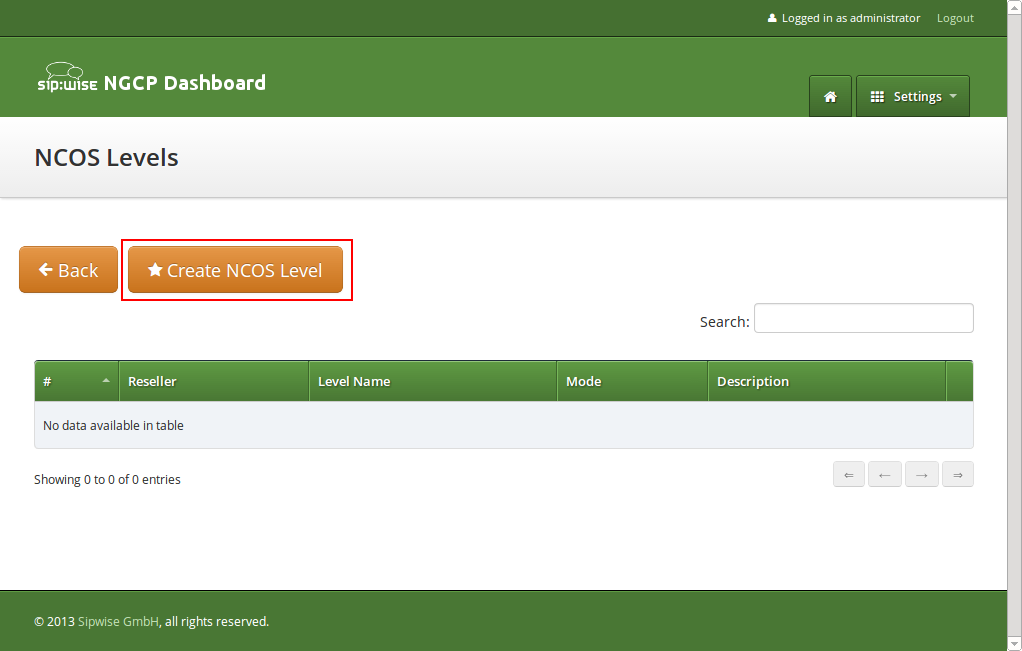
NCOS Levels provide predefined lists of allowed or denied destinations for outbound calls of local subscribers. Compared to Block Lists, they are much easier to manage, because they are defined on a global scope, and the individual levels can then be assigned to each subscriber. Again there is the distinction for user- and administrative-levels.
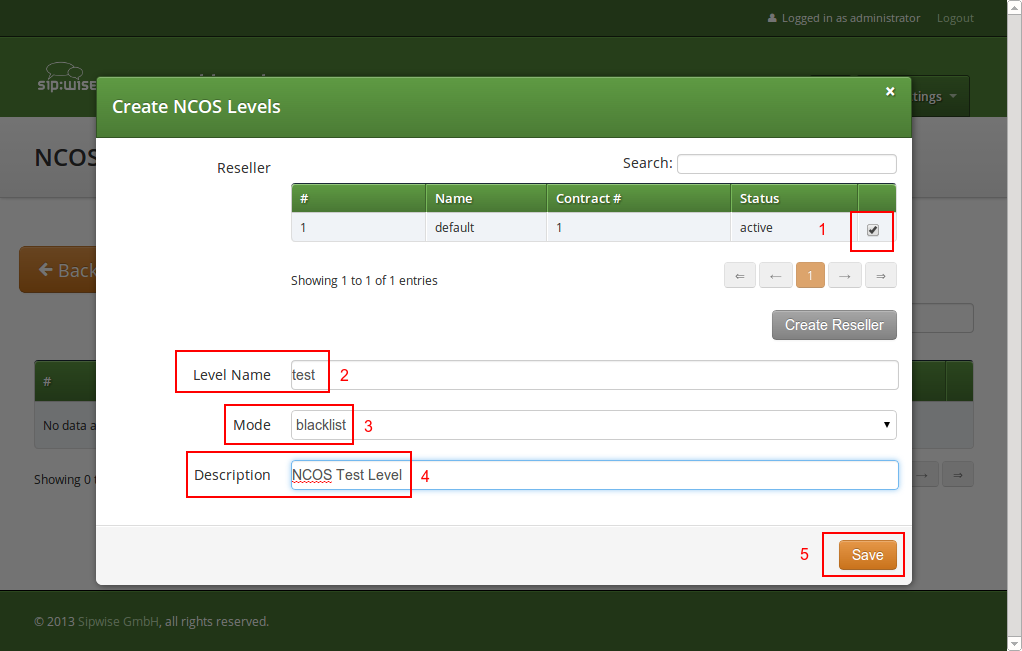
NCOS levels can either be whitelists or blacklists.
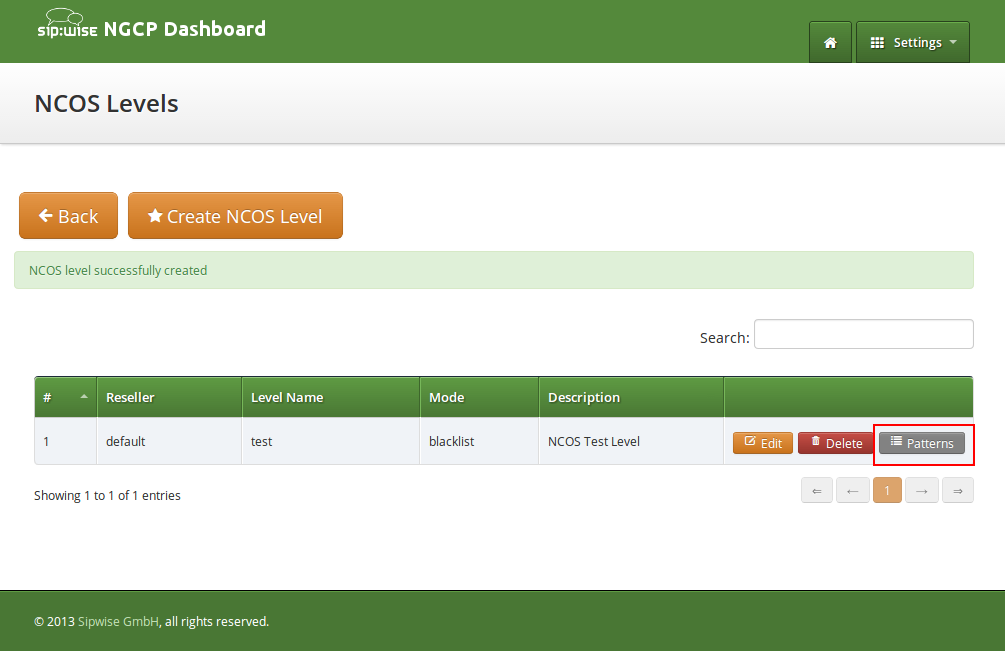
To create an NCOS Level, go to Settings→NCOS Levels and press the Create NCOS Level button.
Select a reseller, enter a name, select the mode and add a description, then click the Save button.
To define the rules within the newly created NCOS Level, click on the Patterns button of the level.
In the Number Patterns view you can create multiple patterns to define your level, one after the other. Click on the Create Pattern Entry Button on top and fill out the form.
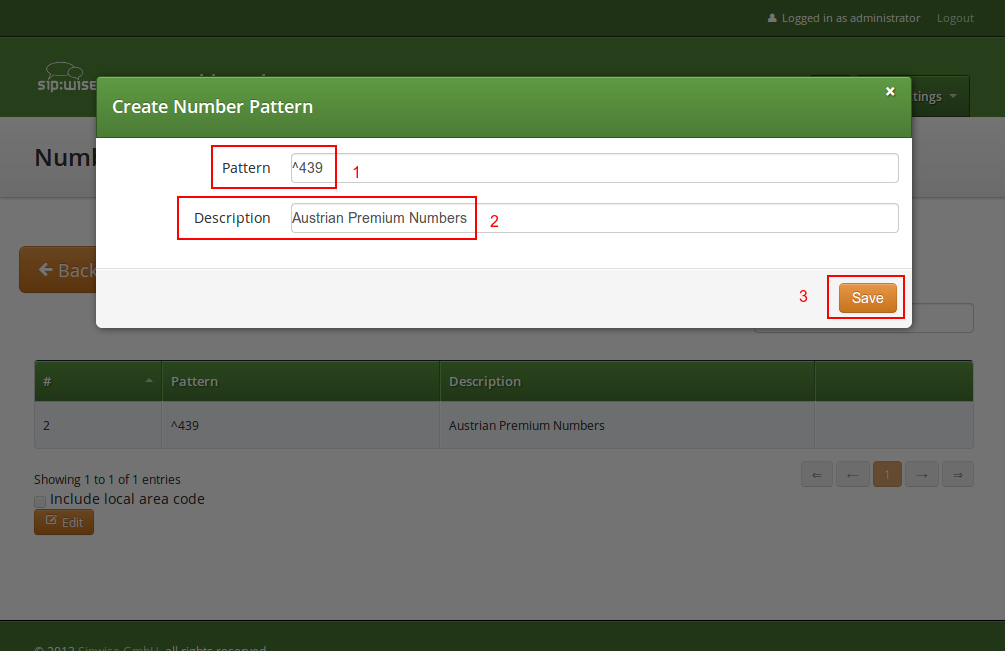
In this example, we block (since the mode of the level is blacklist) all numbers starting with 439. Click the
Save button to save the entry in the level.
The option include local area code in list for a blacklist means that calls within the area code of the subscribers are
denied, and for whitelist that they are allowed, respectively. For example if a subscriber has country-code 43 and area-code 1,
then selecting this checkbox would result in an implicit entry ^431.
Once you’ve defined your NCOS Levels, you can assign them to local subscribers. To do so, navigate to Settings→Subscribers, search for the subscriber you want to edit, press the Details button and go to the Preferences View. There, press the Edit button on either the ncos or admncos setting in the Call Blockings__ section.
You can assign the NCOS level to all subscribers within a particular domain. To do so, navigate to Settings→Domains, select the domain you want to edit and click Preferences. There, press the Edit button on either ncos or admin_ncos in the Call Blockings section.
Note: if both domain and subscriber have same NCOS preference set (either ncos or adm_ncos, or both) the subscriber’s preference is used. This is done so that you can override the domain-global setting on the subscriber level.
In some countries there are regulatory requirements that prohibit subscribers from forwarding their numbers to special numbers like emergency, police etc. While the sip:provider CE does not deny provisioning Call Forward to these numbers, the administrator can prevent the incoming calls from being actually forwarded to numbers defined in the NCOS list: just select the appropriate NCOS level in the domain’s or subscriber’s preference adm_cf_ncos. This NCOS will apply only to the Call Forward from the subscribers and not to the normal outgoing calls from them.
The sip:provider CE provides subscriber preference allowed_ips to restrict the IP addresses that subscriber is allowed to use the service from. If the REGISTER or INVITE request comes from an IP address that is not in the allowed list, the sip:provider CE will reject it with a 403 message. Also a voice message can be played when the call attempt is rejected (if configured).
By default, allowed_ips is an empty list which means that subscriber is not restricted. If you want to configure a restriction, navigate to Settings→Subscribers, search for the subscriber you want to edit, press Details and then Preferences and press Edit for the allowed_ips preference in the Access Restrictions section.
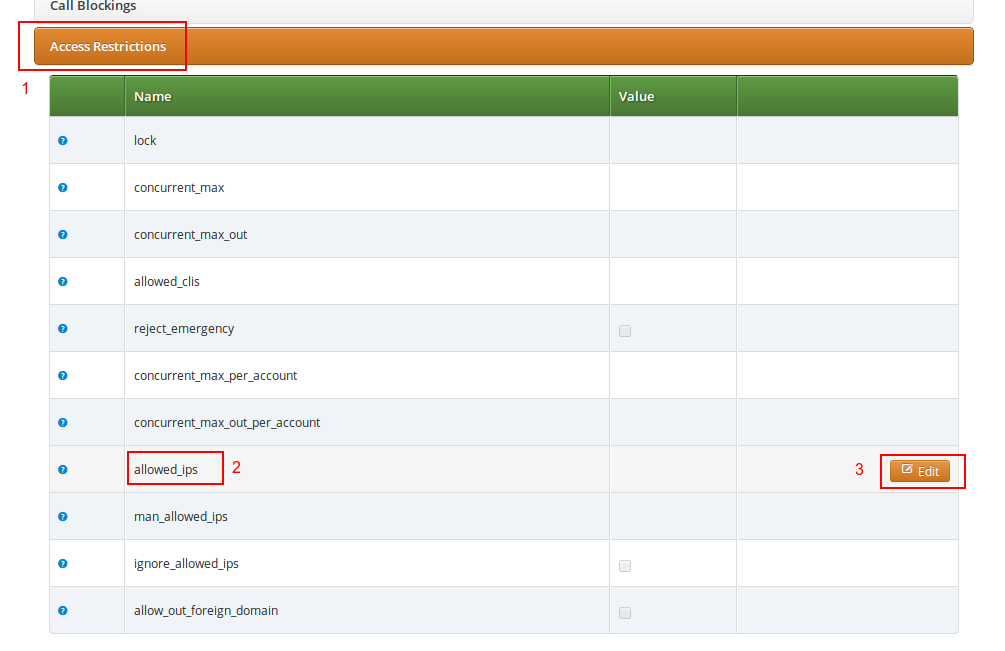
Press the Edit button to the right of empty drop-down list.
You can enter multiple allowed IP addresses or IP address ranges one after another. Click the Add button to save each entry in the list. Click the Delete button if you want to remove some entry.
The sip:provider CE provides the capabilities for normal call forwarding (deflecting a call for a local subscriber to another party immediately or based on events like the called party being busy or doesn’t answer the phone for a certain number of seconds) and serial call hunting (sequentially executing a group of deflection targets until one of them succeeds). Targets can be stacked, which means if a target is also a local subscriber, it can have another call forward or hunt group which is executed accordingly.
Call Forwards and Call Hunting Groups can either be executed unconditionally or based on a Time Set Definition, so you can define deflections based on time period definitions (e.g. Monday to Friday 8am to 4pm etc).
Go to your Subscriber Preferences and click Edit on the Call Forward Type you want to set (e.g. Call Forward Unconditional).
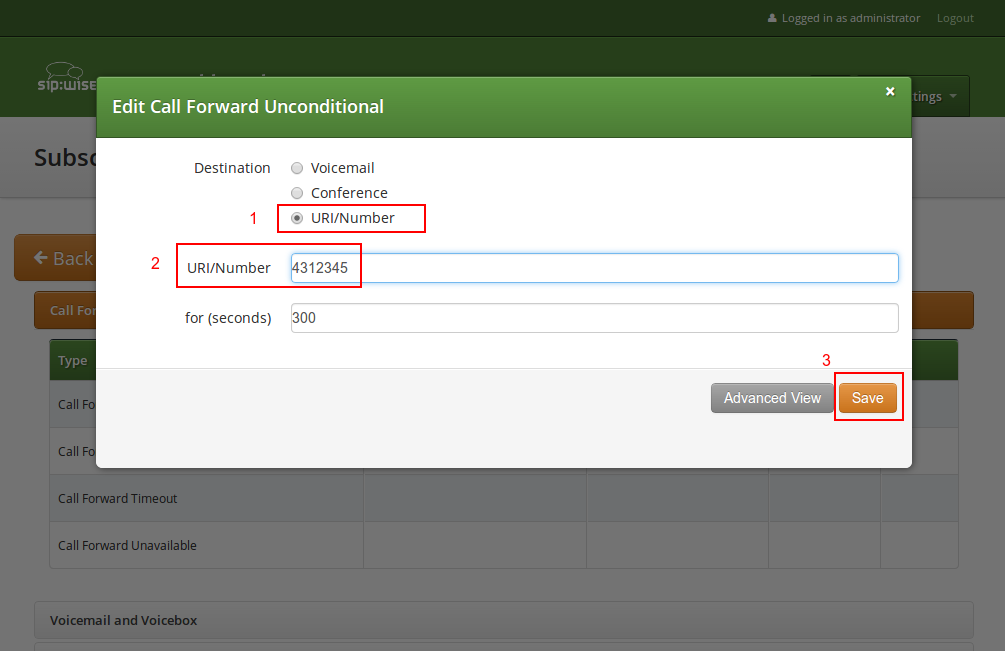
If you select URI/Number in the Destination field, you also have to set a URI/Number. The timeout defines for how long this destination should be tried to ring.
If you want multiple destinations to be executed one after the other, you need to change into the Advanced View when editing your call forward. There, you can select multiple Destination Set/Time Set pairs to be executed.
A Destination Set is a list of destinations to be executed one after another.
A Time Set is a time definition when to execute this Destination Set.
Click on Manage Destination Sets to see a list of available sets. The quickset_cfu has been implicitly created during our creation of a simple call forward. You can edit it to add more destinations, or you can create a new destination set.
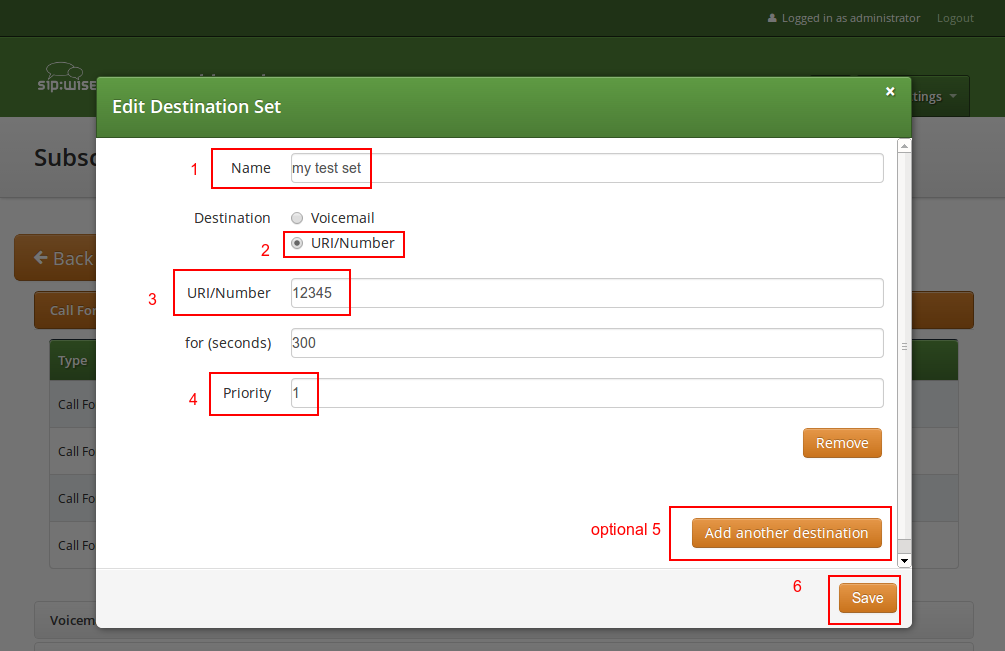
When you close the Destination Set Overview, you can now assign your new set in addition or instead of the quickset_cfu set.
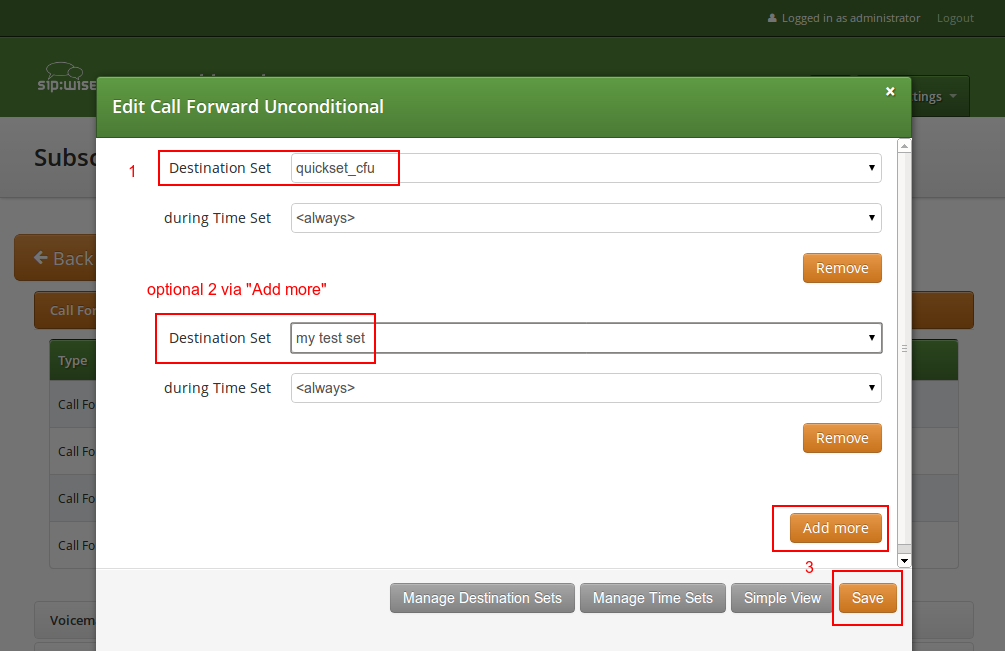
Press Save to store your settings.
Click on Manage Time Sets in the advanced call-forward menu to see a list of available time sets. By default there are none, so you have to create one.
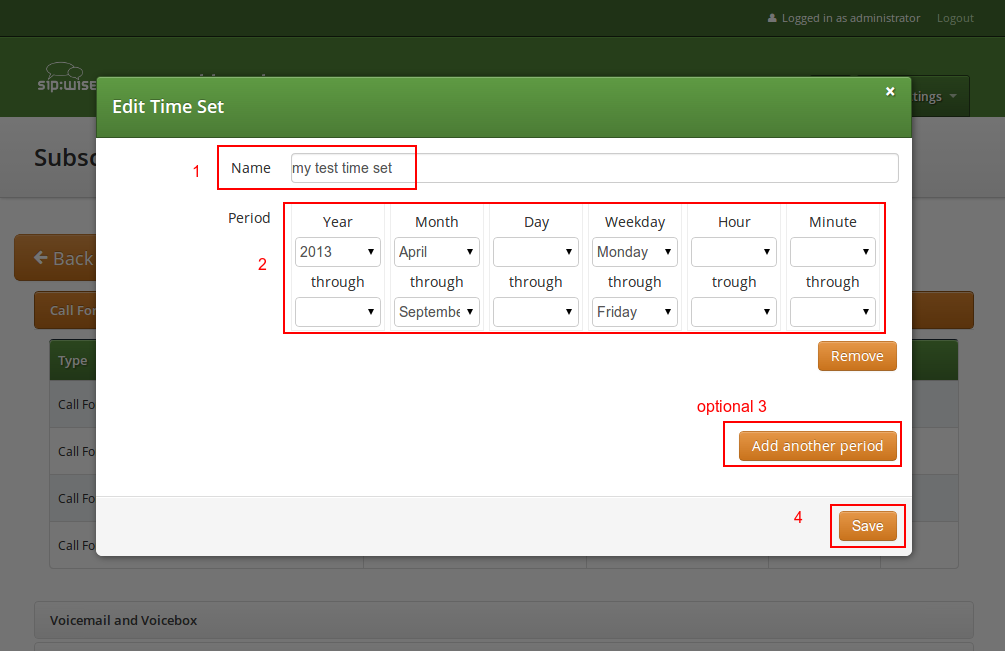
You need to provide a Name, and a list of Periods where this set is active. If you only set the top setting of a date field (like the Year setting in our example above), then it’s valid for just this setting (like the full year of 2013 in our case). If you provide the bottom setting as well, it defines a period (like our Month setting, which means from beginning of April to end of September).
the period is a through definition, so it covers the full range. If you define an Hour definition 8-16, then this means from 08:00 to 16:59:59 (unless you filter the Minutes down to something else). |
If you close the Time Sets management, you can assign your new time set to the call forwards you’re configuring.
It may be useful and mandatory - specially with NGN interconnection - to enable SIP History header and/or Diversion header for outbound requests to a peer or even for on-net calls. In order to do so, you should enable the following preferences in Domain’s and Peer’s Preferences:
The preferences a subscriber can provision by himself via the CSC can be limited via profiles within profile sets assigned to subscribers.
Profile sets define containers for profiles. The idea is to define profile sets with different profiles by the administrator (or the reseller, if he is permitted to do so). Then, a subscriber with administrative privileges can re-assign profiles within his profile sets for the subscribers of his customer account.
Profile Sets can be defined in Settings→Subscriber Profiles. To create a new Profile Set, click Create Subscriber Profile Set.
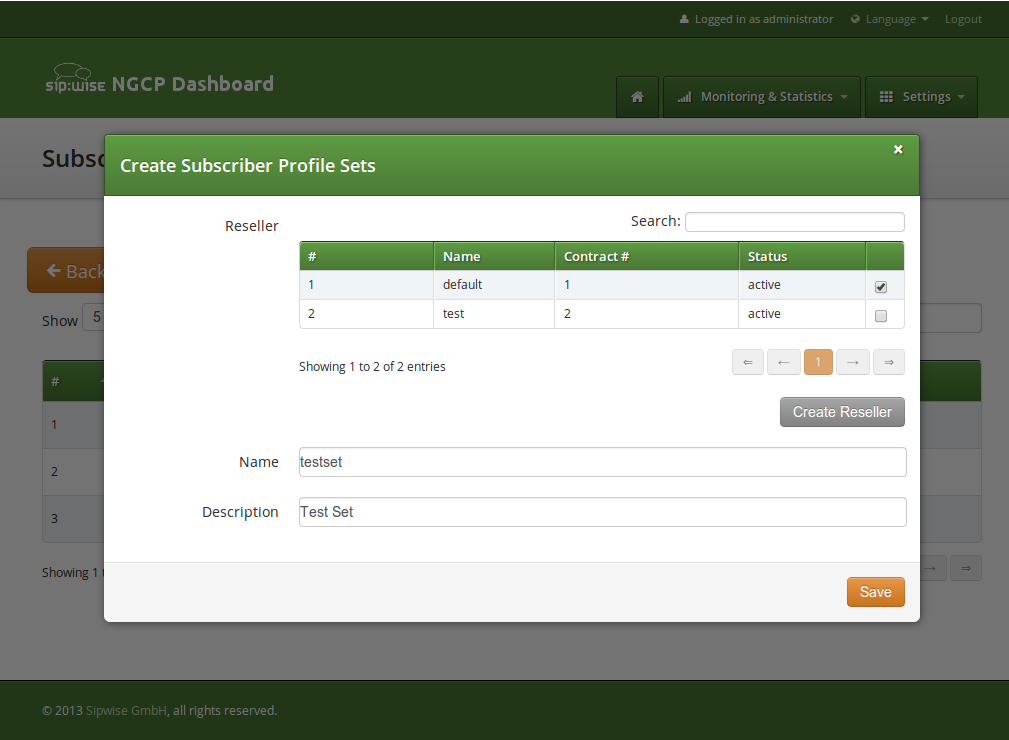
You need to provide a reseller, name and description.
To create Profiles within a Profile Set, hover over the Profile Set and click the Profiles button.
Profiles within a Profile Set can be created by clicking the Create Subscriber Profile button.
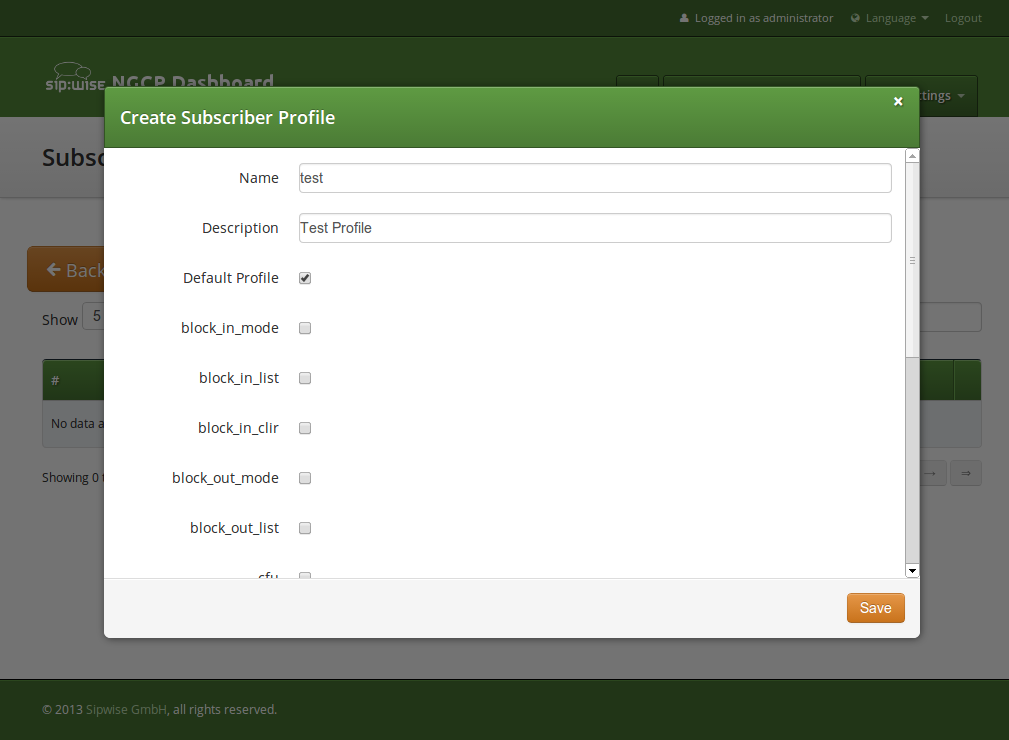
Checking the Default Profile option causes this profile to get assigned automatically to all subscribers, who have the profile set assigned. Other options define the user preferences which should be made available to the subscriber.
For a subscriber to manage his voicebox via IVR, there are two ways to access the voicebox. One is to call the URI voicebox@yourdomain from the subscriber itself, allowing password-less access to the IVR, as the authentication is already done on SIP level. The second is to call the URI voiceboxpass@yourdomain from any subscriber, causing the system to prompt for a mailbox and a PIN.
Since access might need to be provided from external networks like PSTN/Mobile, and since certain SIP phones don’t support calling alphanumeric numbers to dial voicebox, you can map any arbitrary number to the voicebox URIs using rewrite rules.
To do so, you can provision a match pattern like ^(00|\+)12345$ with a replace pattern voicebox or voiceboxpass to map a number to either password-less or password-based IVR access.
When reaching voiceboxpass, the subscriber is prompted for her mailbox number and a password. All numbers assigned to a subscriber are valid input (primary number and any alias number). By default, the required format is in E.164, so the subscriber needs to enter the full number including country code, for example 4912345 if she got assigned a German number.
You can globally configure a rewrite rule in config.yml using asterisk.voicemail.normalize_match and asterisk.voicemail.normalize_replace, allowing you to customize the format a subscriber can enter, e.g. having ^0([1-9][0-9]+)$ as match part and 49$1 as replace part to accept German national format.
The following list shows you how the voicebox menu is structured.
1 Read voicemail messages
3 Advanced options
9 Save message in a folder
2 Change folders
3 Advanced Options
0 Mailbox options
1 Record your unavailable message
2 Record your busy message
3 Record your name
4 Record your temporary greetings
A message/greeting is a short message that plays before the caller is allowed to record a message. The message is intended to let the caller know that you are not able to answer their call. It can also be used to convey other information like when you will be available, other methods to contact you, or other options that the caller can use to receive assistance.
The IVR menu has three types of greetings.
The standard voice mail greeting is the "unavailable" greeting. This is used if you don’t answer the phone and so the call is directed to your voice mailbox.
Recorded name is unavailable.”
Digits-of-number-dialed is unavailable".
If you wish, you can record a custom greeting used when someone calls you and you are currently on the phone. This is called your "Busy" greeting.
Recorded name is busy."
Digits-of-number-dialed is busy."
You can also record a temporary greeting. If it exists, a temporary greeting will always be played instead of your "busy" or "unavailable" greetings. This could be used, for example, if you are going on vacation or will be out of the office for a while and want to inform people not to expect a return call anytime soon. Using a temporary greeting avoids having to change your normal unavailable greeting when you leave and when you come back.
The Voicemail system allows you to save and organize your messages into folders. There can be up to ten folders.
When a caller leaves a message for you,the system will put the message into the "New Messages" folder. If you listen to the message, but do not delete the message or save the message to a different folder, it will automatically move the message to the "Old Messages" folder. When you first log into your mailbox, the Voicemail System will make the "New Messages" folder the current folder if you have any new messages. If you do not have any new messages the it will make the "Old Messages" folder the current folder.
The language for the Voicemail system IVR or Vertical Service Codes (VSC) IVRs may be set using the subscriber or domain preference language.
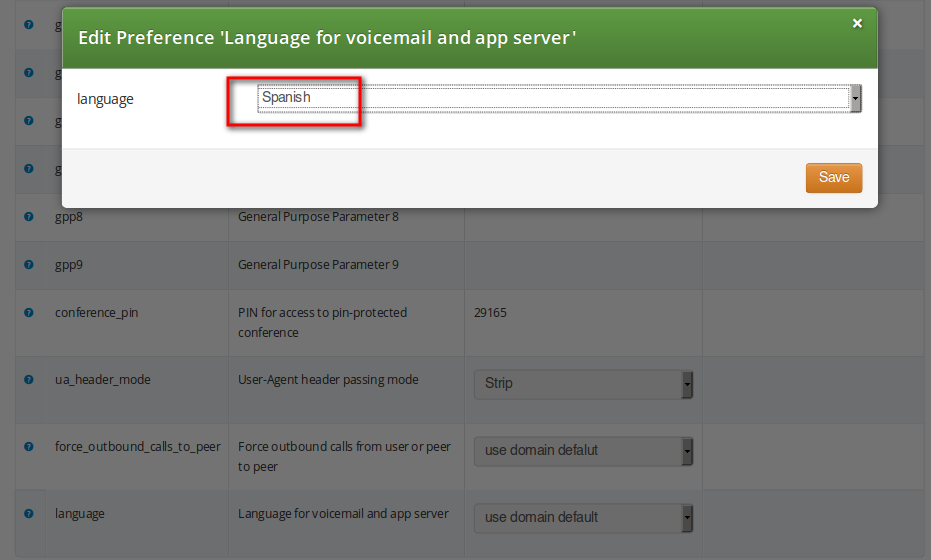
The sip:provider CE provides the pre-installed prompts for the Voicemail in the English, Spanish, French and Italian languages and the pre-installed prompts for the Vertical Service Codes IVRs in English only.
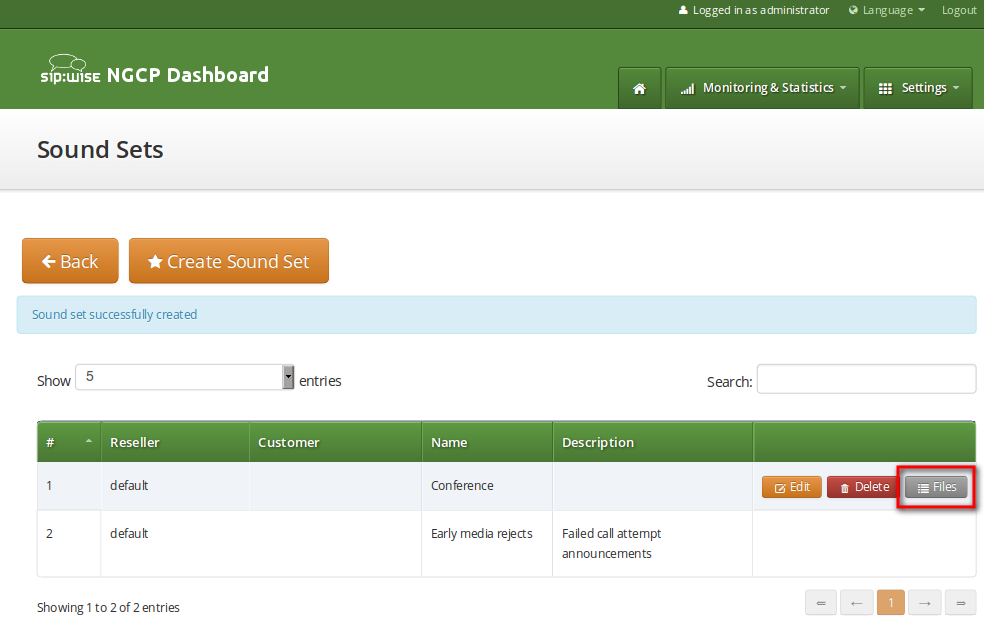
The other IVRs such as the Conference system and the error announcements use the Sound Sets configured in NGCP Panel and uploaded by the administrator in his language of choice.
The sip:provider CE provides the administrator with ability to upload the voice prompts such as conference prompts or call error announcements on the Sound Sets page. There is a preference sound_set on Domain and Subscriber levels to link subscribers to the sound set that they should hear (as usual the subscriber preference overrides the domain one). Sound Sets can be defined in Settings→Sound Sets. To create a new Sound Set, click Create Sound Set. Then click the Files button.
You may use 8 or 16 bit mono WAV audio files for all of the voice prompts. |
The call error announcements are grouped under Early Rejects section. Unfold the section and click Upload next to the sound handles (Names) that you want to use. Choose a WAV file from your file system, and click the Loopplay setting if you want to play the file in a loop instead of just once. Click Save to upload the file.
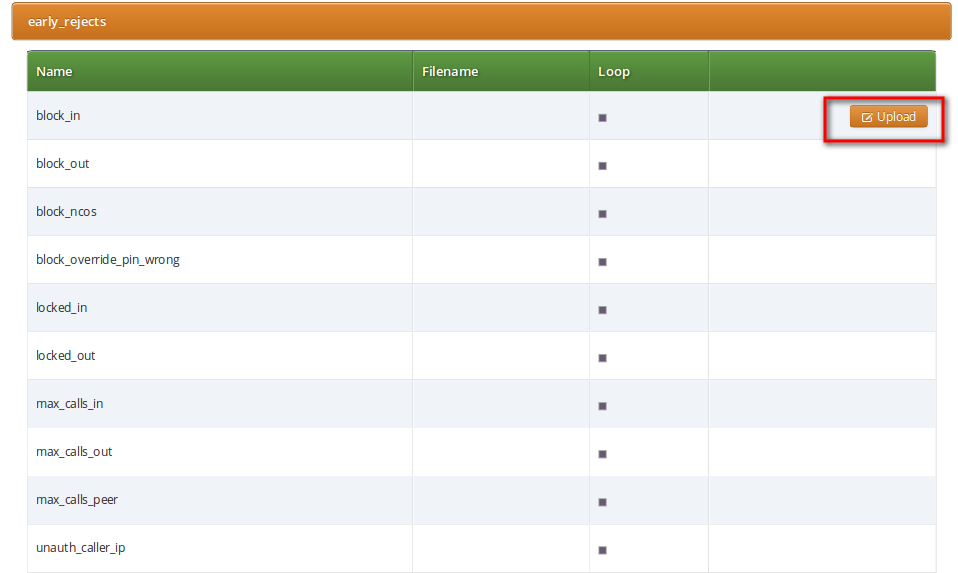
The call error announcements are played to the user in early media hence the name "Early Reject". If you don’t provide the sound files for any handles they will not be used and the sip:provider CE will fallback to sending the error response code back to the user.
Table 2. Early Reject Sound Sets
| Handle | Description | Message played |
|---|---|---|
block_in | This is what the calling party hears when a call is made from a number that is blocked by the incoming block list (adm_block_in_list, block_in_list subscriber preferences) | Your call is blocked by the number you are trying to reach. |
block_out | This is what the calling party hears when a call is made to a number that is blocked by the outgoing block list (adm_block_out_list, block_out_list subscriber preferences) | Your call to the number you are trying to reach is blocked. |
block_ncos | This is what the calling party hears when a call is made to a number that is blocked by the NCOS level assigned to the subscriber or domain (the NCOS level chosen in ncos and adm_ncos preferences) | Your call to the number you are trying to reach is not permitted. |
block_override_pin_wrong | Announcement played to calling party if it used wrong PIN code to override the outgoing user block list or the NCOS level for this call (the PIN set by block_out_override_pin and adm_block_out_override_pin preferences) | The PIN code you have entered is not correct. |
locked_in | Announcement played on incoming call to a subscriber that is locked for incoming calls | The number you are trying to reach is currently not permitted to receive calls. |
locked_out | Announcement played on outgoing call to subscriber that is locked for outgoing calls | You are currently not allowed to place outbound calls. |
max_calls_in | Announcement played on incoming call to a subscriber who has exceeded the concurrent_max limit by sum of incoming and outgoing calls or whose customer has exceeded the concurrent_max_per_account limit by sum of incoming and outgoing calls | The number you are trying to reach is currently busy. Please try again later. |
max_calls_out | Announcement played on outgoing call to a subscriber who has exceeded the concurrent_max (total limit) or concurrent_max_out (limit on number of outbound calls) or whose customer has exceeded the concurrent_max_per_account or concurrent_max_out_per_account limit | |
All outgoing lines are currently in use. Please try again later. | max_calls_peer | Announcement played on calls from the peering if that peer has reached the maximum number of concurrent calls (configured by admin in concurrent_max preference of peering server) |
The network you are trying to reach is currently busy. Please try again later. | unauth_caller_ip | This is what the calling party hears when it tries to make a call from unauthorized IP address or network (allowed_ips, man_allowed_ips preferences) |
You are not allowed to place calls from your current network location. | relaying_denied | Announcement played on inbound call from trusted IP (e.g. external PBX) with non-local Request-URI domain |
The network you are trying to reach is not available. | invalid_speeddial | This is what the calling party hears when it calls an empty speed-dial slot |
The speed dial slot you are trying to use is not available. | cf_loop | Announcement played when the called subscriber has the call forwarding configured to itself |
The number you are trying to reach is forwarded to an invalid destination. | callee_offline | Announcement played on incoming call to the subscriber which is currently not registered |
The number you are trying to reach is currently not available. Please try again later. | callee_busy | Announcement played on incoming call to the subscriber which is currently busy (486 response from the UAS) |
The number you are trying to reach is currently busy. Please try again later. | callee_unknown | Announcement that is played on call to unknown or invalid number (not associated with any of our subscribers/hunt groups) |
The number you are trying to reach is not in use. | callee_tmp_unavailable | Announcement played on incoming call to the subscriber which is currently unavailable (408, other 4xx or no response code or 30x with malformed contact) |
The number you are trying to reach is currently not available. Please try again later. | peering_unavailable | Announcement played in case of outgoing off-net call when there is no peering rule matching this destination and/or source |
The network you are trying to reach is not available. | voicebox_unavailable | Announcement played on call to voicebox if the voicemail server is not configured (system operation is impaired) |
The voicemail of the number you are trying to reach is currently not available. Please try again later. | emergency_unsupported | Announcement played when emergency destination is dialed but the emergency calls are administratively prohibited for this user or domain (reject_emergency preference is enabled) |
You are not allowed to place emergency calls from this line. Please use a different phone. | no_credit | Announcement played when prepaid account has insufficient balance to make a call to this destination |
The sip:provider CE provides the simple pin-protected conferencing service built using the SEMS DSM scripting language. Hence it is open for all kinds of modifications and extensions.
Template files for the sems conference scripts stored in /etc/ngcp-config/templates/etc/ngcp-sems/:
Go to your Subscriber Preferences and click Edit on the Call Forward Type you want to set (e.g. Call Forward Unconditional).
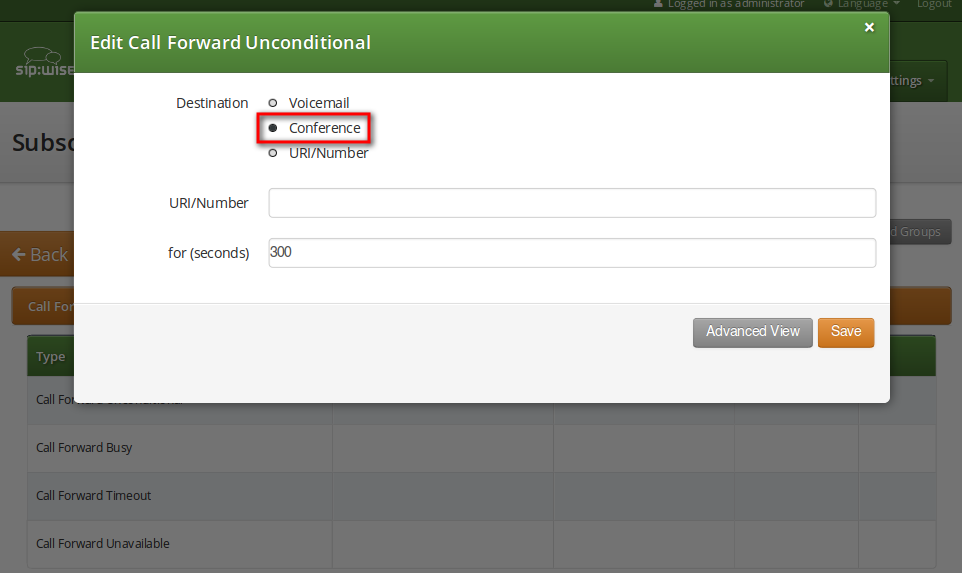
You should select Conference option in the Destination field and leave the URI/Number empty. The timeout defines for how long this destination should be tried to ring.
Sound Sets can be defined in Settings→Sound Sets. To create a new Sound Set, click Create Sound Set. Then click the Files button.
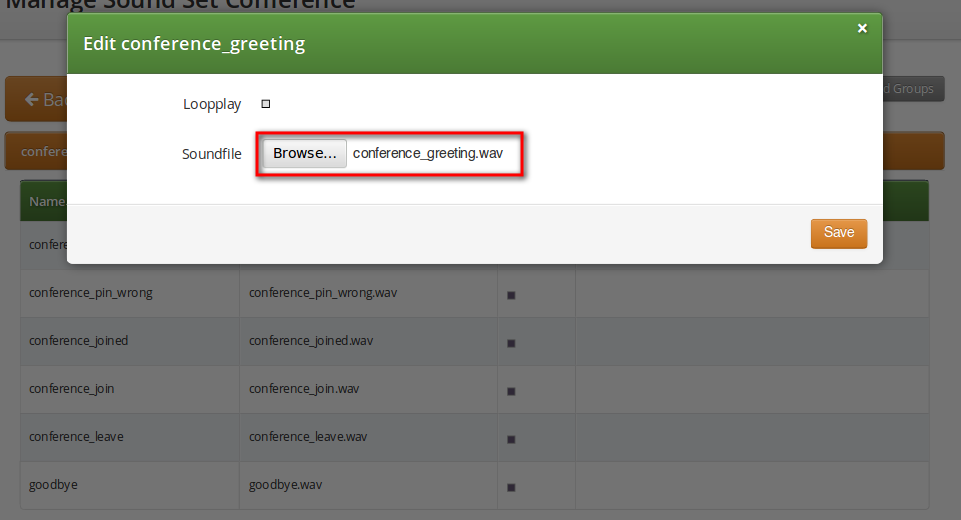
Upload the following files:
Table 3. Conference Sound Sets
| Handle | Message played |
|---|---|
conference_greeting | Welcome to the conferencing service. Please enter your PIN, followed by the pound key. |
conference_pin_wrong | You have entered an invalid PIN number. Please try again. |
conference_joined | You will be placed into the conference. |
conference_join | A person has joined the conference. |
conference_leave | A person has left the conference. |
goodbye | Goodbye. |
You may use 8 or 16 bit mono WAV audio files. |
Then set the preference sound_set on the Domain or Subscriber level in order to assign the Sound Set you have just created to the subscriber (as usual the subscriber preference overrides the domain one).
It is mandatory to configure the PIN code for entrance to the conference on the same subscriber which has the Call Forwarding active. Responsible for this is the conference_pin preference in the Internals section of subscriber preferences.
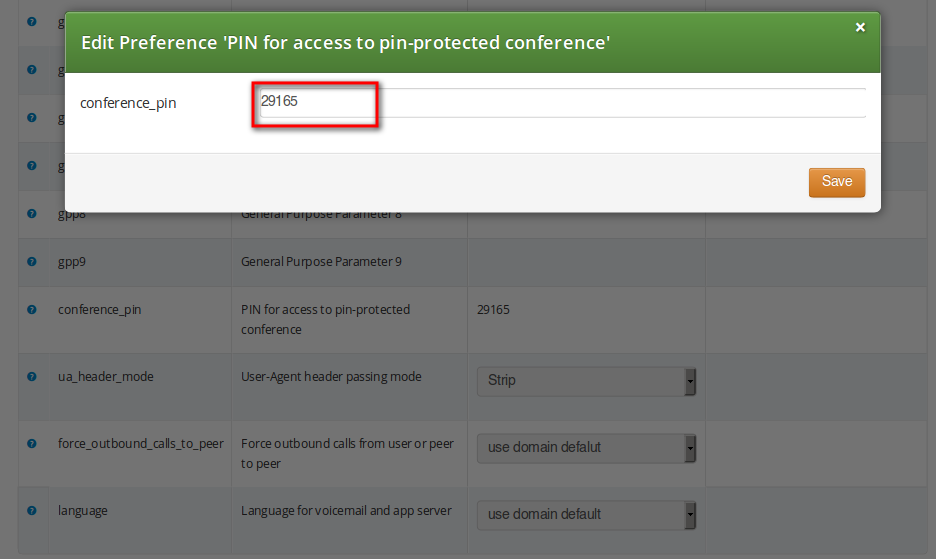
When calling the conference IVR you are requested to enter this PIN. Upon the successful entry of the PIN the caller hears the announcement that he is going to be placed into a conference and at the same time this is announced to all participants in the conference.
MCID feature allows customers to report unwanted calls to the platform operator.
To enable the feature first edit config.yml and enable there apps: malicious_call: yes and kamailio: store_recentcalls: yes. The latter option enables kamailio to store recent calls per subscrbriber UUID in the redis DB (the amount of stored recent calls will not exceed the amount of provisionined subscribers).
Next step is to create a system sound set for the feature. In Settings→Sound Sets either use your already existing Sound Set or create a new Sound Set and then assign it to your domain or subscribers. In the Sound Set there is a fileset malicious_call_identification→mailicious_call_report for that purpose.
Once the Sound Set is created the final step is to create a new Rewrite Rule and to route calls to, for instance *123 → MCID application. For that you create a Calee Inbound rewrite rule ^(\*123)$ → malicious_call
Finaly you run ngcpcfg apply Enabling MCID to recreate the templates and automatically restart depended services.
As a subscriber, to report a malicious call you call to either malicious_call or to your custom number assigned for that purpose. Please note that you can report only your last received call. You will hear the media reply from the Sound Set you have previosuly configured.
To check reported malicious calls as the plafrom operator open Settings→Malicious Calls tab where you will see a list of registered calls. You can selectively delete records from the list and alternatively you can manage the reported calls by using the REST API.
By default the expiration time for the most recent call per subscriber is 3600 seconds (1 hour). If you wish to prolong or shorten the expiration time open constants.yml and set there recentcalls: expire: 3600 to a new value, and issue ngcpcfg apply Enabling MCID afterwards.
| | ||