| |
| |
With the pilot subscriber created before, the customer can log into the customer self-care interface and manage the PBX.
As an administrator, you can also do this for him, and we will walk through the typical steps as an administrator to configure the different features.
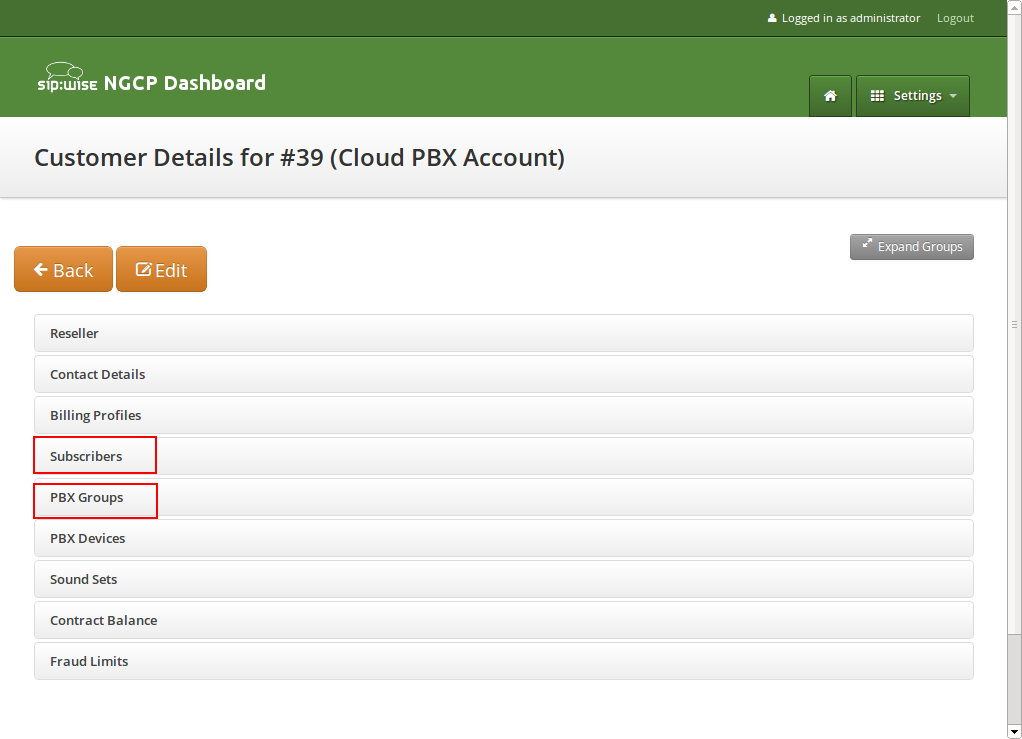
Go the the Customer Details of the PBX customer you want to configure, e.g. by navigating to Settings→Customers and clicking the Details button of the customer you want to configure.
Since we already created a pilot subscriber, more settings now appear on the Customer Details view. The sections we’re interested in for now are the Subscribers and PBX Groups sections.
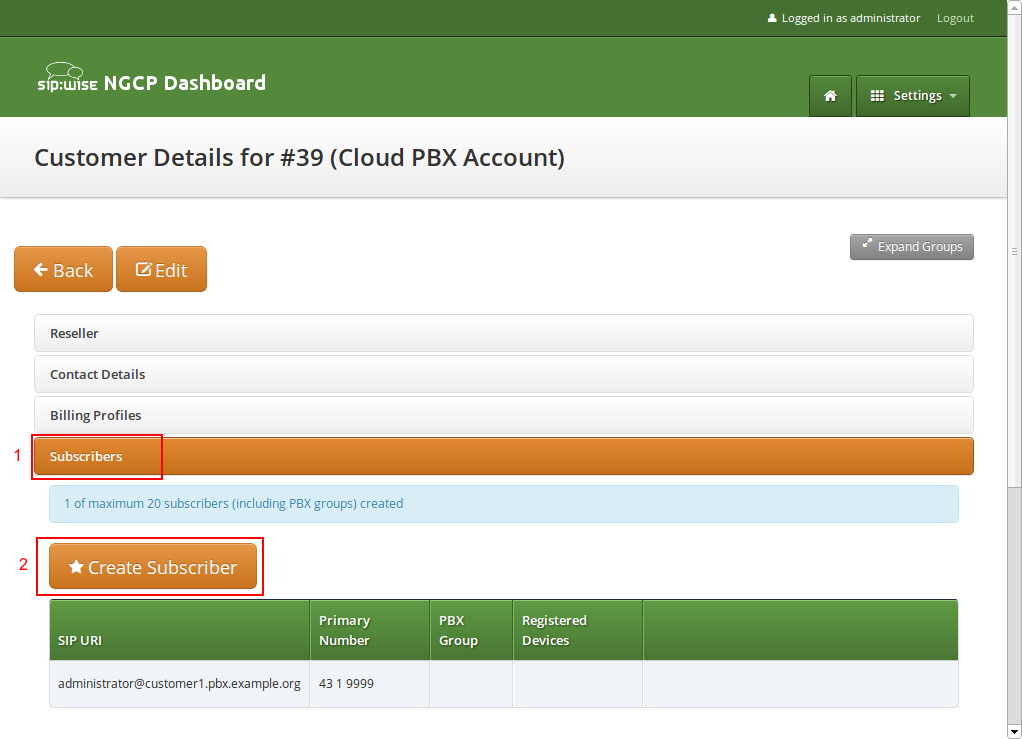
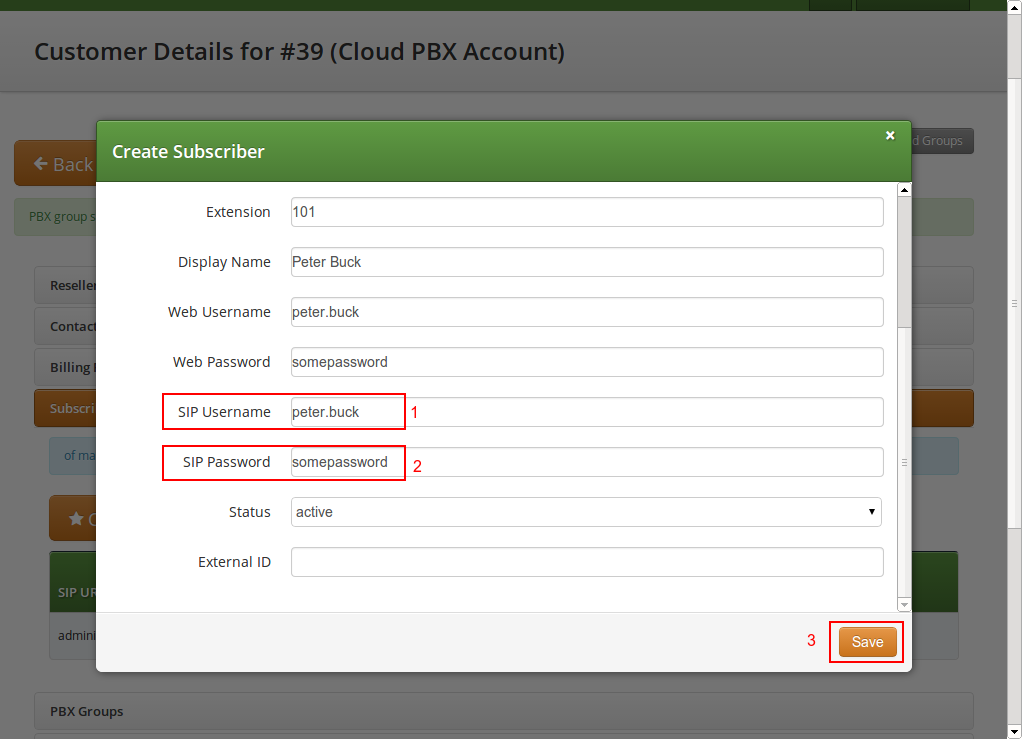
To create another subscriber for the customer PBX, open the Subscribers row and click Create Subscriber.
When creating another subscriber in the PBX after having the pilot subscriber, some fields are different now, because the Domain and E.164 Number are already pre-defined at the pilot subscriber level.
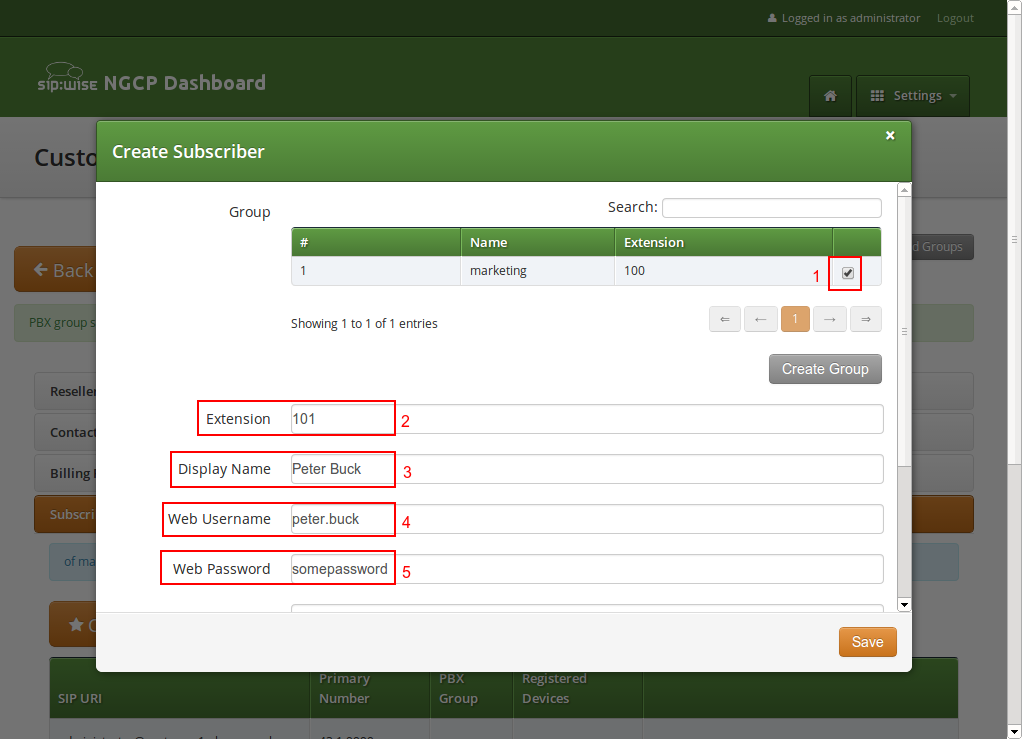
What you need to define for a new subscriber is the Group the subscriber is supposed to be in. We don’t have a group yet, so create one by clicking Create Group.
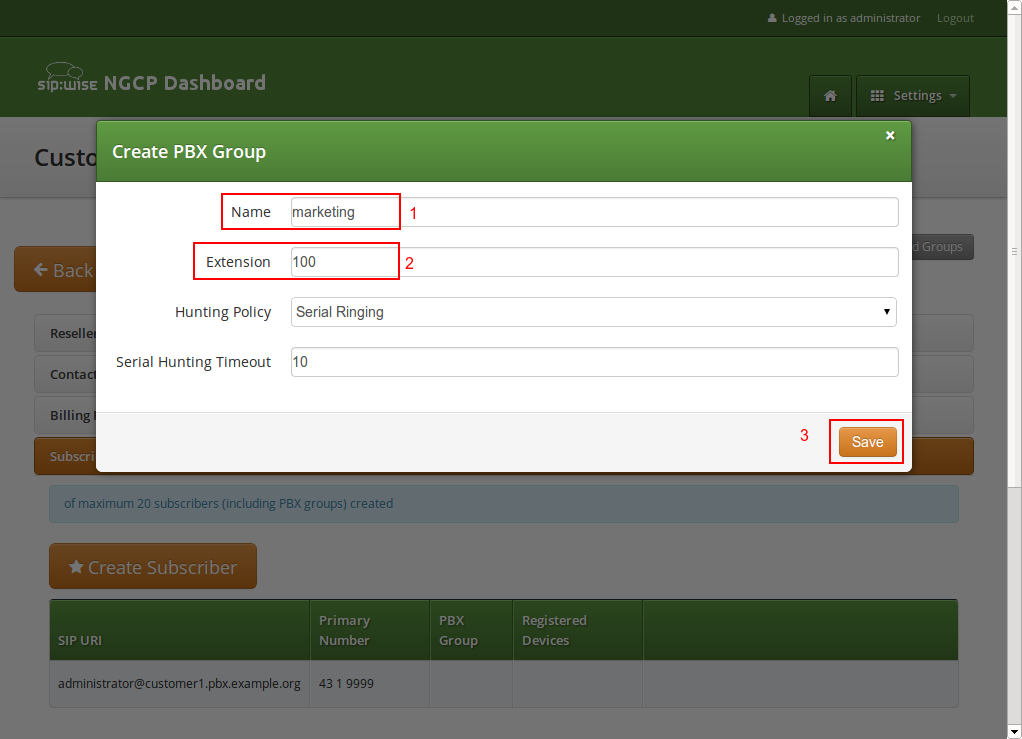
A PBX Group has four settings:
43 1 9999 and the extension is 100, you can reach the group from the outside by dialing 43 1 9999 100. Since PBX Groups are actually just normal subscribers in the system, you can assign Alias Numbers to it for DID later, e.g. 43 1 9998.
Serial Ringing causes each of the subscribers to be tried one after another, until one of them picks up or all subscribers are tried. Parallel Ringing causes all subscribers in the group to be tried in parallel. Note that a subscriber can have a call-forward configured to some external number (e.g. his mobile phone), which will work as well.
We will only fill in the Name and Extension for now, as the hunting policy can be changed later if needed. Click Save to create the group.
Once the group is created and selected, fill out the rest of the form as needed. Instead of the E.164 Number, you can now only choose the Extension, which is appended to the primary number of the pilot subscriber and is then used as primary number for this particular subscribers. Again, if your pilot number is 43 1 9999 and you choose extension 101 here, the number of this subscriber is going to be 43 1 9999 101. Also, you can again later assign more alias numbers (e.g. 43 1 9997) to this subscriber for DID.
The rest of the fields is as usual, with Display Name defining the real name of the user, Web Username and Web Password allowing the subscriber to log into the customer self-care interface, and the SIP Username and SIP Password to allow signing into the SIP and XMPP services.
Click Save to create the subscriber.
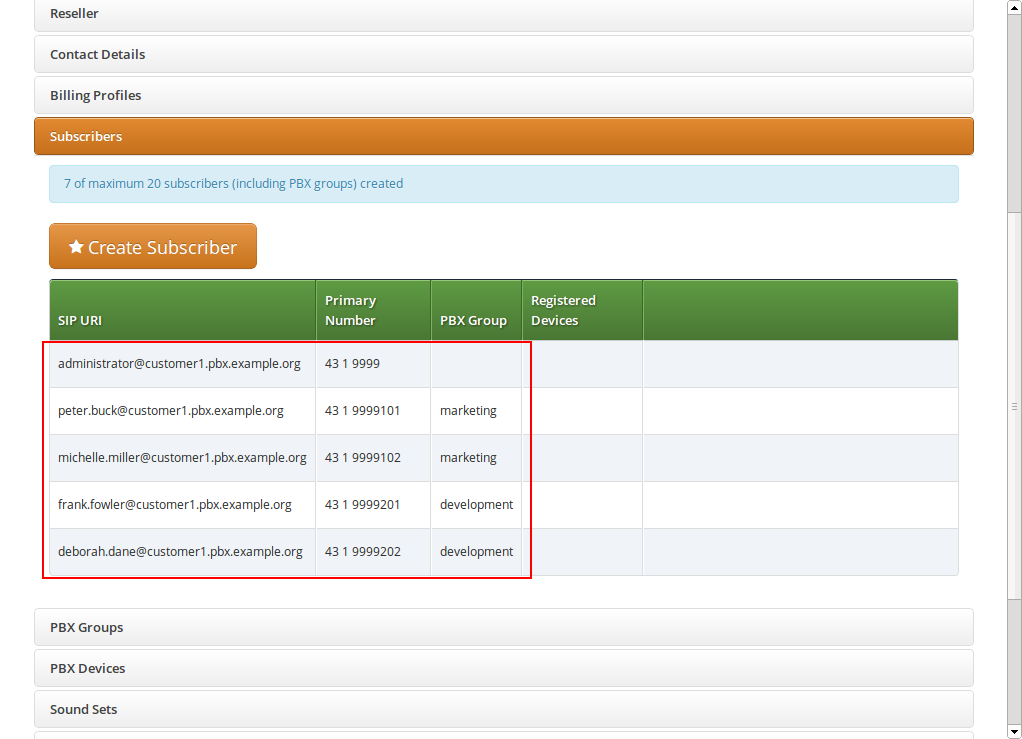
Repeat the steps to create all the subscribers and groups as needed. An example of a small company configuration in terms of subscribers and groups might look like this:
The subscribers can be reached via 3 different ways. First, you can call them by their SIP URIs (e.g. by dialing |
Basically you can register any SIP phone to the system using the SIP credentials of your subscribers. However, the platform supports Device Provisioning of certain vendors and models, as described in Section A.1, “Configuring the Device Management”.
To configure a physical device, open the PBX Devices row in the Customer Details view and click Create Device.
You have to set three general parameters for your new device, which are:
Reception or the name of the owner of the device.
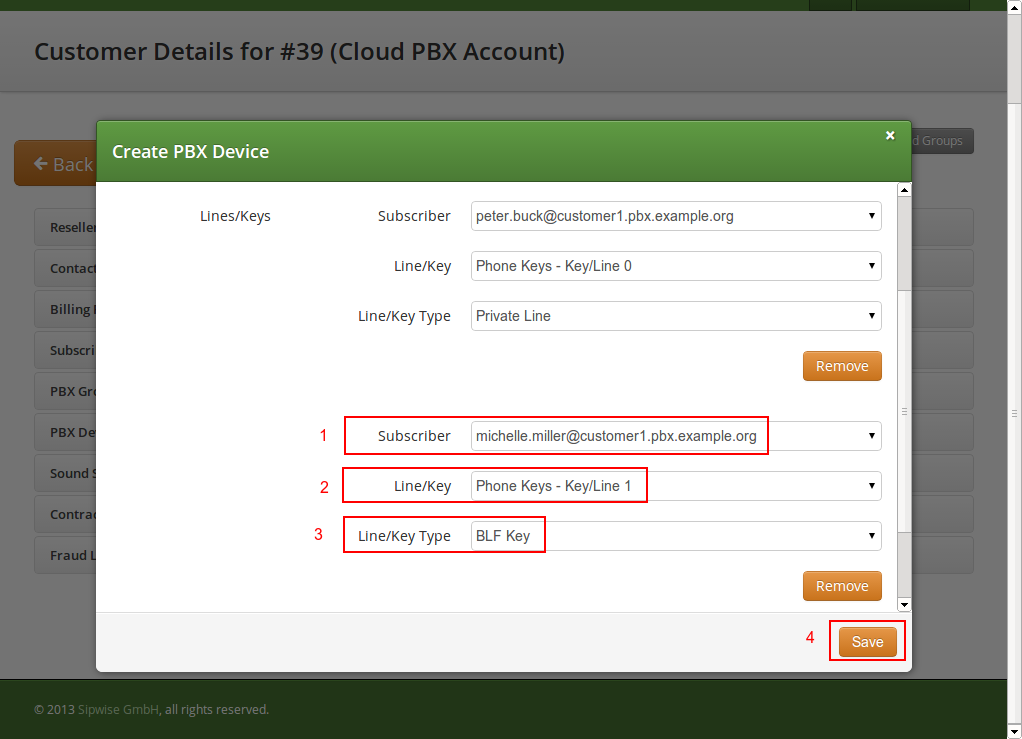
In addition to that information, you can configure the lines (subscribers) you want to use on which key, and the mode of operation (e.g. if it’s a normal private phone line, or if you want to monitor another subscriber using BLF, or if you want it to act as shared line using SLA).
For example, a Cisco SPA504G has 4 keys you can use for private and shared lines as well as BLF on the phone itself, and in our example we have an Attendant Console attached to it as well, so you have 32 more keys for BLF.
The settings per key are as follows:
Line/Key Type: The mode of operation for this key, with the following options (depending on which options are enabled in the Device Model configuration for this device:
BLF Key: The Busy Lamp Field monitors the call state of another subscriber and provides three different functionalities, depending on the actual state:
In our example, we will first configure a private line on the first key, and BLF for another subscriber on the second key.
This configures the general options plus the first key. To configure the second key, click Add another Line/Key and fill out the second line config accordingly. Click Save to save your PBX device configuration.
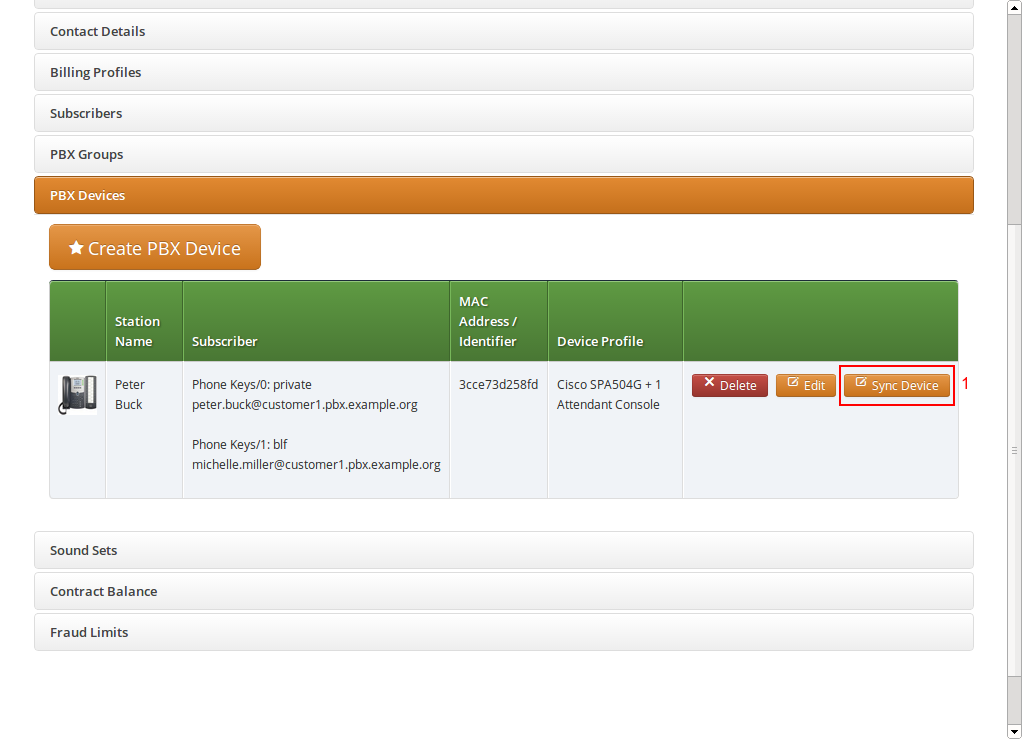
Once the PBX device is saved, you will see it in the list of PBX Devices.
Since a stock device obtained from an arbitrary distributor doesn’t know anything about your system, it can’t fetch its configuration from there. For that to work, you need to push the URL of where the phone can get the configuration to the phone once.
In order to do so, click the Sync Device button on the device you want to configure for the very first time.
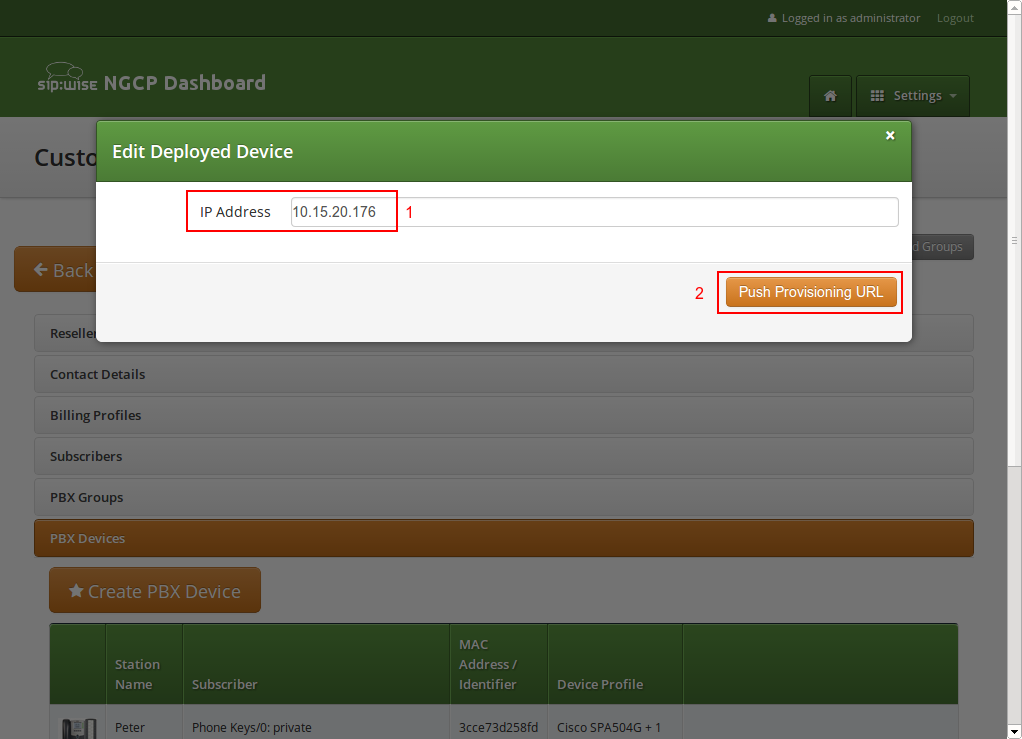
As you will see in the next step, you need the actual IP address of the phone to push the provisioning URL onto it. That implies that you need access to the phone to get the IP, and that your browser is in the same network as the phone in order to be able to connect to it, in case the phone is behind NAT. |
Enter the IP Address of the phone (on Cisco SPAs, press Settings 9, where Settings is the paper sheet symbol, and note down the Current IP setting), then click Push Provisioning URL.
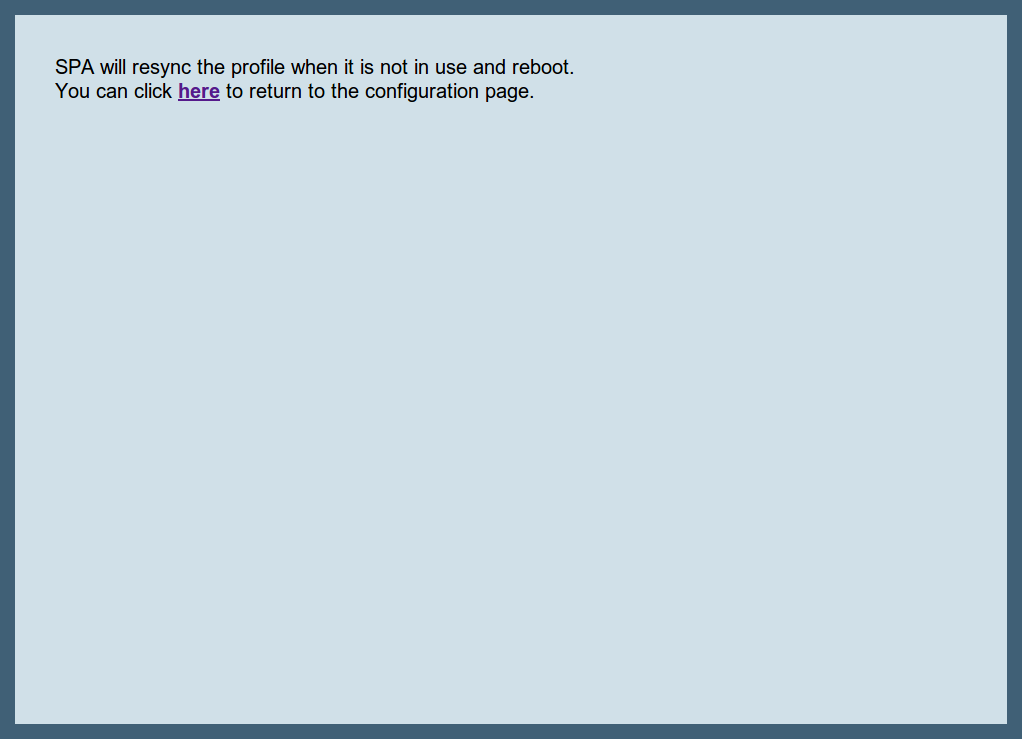
You will be redirected directly to the phone, and the Provisioning URL is automatically set. If everything goes right, you will see a confirmation page from the phone that it’s going to reboot.
You can close the browser window/tab and proceed to sync the next subscriber.
You only have to do this step once per phone to tell it the actual provisioning URL, where it can fetch the configuration from. From there, it will regularly sync with the server automatically to check for configuration changes, and applies them automatically. |
In the Customer Details view, there is a row Sound Sets, where the customer can define his own sound sets for Auto Attendant, Music on Hold and the Office Hours Announcement.
To create a new sound set, open the Sound Sets row and click Create Sound Set.
If you do this as administrator or reseller, the Reseller and/or Customer is pre-selected, so keep it as is. If you do this as customer, you don’t see any Reseller or Customer fields.
So the important settings are:
Fill in the settings and click Save.
To upload files to your Sound Set, click the Files button for the Sound Set.
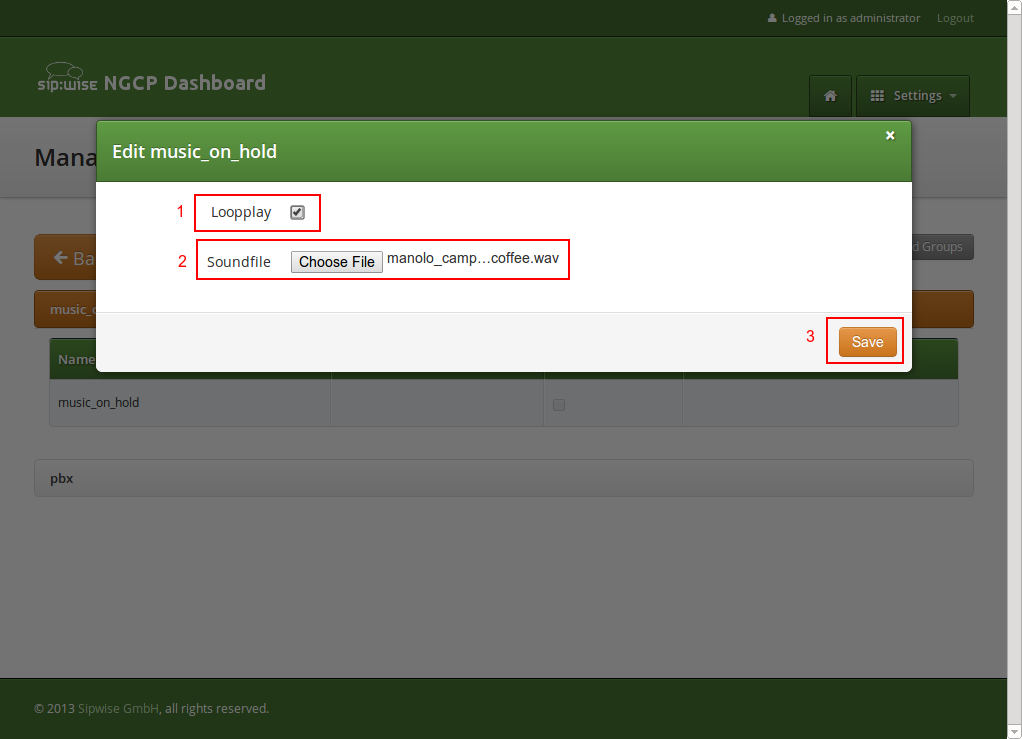
Open the music_on_hold row and click Upload on the music_on_hold entry. Choose a WAV file from your file system, and click the Loopplay setting if you want to play the file in a loop instead of just once. Click Save to upload the file.
When configuring a Call Forward to the Auto Attendant, it will play the following files:
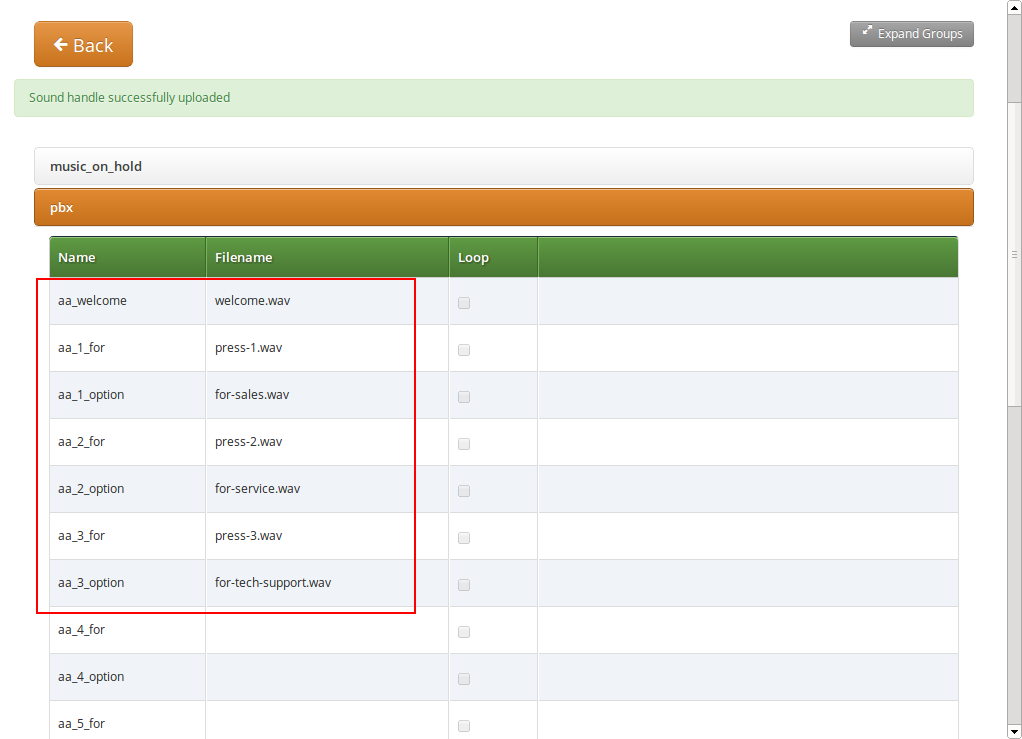
aa_welcome: This is the welcome message (the greeting) which is played when someone calls the Auto Attendant.
aa_X_for/aa_X_option: Each menu item in the Auto Attendant consists of two parts. The for part, which plays something like Press One for, and the option part, which play something like Marketing. The Auto Attendant only plays those menu options where both the for part and the option part is present, so if you only have 3 destinations you’d like to offer, and you want them to be on keys 1, 2 and 3, you have to upload files for aa_1_for, aa_1_option, aa_2_for, aa_2_option and aa_3_for and aa_3_option.
The sound files only define the general structure of what is being played to the caller. The actual destinations behind your options are configured separately in Section A.4.4.2, “Configuring the Auto Attendant Slots”. |
An example configuration could look like this:
The Auto Attendant feature can be activated for any subscriber in the Customer PBX individually. There are three steps involved. First, you have to prepare a Sound Set to have Auto Attendant sound files. Second, you have to configure the destinations for the various options you provide (e.g. pressing 1 should go to the marketing subscriber, 2 to development and 3 to some external number). Third, you have to set a Call Forward to the Auto Attendant.
To do so, go to Customer Details and in the Subscribers section, click the Preferences button of the subscriber, where the Auto Attendant should be set.
Create a Sound Set and upload the Sound Files for it as described in Section A.4.3.2, “Uploading Auto-Attendant Sound Files”. Back in the Subscriber Preferences view, set the Customer Sound Set preference to the Sound Set to be used. To do so, click Edit on the Customer Sound Set preference and assign the set to be used.
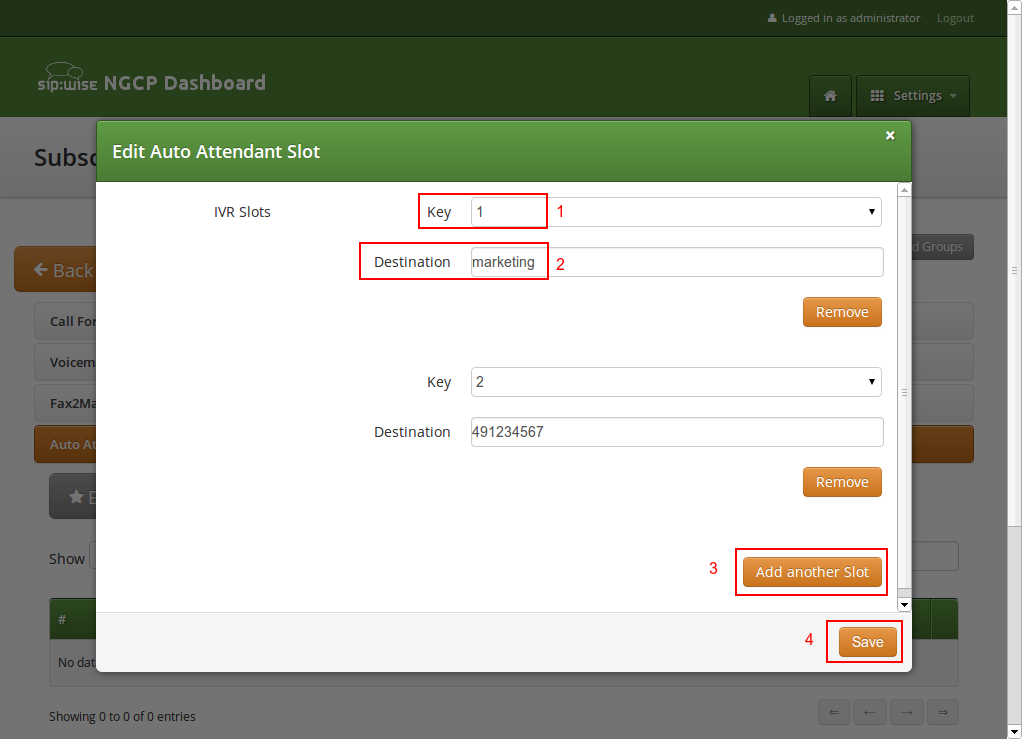
In the Auto Attendant Slots section, click the Edit Slots button to configure the destination options.
Click Add another Slot to add a destination option, select the Key the destination should be assigned to, and enter a Destination. The destination can be a subscriber username (e.g. marketing), a full SIP URI (e.g. sip:michelle.miller@customer1.pbx.example.org or any external SIP URI) or a number or extension (e.g. 491234567 or 101).
Repeat the step for every option you want to add, then press Save.
Once the Sound Set and the Slots are configured, activate the Auto Attendant by setting a Call Forward to Auto Attendant.
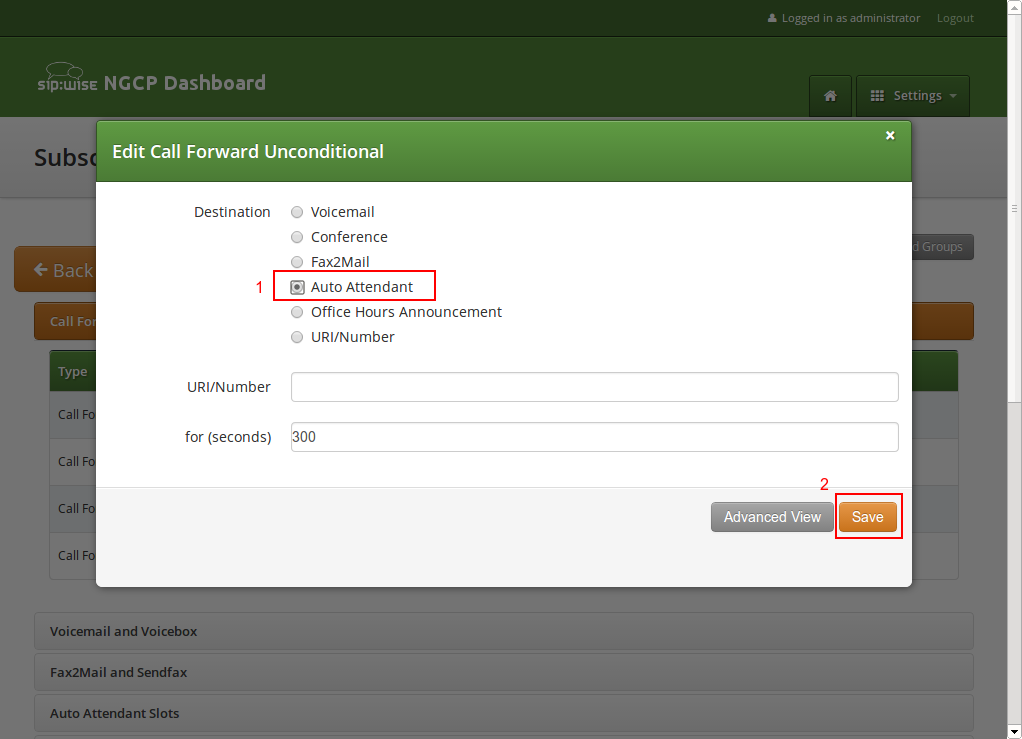
To do so, open the Call Forwards section in the Subscriber Preferences view and press Edit on the Call Forward type (e.g. Call Forward Unconditional if you want to redirect callers unconditionally to the Auto Attendant).
Select Auto Attendant and click Save to activate the Auto Attendant.
As with any other Call Forward, you can define more complex forwarding rules in the Advanced View to only forward the call to the Auto Attendant during specific time periods, or as a fallback if no one picks up the office number. |
| | ||