| |
| |
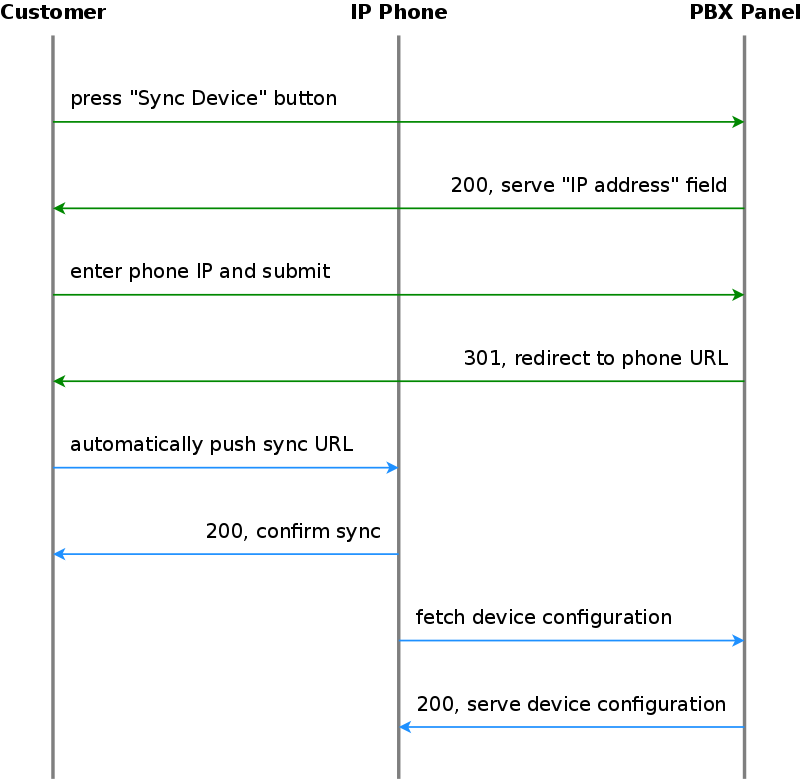
The IP phones supported by the PBX need to initially be configured to fetch their configuration from the system. Since the phones have no initial information about the system and its provisioning URL, they need to be boot-strapped. Furthermore, changes for a specific device might have to be pushed to the device immediately instead of waiting for it to re-fetch the configuration automatically.
The following chapters describe the work-flows how this is accomplished without having the customer directly accessing the phone.
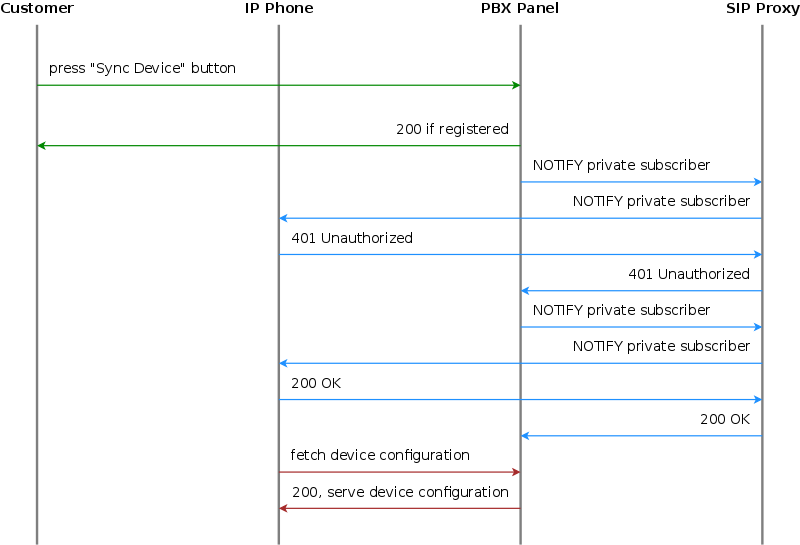
If one of the subscribers configured on a PBX device is registered via SIP, the system can trigger a re-sync of the phone directly via SIP without having the customer enter the IP of the phone again. This is accomplished by sending a special NOTIFY message to the subscriber:
NOTIFY sip:subscriber@domain SIP/2.0
To: <sip:subscriber@domain>
From: <sip:subscriber@domain>;tag=some-random-tag
Call-ID: some-random-call-id
CSeq: 1 NOTIFY
Subscription-State: active
Event: check-sync
Content-Length: 0
In order to prevent unauthorized re-syncs, the IP phone challenges the request with its own SIP credentials, so the NOTIFY is sent twice, once without authentication, and the second time with the subscriber’s own SIP credentials.
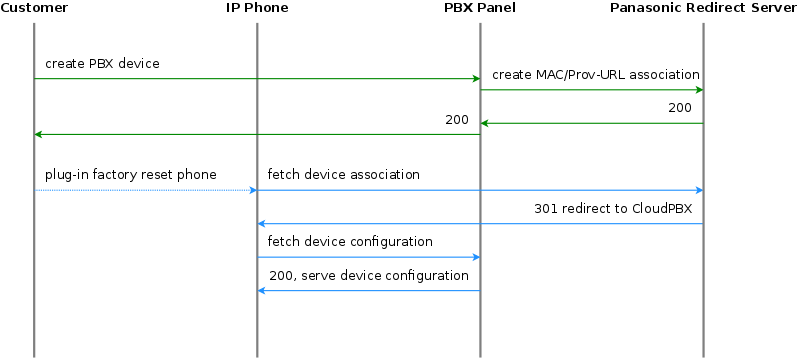
Panasonic provides a zero-touch provisioning mechanism in their firmwares, which causes the factory-reset phones to connect to a Panasonic web service at https://provisioning.e-connecting.net to check if a custom provisioning URL is configured for the MAC address of the phone. If an association between the MAC and a provisioning URL is found, the web service redirects the phone to the provisioning URL, where the phone connects to in order to obtain the configuration file.
The CloudPBX module ensures that when an end customer creates a Panasonic device, the MAC address is automatically provisioned on the Panasonic web service via an API call, so the customer’s phone can use the correct provisioning URL to connect to the auto-provisioning server of the CloudPBX.
As a result, no customer interaction is required to bootstrap Panasonic phones, other than just creating the phone with the proper MAC on the CloudPBX web interface.
For already provisioned phones, the end customer might need to perform a factory reset:
The default username for factory-reset phones is admin with password adminpass.
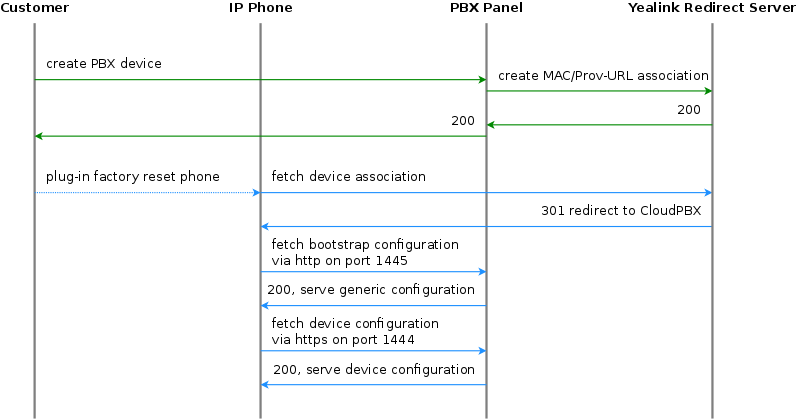
Yealink provides a zero-touch provisioning mechanism in their firmwares, which causes the factory-reset phones to connect to a Yealink web service at https://rps.yealink.com to check if a custom provisioning URL is configured for the MAC address of the phone. If an association between the MAC and a provisioning URL is found, the web service redirects the phone to the provisioning URL, where the phone connects to in order to obtain the configuration file.
If both Cisco SPA and Yealink phones are used, an issue with the Cisco-signed server certificate configured on the provisioning port (1444 by default) of the CloudPBX provisioning server arises. Yealink phones by default only connect to trusted server certificates, and the Cisco CA certificate used to sign the server certificate is not trusted by Yealink. Therefore, a two-step approach is used to disable the trusted check via a plain insecure http port (1445 by default) first, where only device-generic config options are served. No user credentials are provided in this case, because no SSL client authentication can be performed. The generic configuration disables the trusted check, and at the same time changes the provisioning URL to the secure port, where the Yealink phone is now able to connect to.
The CloudPBX module ensures that when an end customer creates a Yealink device, the MAC address is automatically provisioned on the Yealink web service via an API call, so the customer’s phone can use the correct insecure bootstrap provisioning URL to connect to the auto-provisioning server of the CloudPBX for the generic configuration, which in turn provides the information on where to connect to for the secure, full configuration.
As a result, no customer interaction is required to bootstrap Yealink phones, other than just creating the phone with the proper MAC on the CloudPBX web interface.
Older Yealink firmwares don’t automatically connect to the Yealink auto-provisioning server on initial boot, so it needs to be enabled manually by the end customer.
| | ||